

To begin, navigate to the central configuration hub:
Step 1: Click the Settings gear icon on the top right menu panel.
Step 2: From the horizontal tabs, click on Organization.
Step 3: Select the Company Profile card from the setup grid options.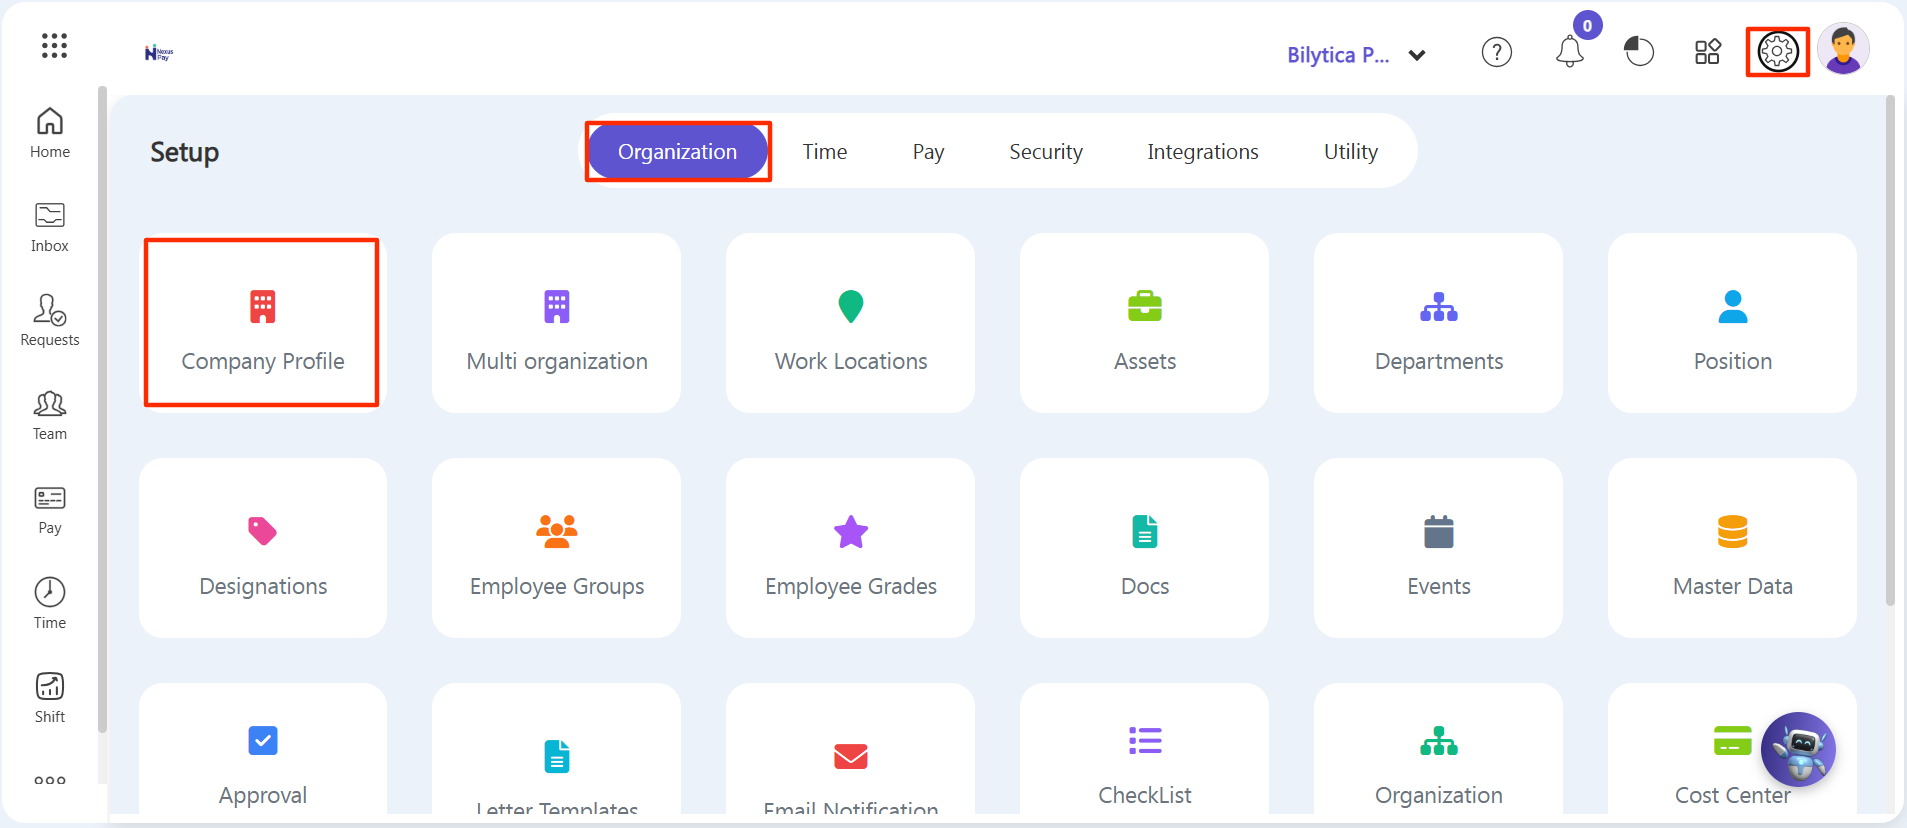
The Company Profile setup view is divided into four main sections: General, Policies, Other, and AI Request.
6.1.1. The 'General' Section: Basic Information
This section establishes your company’s system identity.
• Company Information: Fill in your registered Company Name, Type (e.g., Private Limited), and official Website URL.
• Company Logo & Cover Image: Upload your business logo and cover image to personalize your profile layout.
Step 4: Click Save in the top right corner once the fields are populated.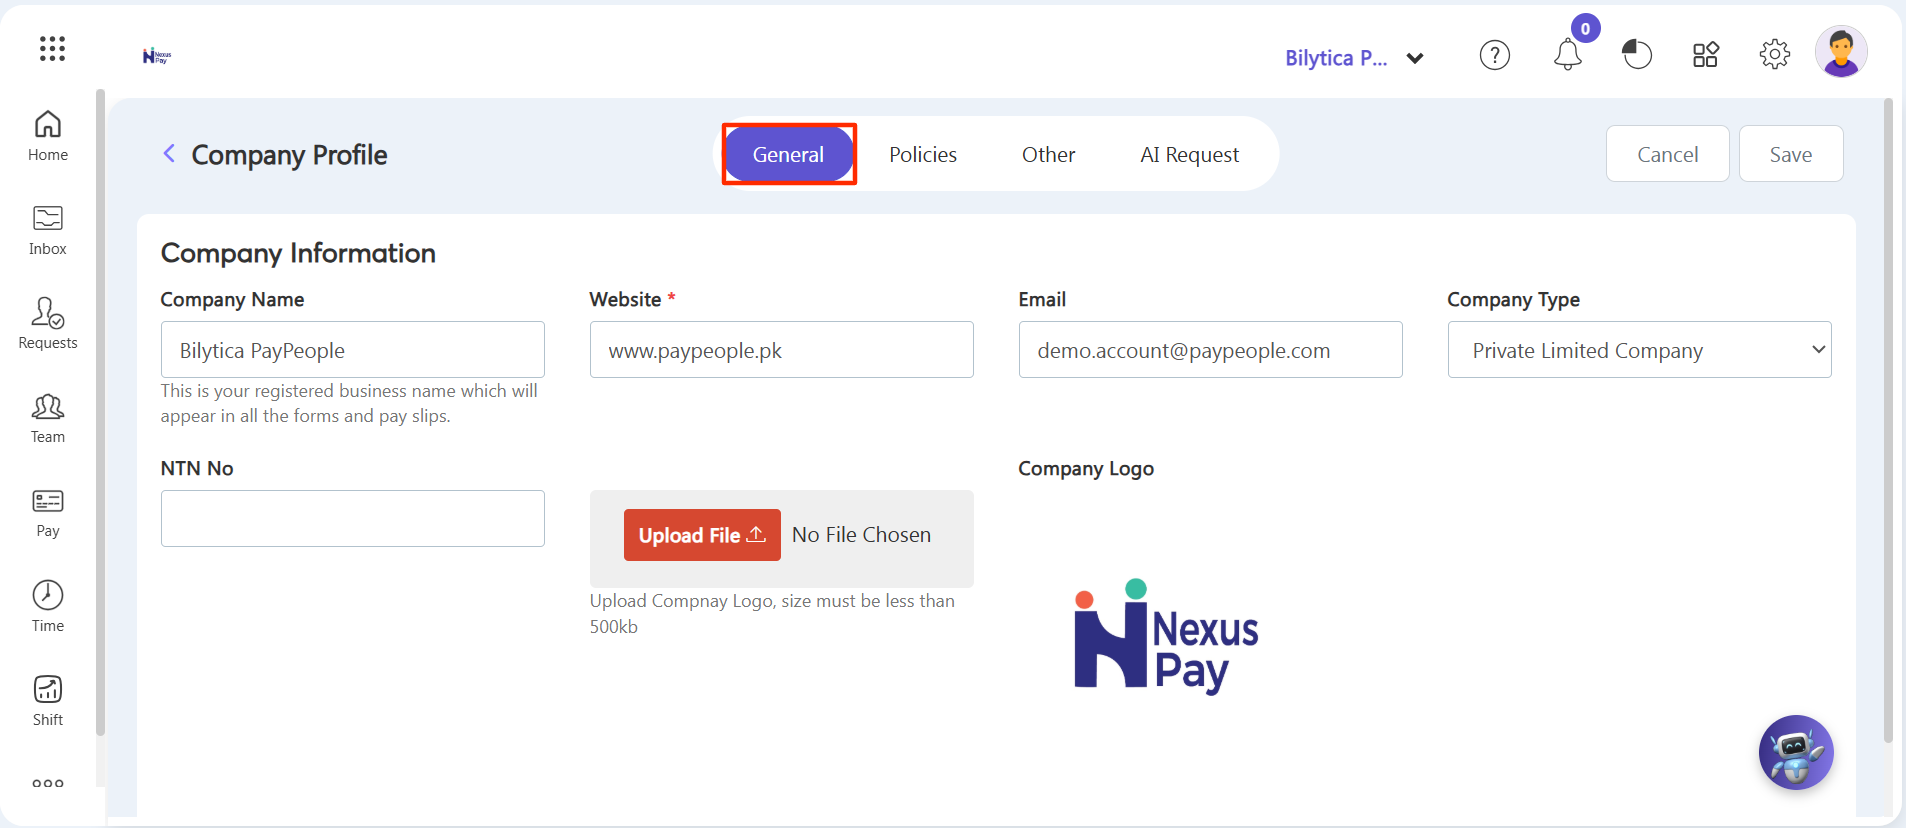
6.1.2. The 'Policies' Section: Attendance & Payroll Rules
This area establishes how your time, tracking, and salary rules function globally.
Time Summary & Payroll Calculations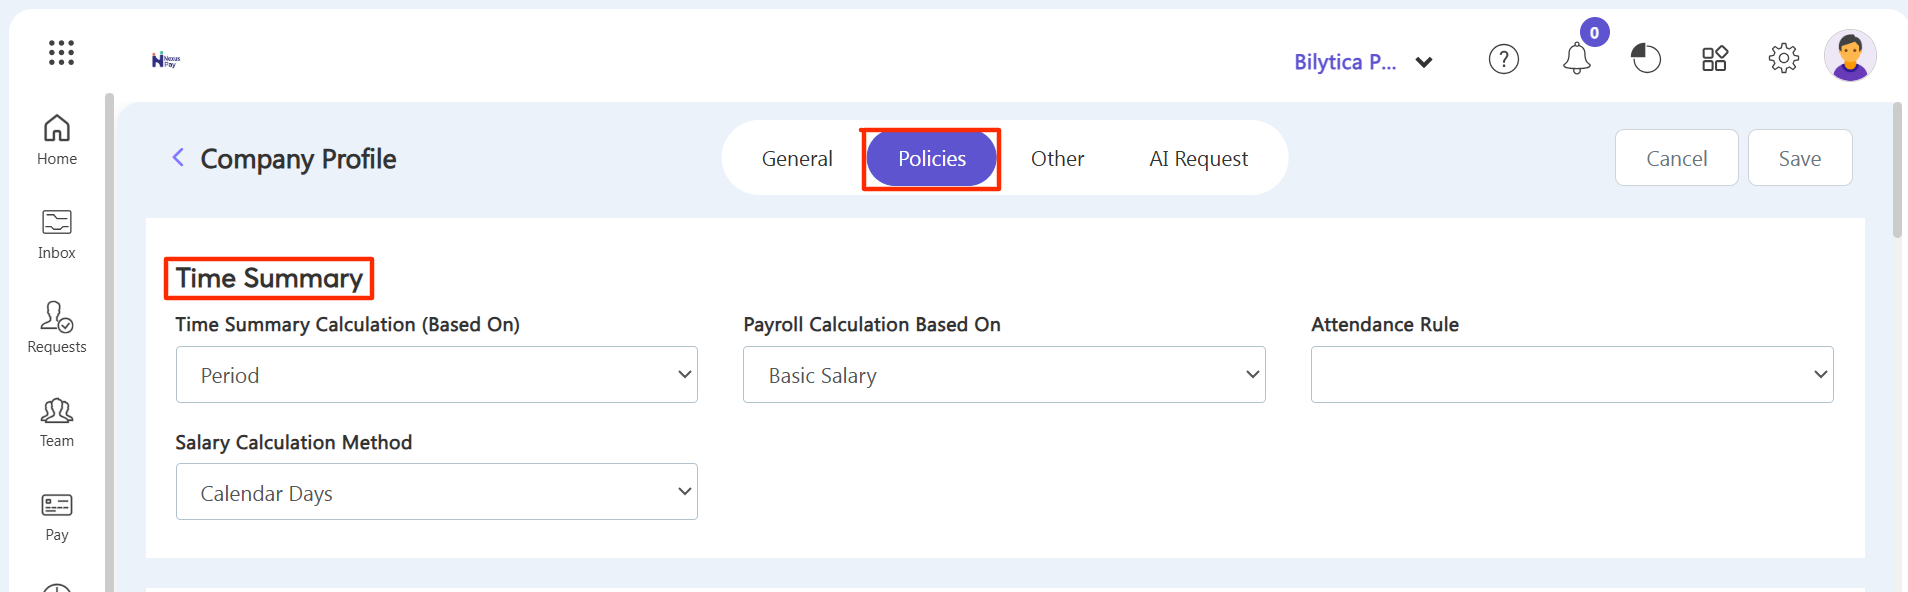
• Attendance Rule: Choose how the system calculates presence (e.g., on a Timesheet basis, Time Summary basis, or Time Entry basis).
• Time Summary Calculation: If using a summary basis, select whether it calculates on an Arrear basis or a Period basis.
• Payroll Calculation Based On: Define if payroll processing is driven by Gross Salary or Basic Salary.
• Salary Calculation Method: Choose whether calculation follows Working Days, Calendar Days, or Fixed Days.
Advanced Attendance Configurations
Scroll down further within the policies tab to configure active compliance rules: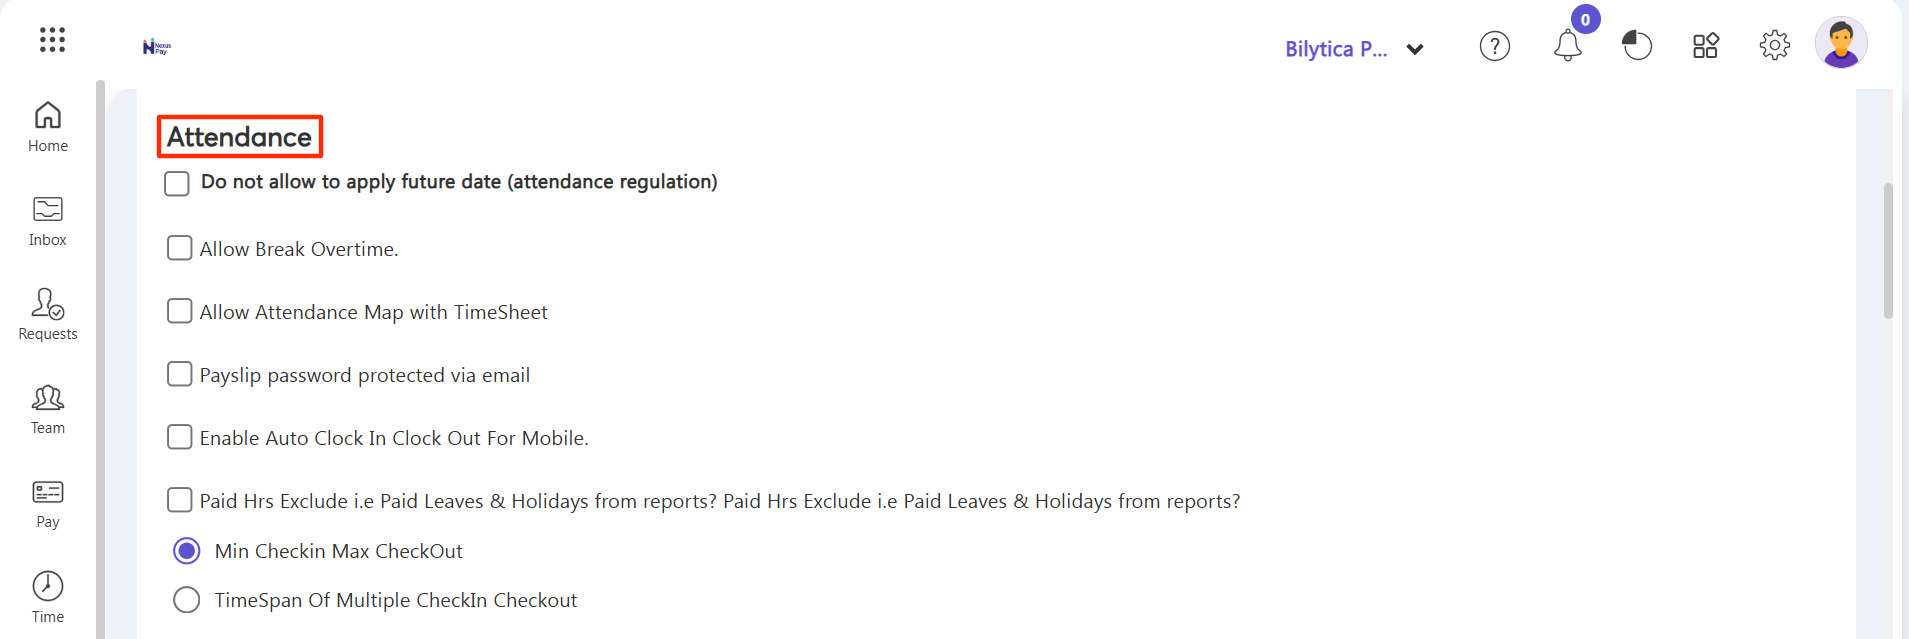
• Do not allow to apply future date: Restricts employees from creating attendance regularization requests for future calendar dates. Requests can only be raised once the date has officially passed.
• Allow Break Overtime: If an employee works through their designated break period, that time is calculated as overtime hours.
• Allow Attendance Map with TimeSheet: When enabled, the system locks timesheet hour entries to match the actual hours the employee spent inside the building. If disabled, hours can be inputted without presence tracking restrictions.
• Payslip password protected via email: Secures emailed payslips by requiring employees to input their standard system login password to open the file.
• Enable Auto Clock In Clock Out For Mobile: Uses geofencing rules to automatically clock employees in when they enter the workplace perimeter and clock them out when they exit.
• Paid Hrs Exclude from reports: Allows you to exclude non-working paid hours (like weekends, public holidays, or paid leaves) from the standard attendance reporting sheets.
• Min Checkin Max Checkout: Flags the very first punch of the day as check-in and the final punch as check-out, automatically ignoring all intermediate entries.
• TimeSpan Of Multiple CheckIn Checkout: Instructs the system to calculate every single punch log, subtracting any time spent away between check-outs and check-ins.
Overtime, Regularization, & Sandwich Rules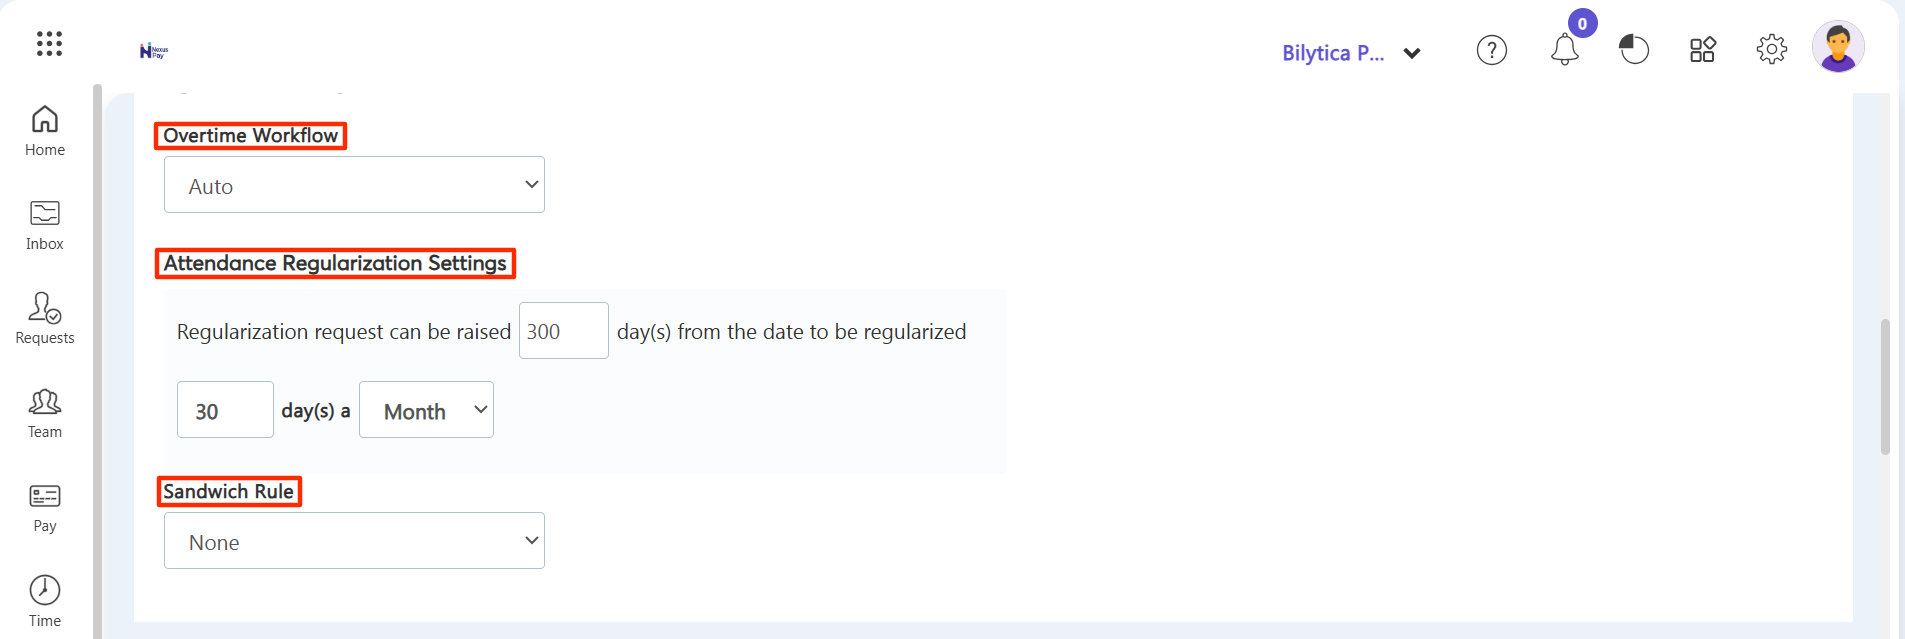
Overtime Workflow: Set how OT entries are approved.
• Auto: OT syncs directly to the employee's timeline.
• Manual: Requires explicit manager approval.
• Pre-approval: Employees must request permission before working the overtime hours.
Attendance Regularization Settings: Set the final deadline limit (number of days) an employee has to request an attendance correction.
Sandwich Rule: When set to a full sandwich rule, taking a leave both immediately before and after a scheduled holiday or weekend causes those middle days to also be deducted from the employee's leave balance.
Loan Eligibility & Settings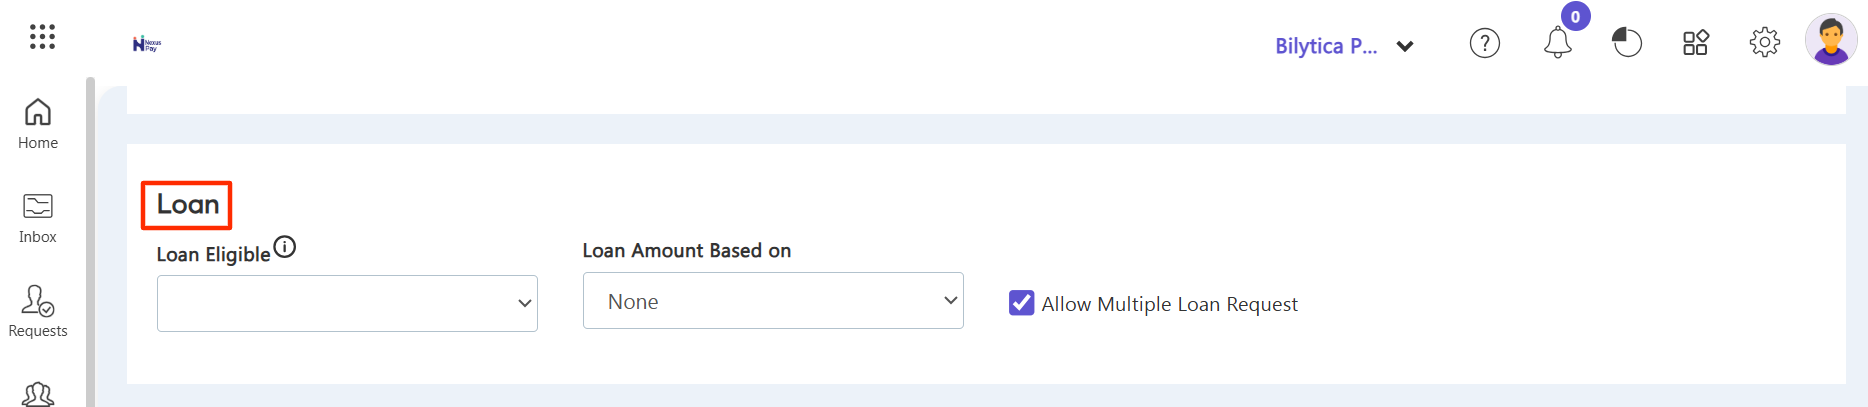
• Loan Eligible: Set the minimum service experience or probationary period required before an employee can request a corporate loan.
• Loan Amount Based on: Map the maximum loan limits to either the employee's Basic Salary or Gross Salary.
• Allow Multiple Loan Requests: Enabling this allows concurrent loan allocations. If disabled, an employee cannot apply for a secondary loan until their current balance is completely paid off.
Format Preferences & Authentication Security
Pay Slip Format: Select your preferred visualization layout style (Format 1 or Format 2) for employee payslip copies.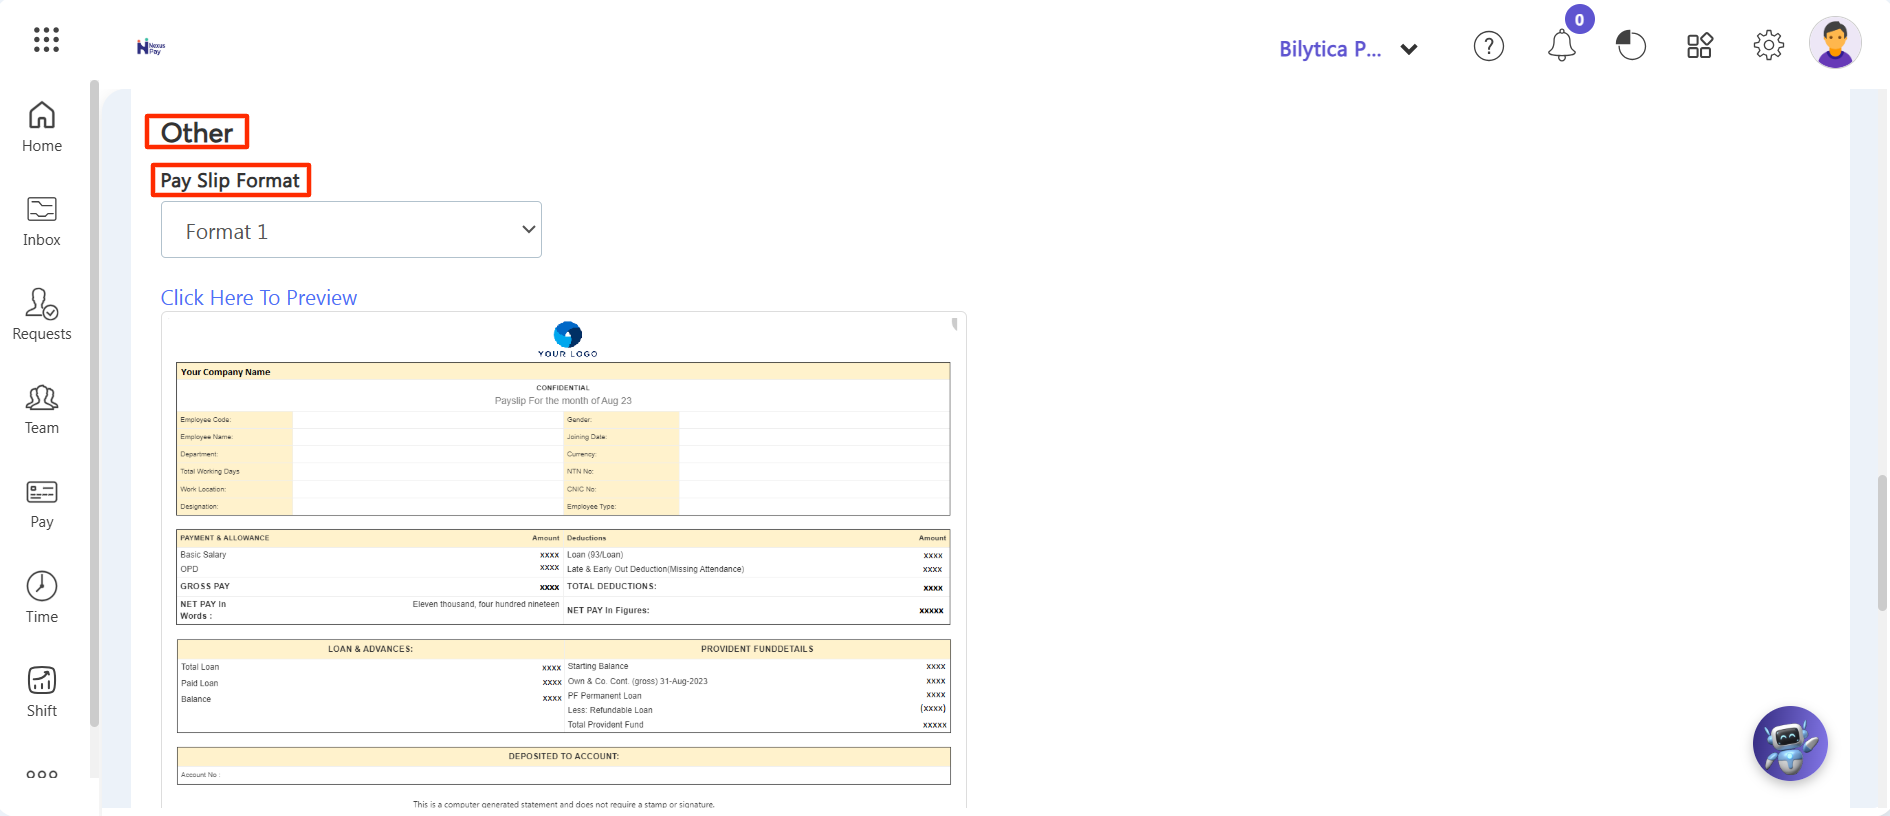
Employee Card Format: Choose your preferred layout format, such as a standard Employee QR Code or a Persian language layout.
Authentication Settings: Enable Multi-factor Authentication (MFA) for security, activate System Idle timeout locks to secure unattended open windows, and enforce a Password Expiry timeline to mandate regular security credential updates.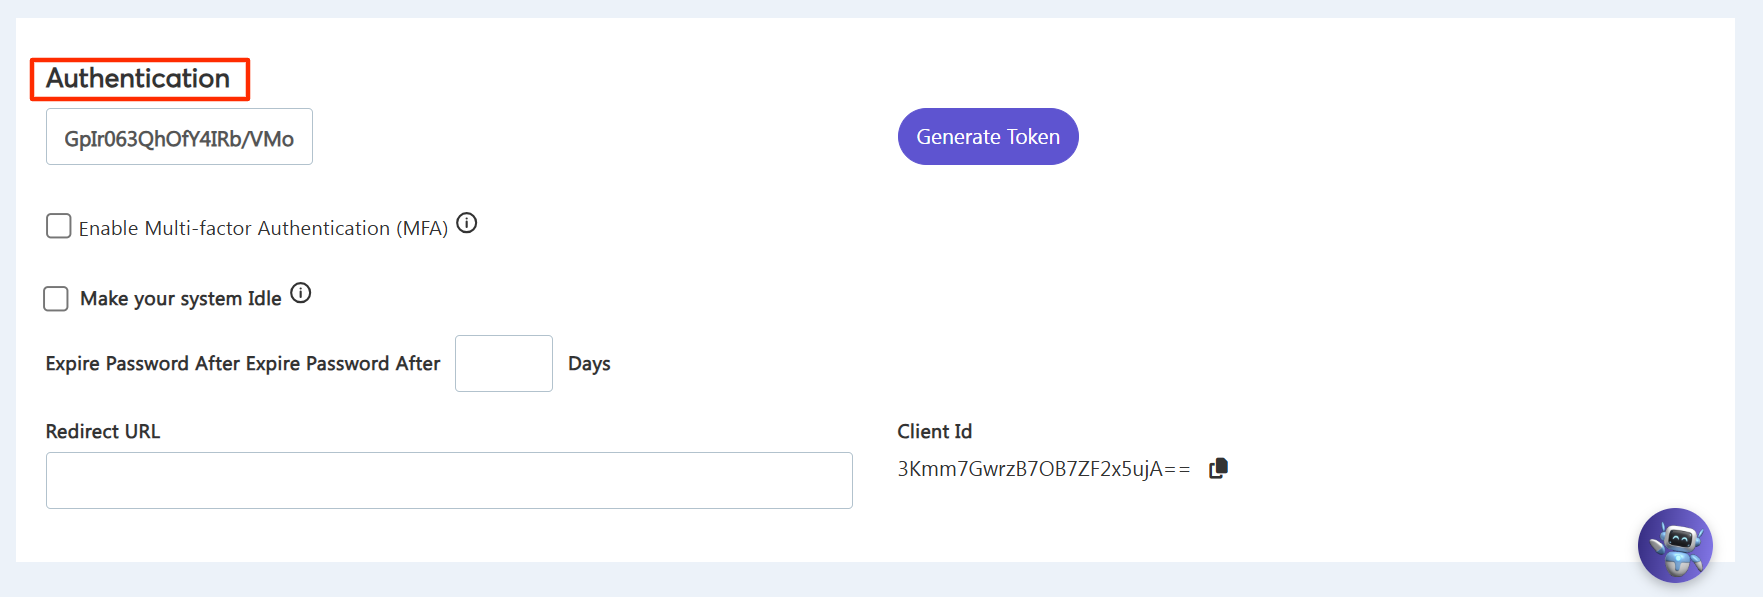
Core Setup Tip:
Setting your core policies correctly here removes the need for manual overrides down the line, as all automated tracking modules use these settings as their baseline logic!
6.1.3. The 'Other' Section
Beyond foundational payroll and attendance workflows, the Company Profile contains regional localization and compliance controls under the 'Other' tab. These options dictate your software's number formats, regional currency, positioning, and data onboarding rules.
1. Accessing the 'Other' Information View
Step 1: While inside your Company Profile menu wizard, look at the top center navigation tab selections.
Step 2: Click cleanly on the Other tab option (highlighted in a red box) to open the localization configuration form.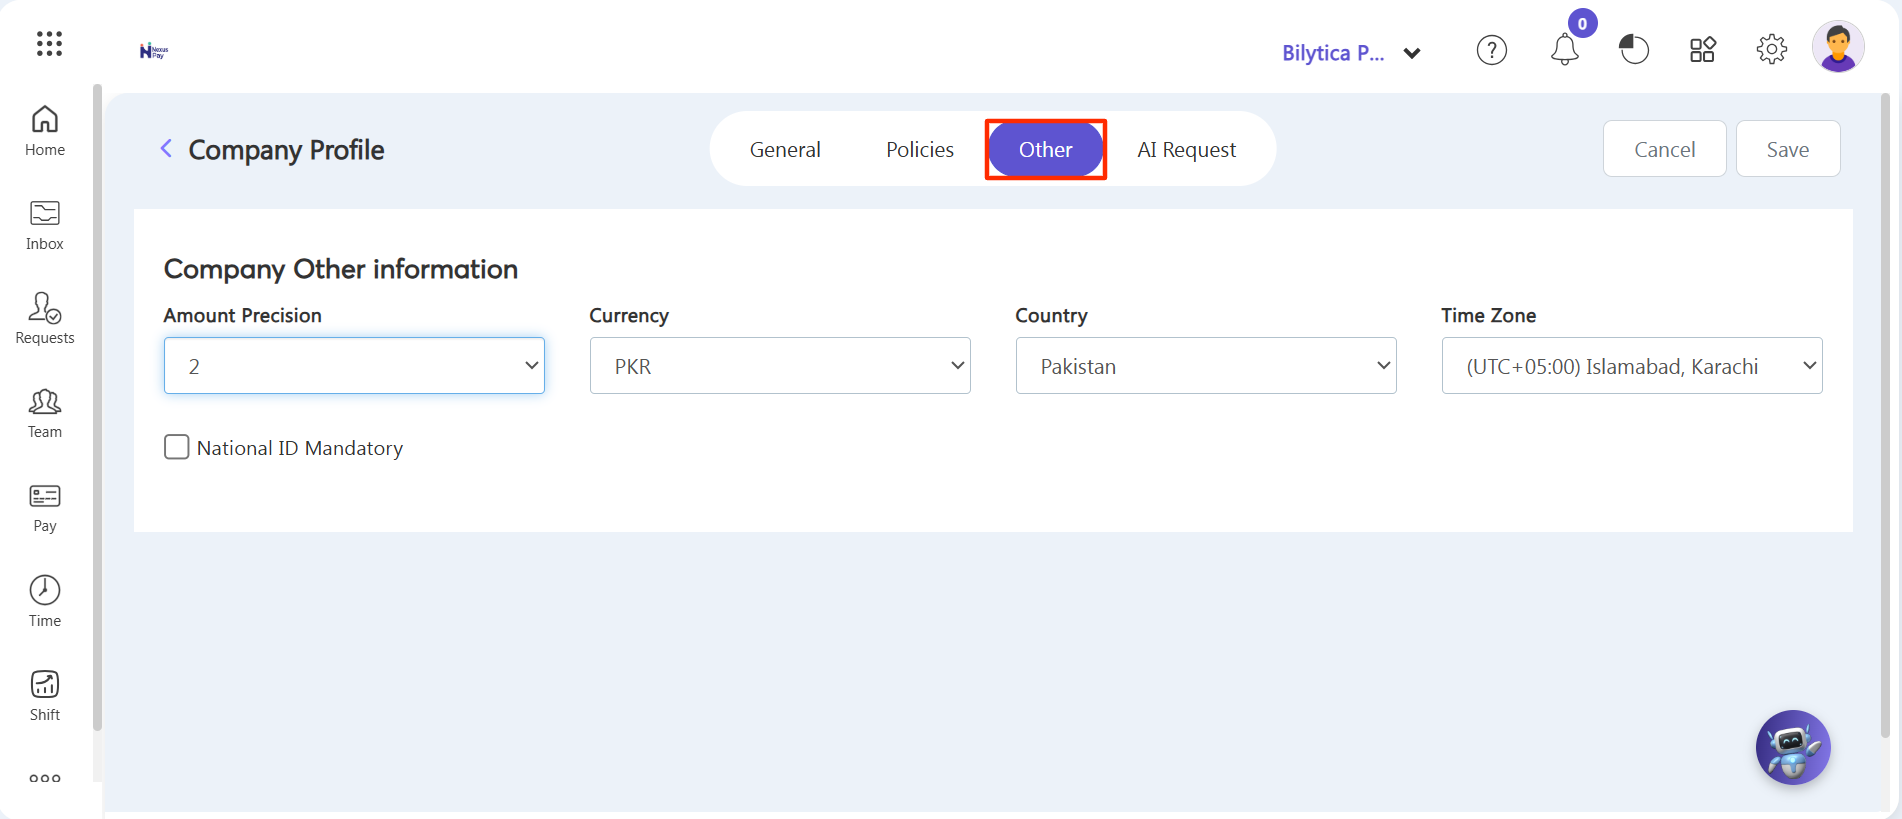
2. Configuring Localization and Security Fields
Populate the form fields according to your corporate location requirements:
• Amount Precision: Set how precise your final amounts or financial calculation numbers should appear inside the software database. This drop-down menu defines exactly how many decimal digits are shown after the decimal point (e.g., selecting '2' for standard cents).
• Currency: Select the primary currency ticker that your organization utilizes for base calculations, expense sheets, and salary registers (such as PKR).
• Country: Set the specific country where your primary corporate entity or organization exists.
• Time Zone: Select the exact regional time zone that your company follows. This controls the system's live clock configurations, shift limits, and automated time calculations (such as UTC+05:00 Islamabad, Karachi).
• National ID Mandatory: Enable this checkbox indicator if you want to make filling out the national ID card fields absolutely compulsory for all employee profiles inside your system database. When active, new profiles cannot be saved without a valid ID entry.
Step 3: Once you have configured these localization parameters to your liking, click the white Save button on the top right margin to permanently lock the configuration adjustments.
Compliance Advice: |