
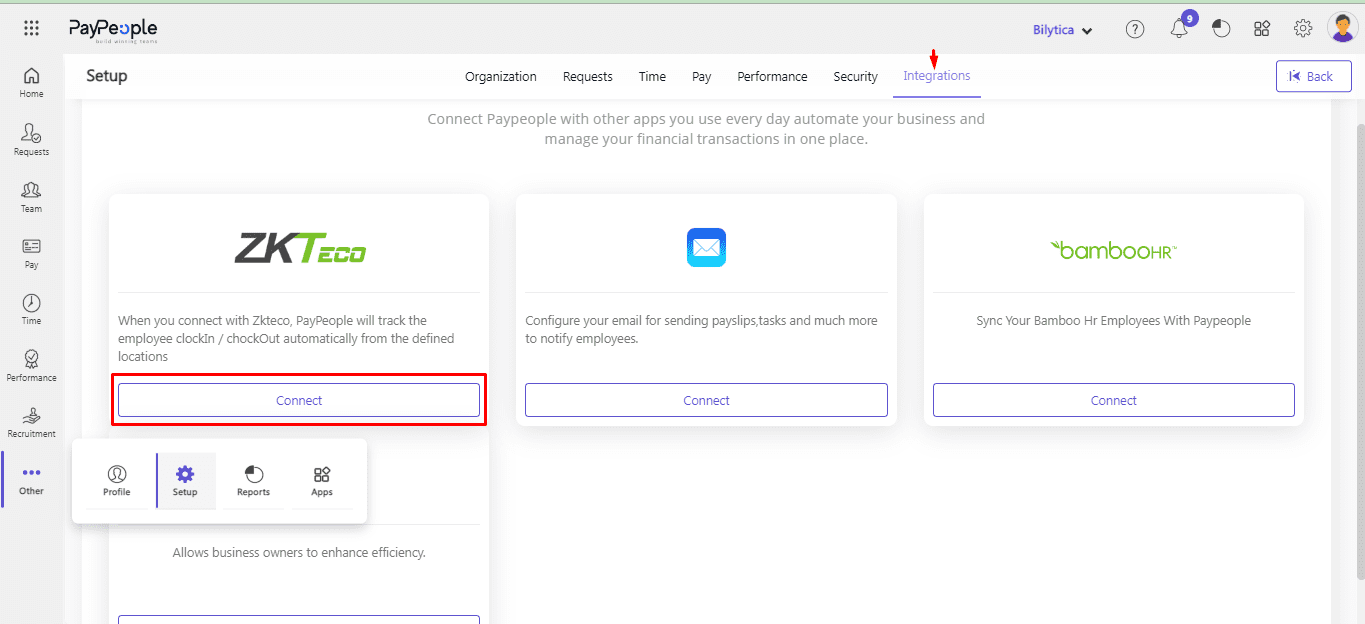
ZKTeco Integration #
Integration with static IP #
PayPeople will track the employee clock-in and clock-out automatically from the specified locations after you connect with Zkteco. The biometric device and Paypeople can be integrated, which makes it easier to manage attendance data.
- Go to Setup -> Integrations -> ZKTeco -> Connect.
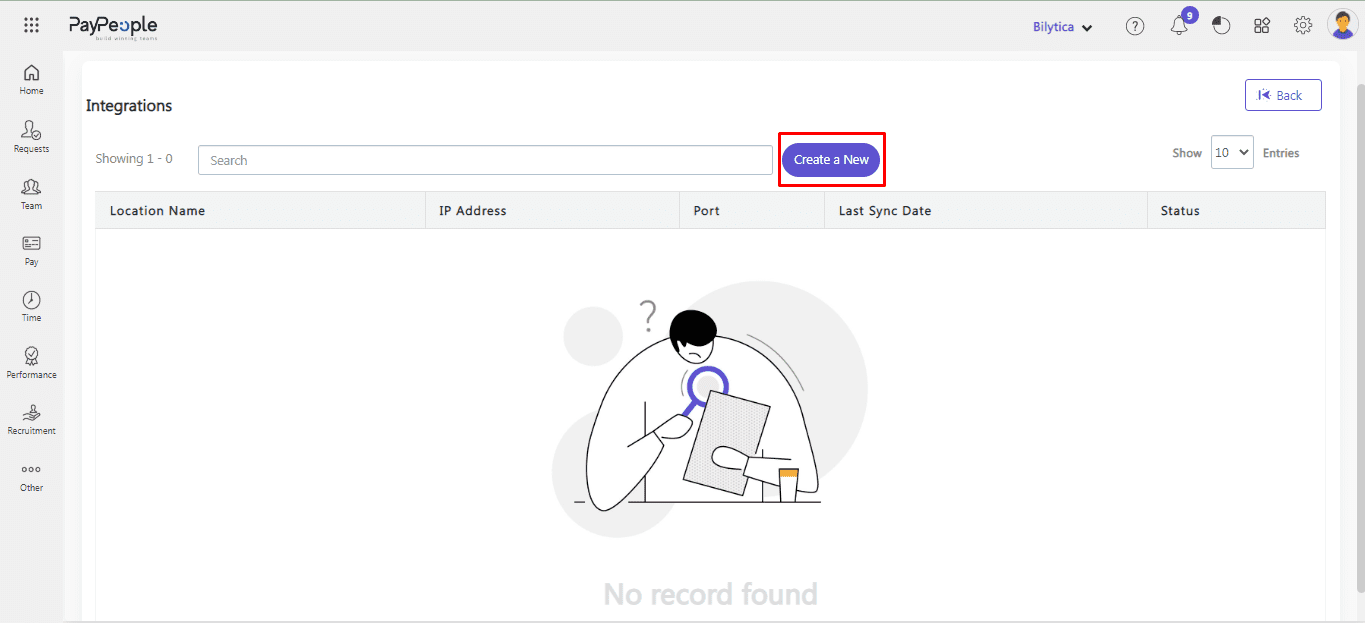
- Click Create a New
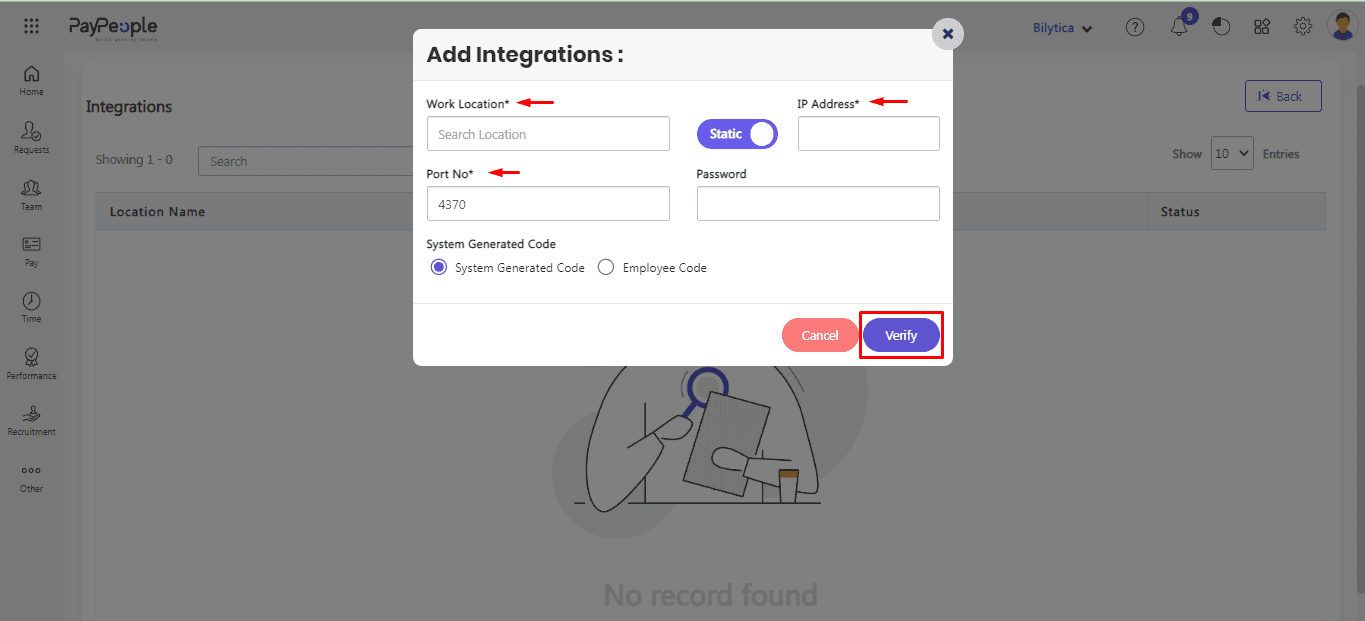
- Search for the location where you wish to connect your device.
- Add the machine’s configured static IP address.
- Include the port number where the mapped IP address is mapped.
- Add the password if any on the Attendance Machine.
- Click verify button and verify the device either on System Generated Code or Attendance Machine Code.
Note:
“The Employee ID generated by Pay people is referred to as the System Generated Code. Kindly ensure to include this ID when mapping it to the respective device.
Employee Code is the code that you map in Employee profile on Attendance machine code generated by Machine“.
Integration with Exe File #
If you intend to incorporate ZKTeco utilizing the Exe file offered by Paypeople. We have prepared a comprehensive guide to assist you in getting started, which includes step-by-step instructions.
- Download the Exe file save it to your computer.
- Install the exe on your computer by running the SDKinstall file.

- Execute the RegisterSDK file located in the DLL folder.

- Run the exe file.

- Enter the IP address of your device and click “Test Connection” and other data.
Note:
“Connected message will indicate that your device is currently active.“

- Include the Paypeople-generated Token in the Multi-organization section under Other, labeled as Token.
- Click save button.
- You can now use the ZKTeco software to manage your device and access the attendance.
If you encounter any issues during the integration process, you can contact Pay people’s customer support team for assistance. They will be happy to help you resolve any problems and ensure that your ZKTeco device is properly integrated into your system.
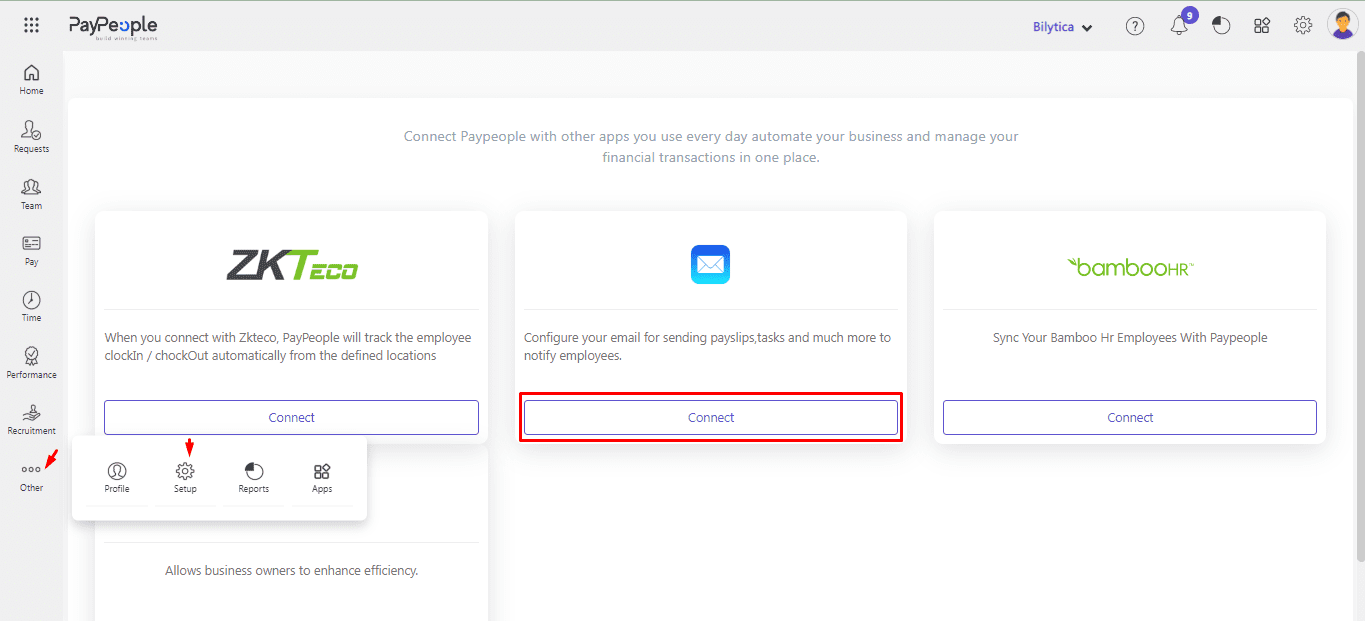
SMTP Configuration #
SMTP (Simple Mail Transfer Protocol) is a standard protocol used for sending emails over the internet. Paypeople is a powerful HR management software that allows you to manage your HR operations efficiently. You can Configure your SMTP on Paypeople and send emails for sending payslips, tasks, and much more to notify employees. Configuring SMTP with Paypeople is a simple process that can be done in a few easy steps.
Instructions to Configure #
Follow these instructions to Configure your SMTP On PayPeople:
- Go to Setup > Integration
- Click on Connect to Configure your email for sending payslips, tasks, and much more to notify employees.
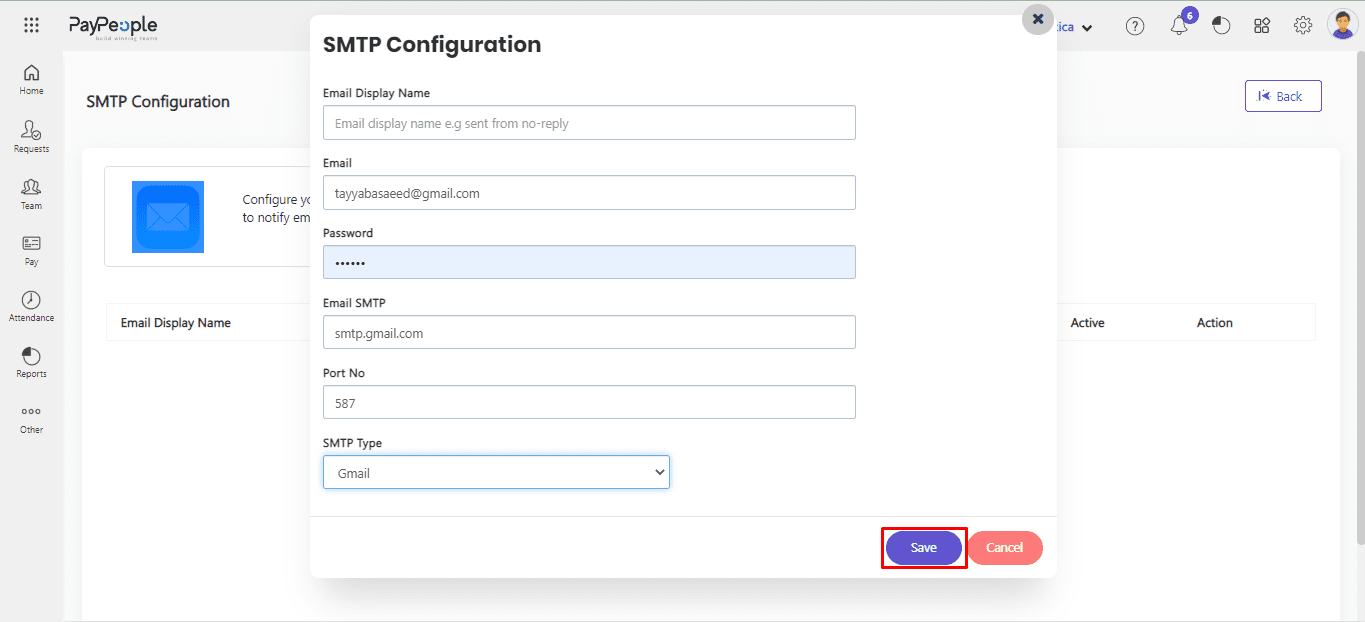
- Click on Add Account.
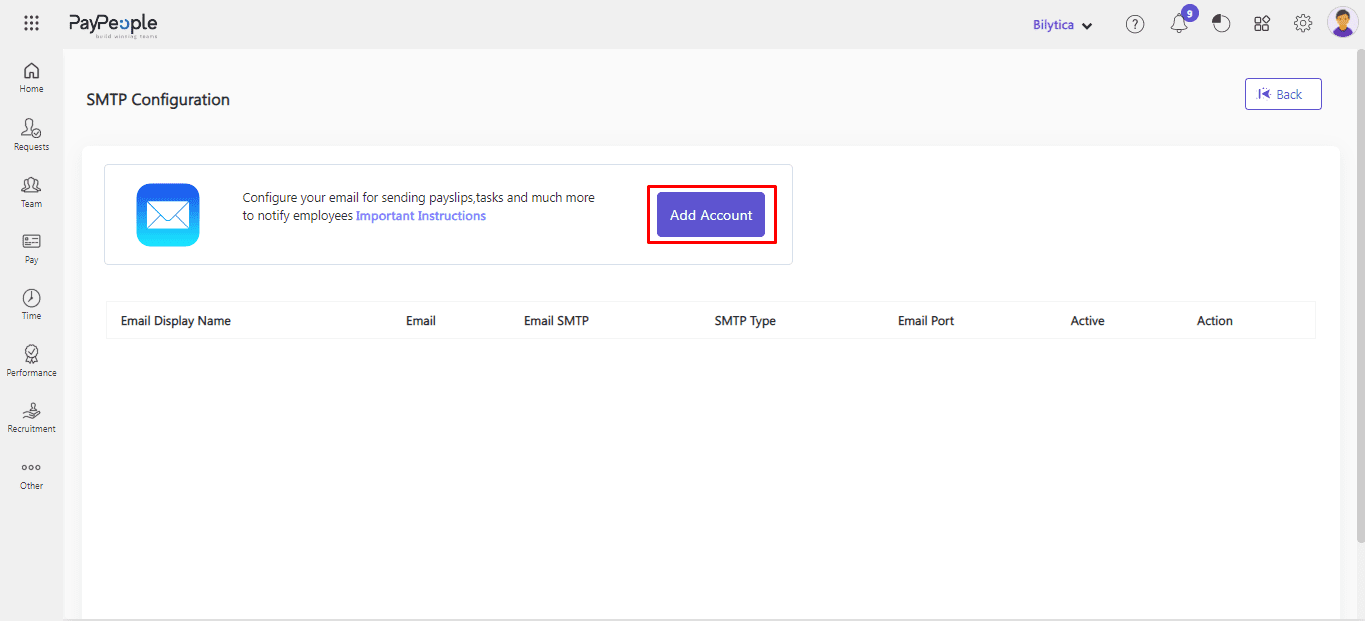
- Fill in the following details and Save them.
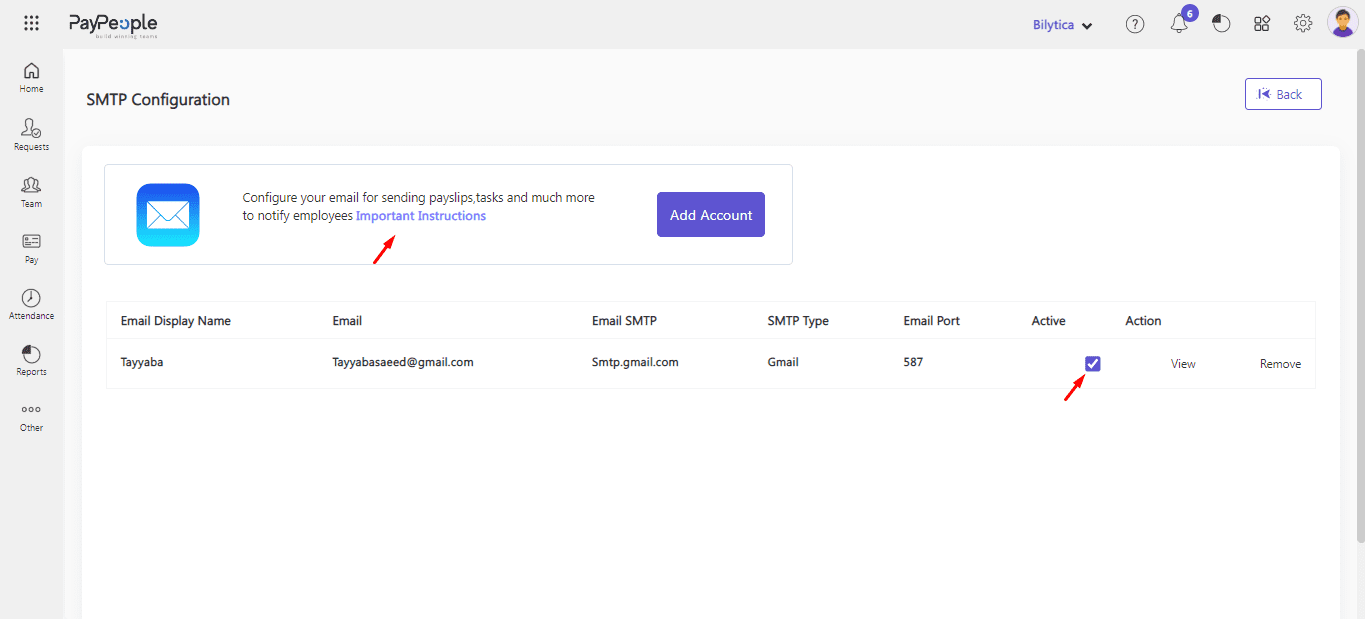
Active desired SMTP:
- Click On Active Check Box to active email and click on it if you want to see important instructions.
Google Calendar Integration #
The Google Calendar Integration feature in PayPeople HRMS allows seamless synchronization of employee schedules, meetings, and tasks with their Google Calendar accounts. This integration streamlines time management, enhances collaboration, and improves overall productivity by ensuring that critical work-related events are easily accessible and manageable.
How to Set Up Google Calendar Integration #
- Enable Integration in PayPeople HRMS:
- Navigate to the Settings section in PayPeople HRMS.
- Locate the Integrations tab and select Google Calendar by click Connect button.

-
- Click Add Account button.
- Your google accounts window will be visible to you. Select account from them.

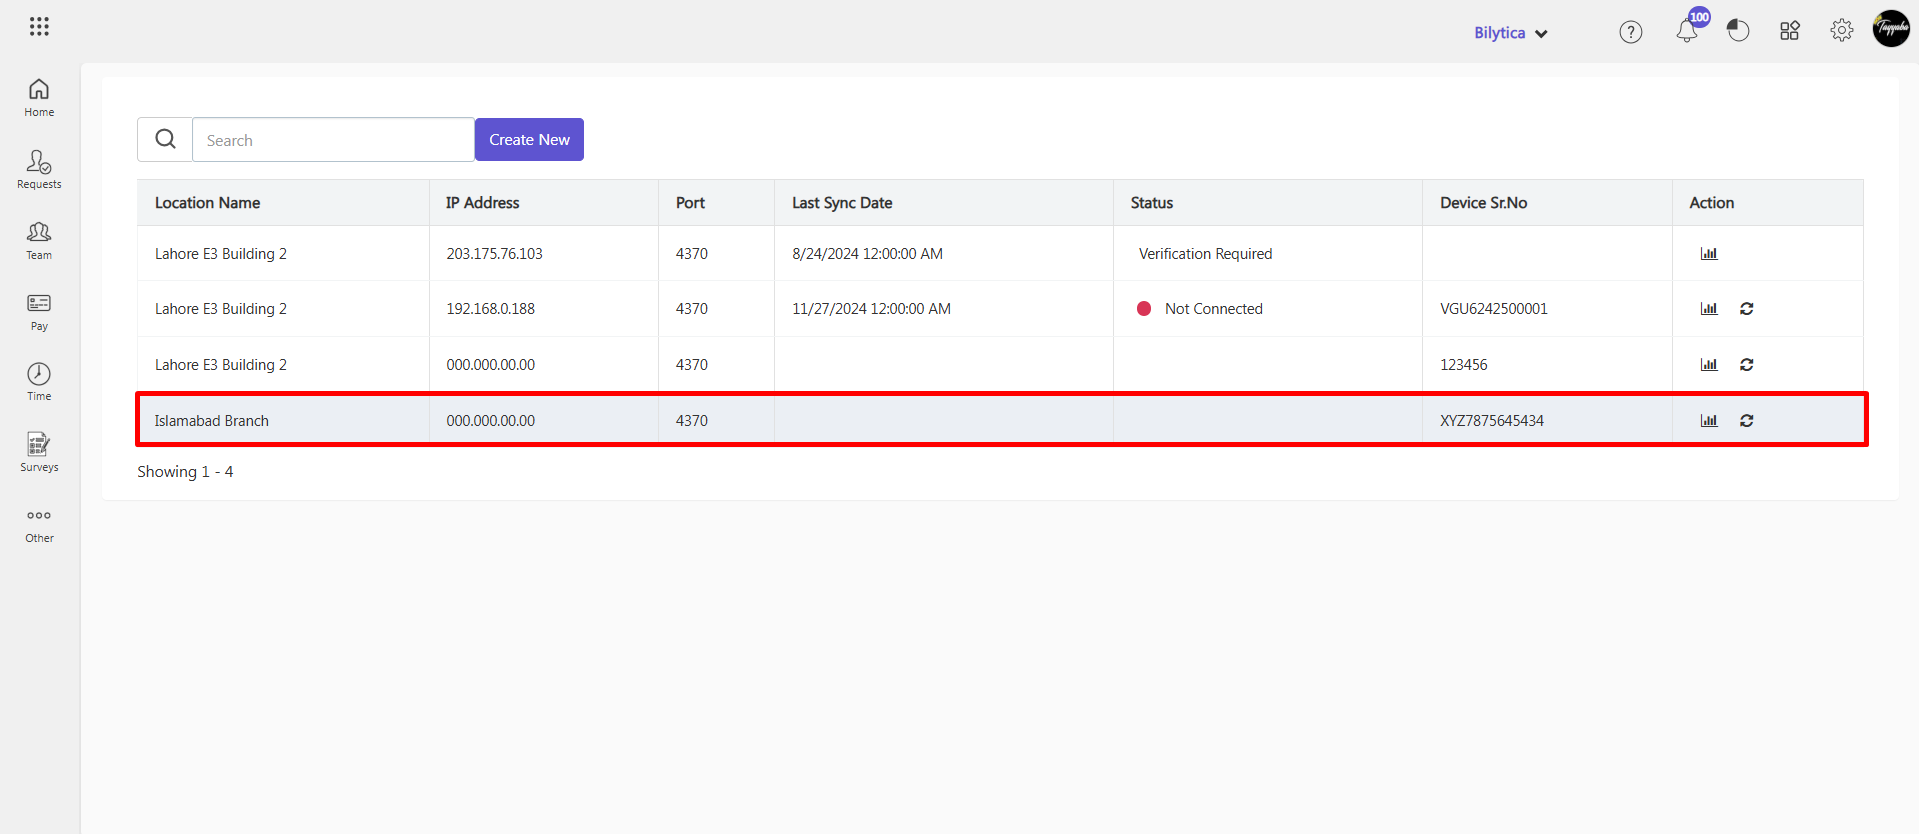
Cloud Server (ADMS) Integration #
Cloud Server or ADMS (Attendance Device Management System) integration in PayPeople allows the synchronization of attendance data from biometric devices directly into the PayPeople platform. Here how you can integrate ZKteco device with PayPeople using Cloud Server Settings:
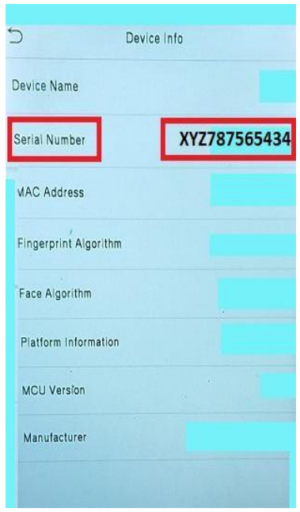
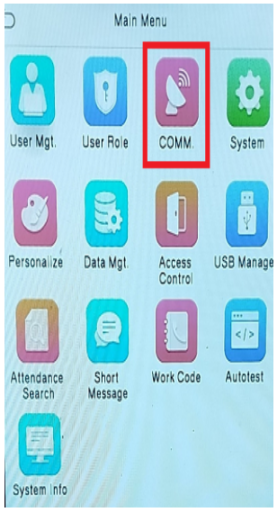
Step1: Device Serial Number #
- Navigate to device menu

- Select System Info
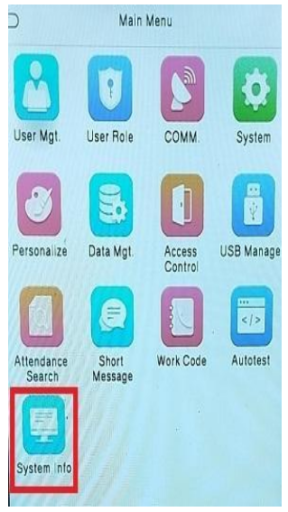
- Go to Device Info
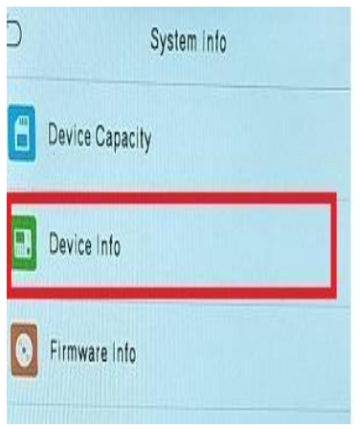
- Look for the Serial Number (this serial number will used to connect with PayPeople ADMS)
Step2: PayPeople Device Connect #
- Login with your PayPeople Admin credentials.
- Click “Settings” icon.
- Select “Integrations” tab.
- Click on “Connect” button under ZKteco Integration.
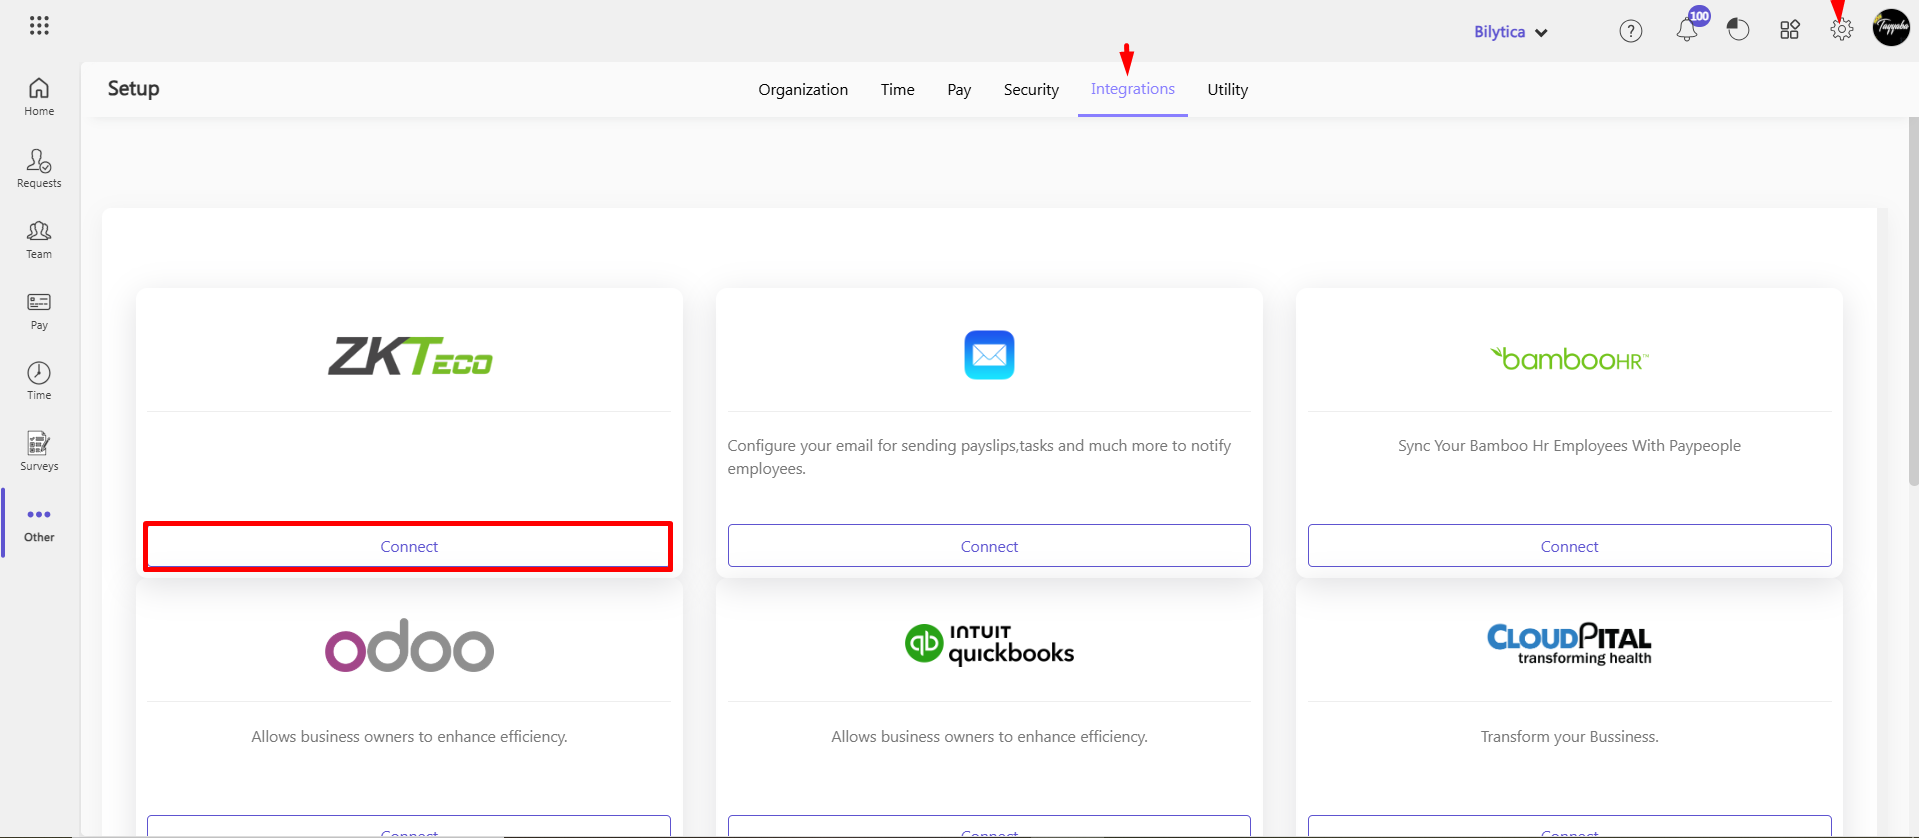
- Click on “Create a New”

- Under the “Connection Type” select Device Sr.No (Cloud Base Attendance)
- Select device location (where configuring device exists) under “Work Location”.
- Add serial number under the input field “Device Serial Number”
- Click on “Add” button
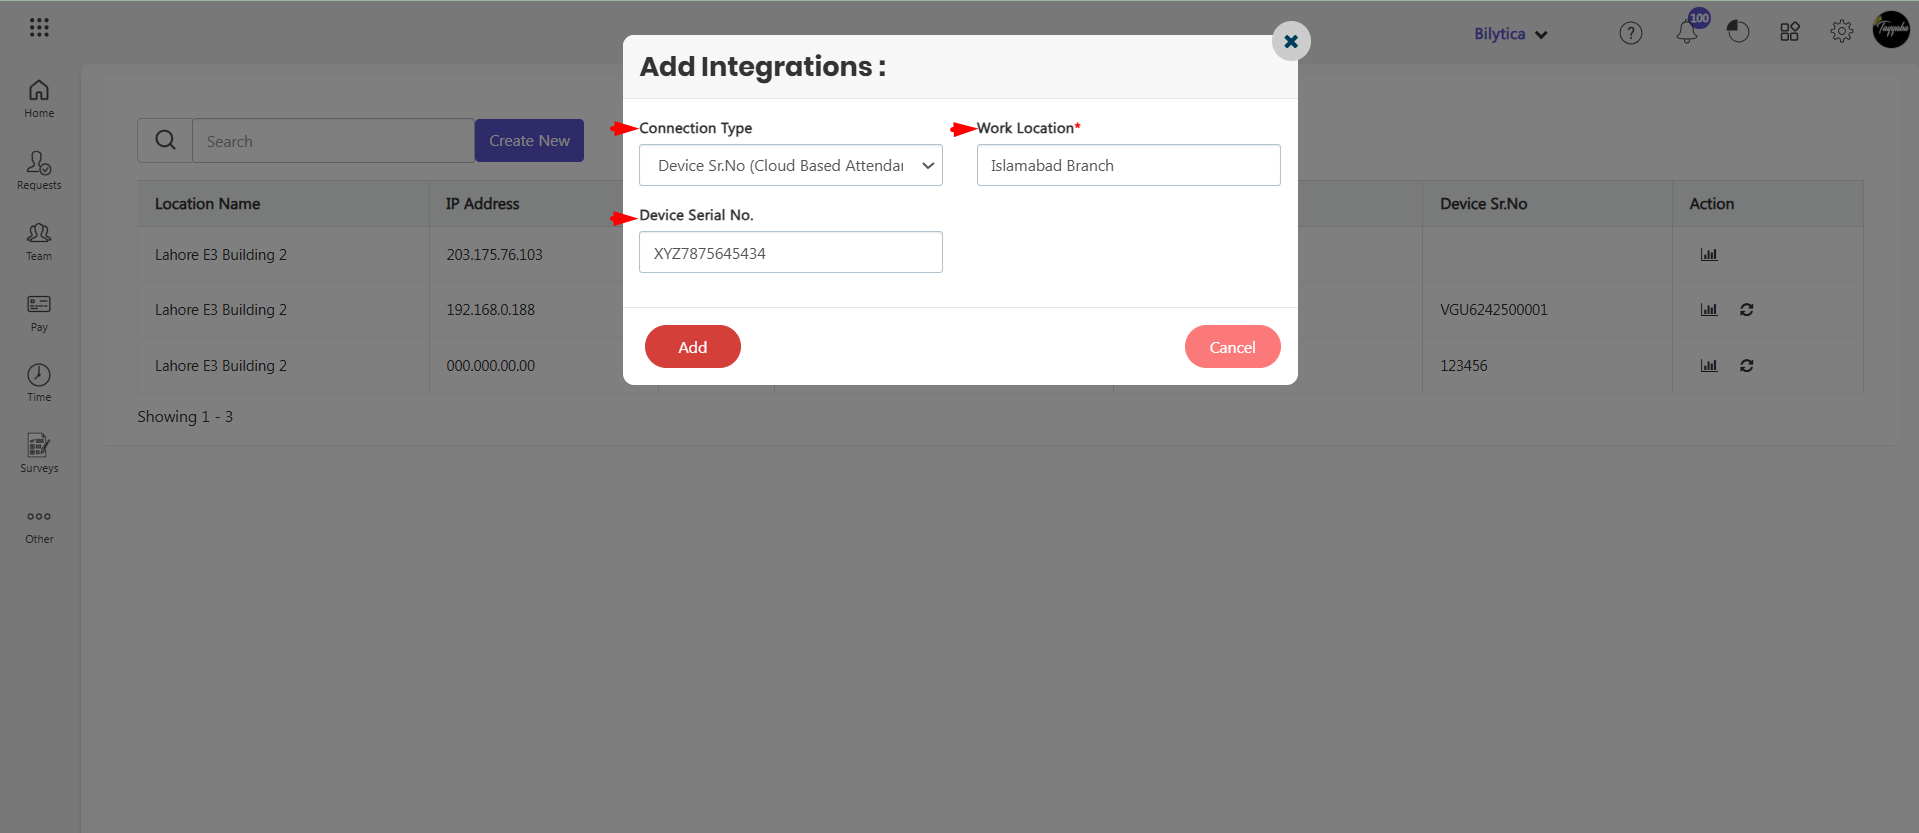
- Your device will be added and showing here.
Step3: Device Configuration #
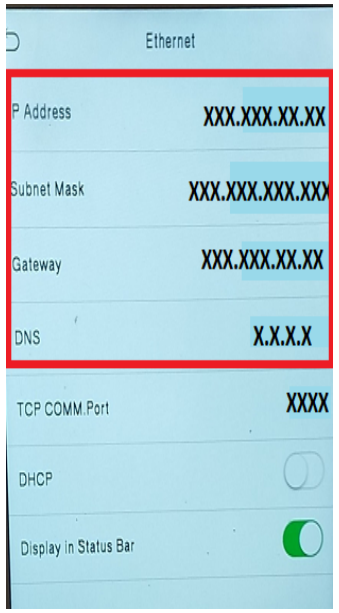
Ethernet Settings #
- Navigate to the “Device Menu”
- Select “Comm”
- Click “Ethernet”

- Verify the following setting match your network configuration
- Subnet Mask
- Gateway
- DNS
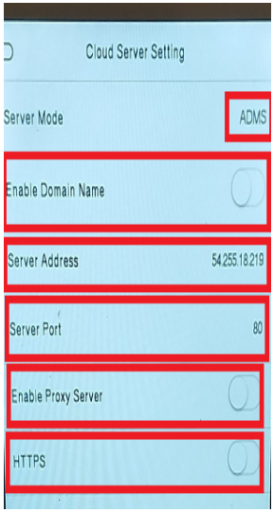
Cloud Server Settings #
- Navigate to “Device Menu”
- Select “Comm”
- Go to “Cloud Server Settings”
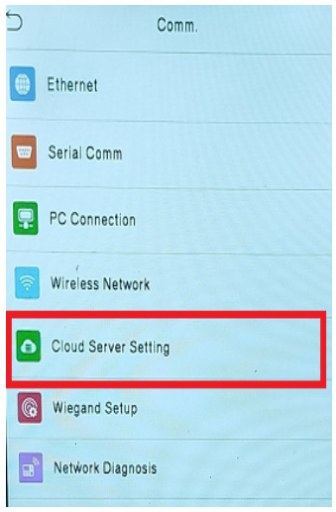
- Ensure the following Configurations:
- Server Mode Set to “ADMS” (this is the dafult setting; contact your admin or implementation person if it differs).
- Enable Domain Name : Ensure this option is disabled (off).
- Server Address : Enter the server IP address : “54.255.18.219”.
- Server Port : Enter the Port number : “80”
- Enable Proxy Server : Ensure this option is disabled (off).
- Server Mode Set to “ADMS” (this is the dafult setting; contact your admin or implementation person if it differs).
Device Type Setting #
- Navigate to “Device Menu”.
- Select “System”.
- Go to “Attendance”.
- Select “Device Type Setting” (skip this step if the option in not available).
- If “Time Attendance Terminal” is selected, you are all set.
- If “Access Control Terminal” is selected, contact to your Admin or implementation person.
Instructions: #
Verify Settings #
Ensure all device settings, including Ethernet, Cloud Server, Device Type, match the provide configurations to enable successfull integration with PayPeople ADMS.
Follow Sequence #
Perform the steps in specified order – staring wiht serial number retreival, followed by device connection and configuration – to avoid setup errors.
Double Check Entires #
Carefully input critical detiails like the serial number, server address, and port number to prevent communication issues between device and the server
Contact Admin for Issues #
If any discrepencies or challanges aries during configuration, prompty contact with admin or implementation team or generate a ticket on our Paypeople portal for support.
To create a ticket you can view this link HelpDesk.
MYTM Integration #
Integrating MYTM with PayPeople can enhance the ecosystem by providing seamless financial and payment solutions for employees and organizations. Here’s how we integrate MYTM with PayPeople:
- Go to Setup => Integration
- Click on “Connect” button under ZKteco Integration.

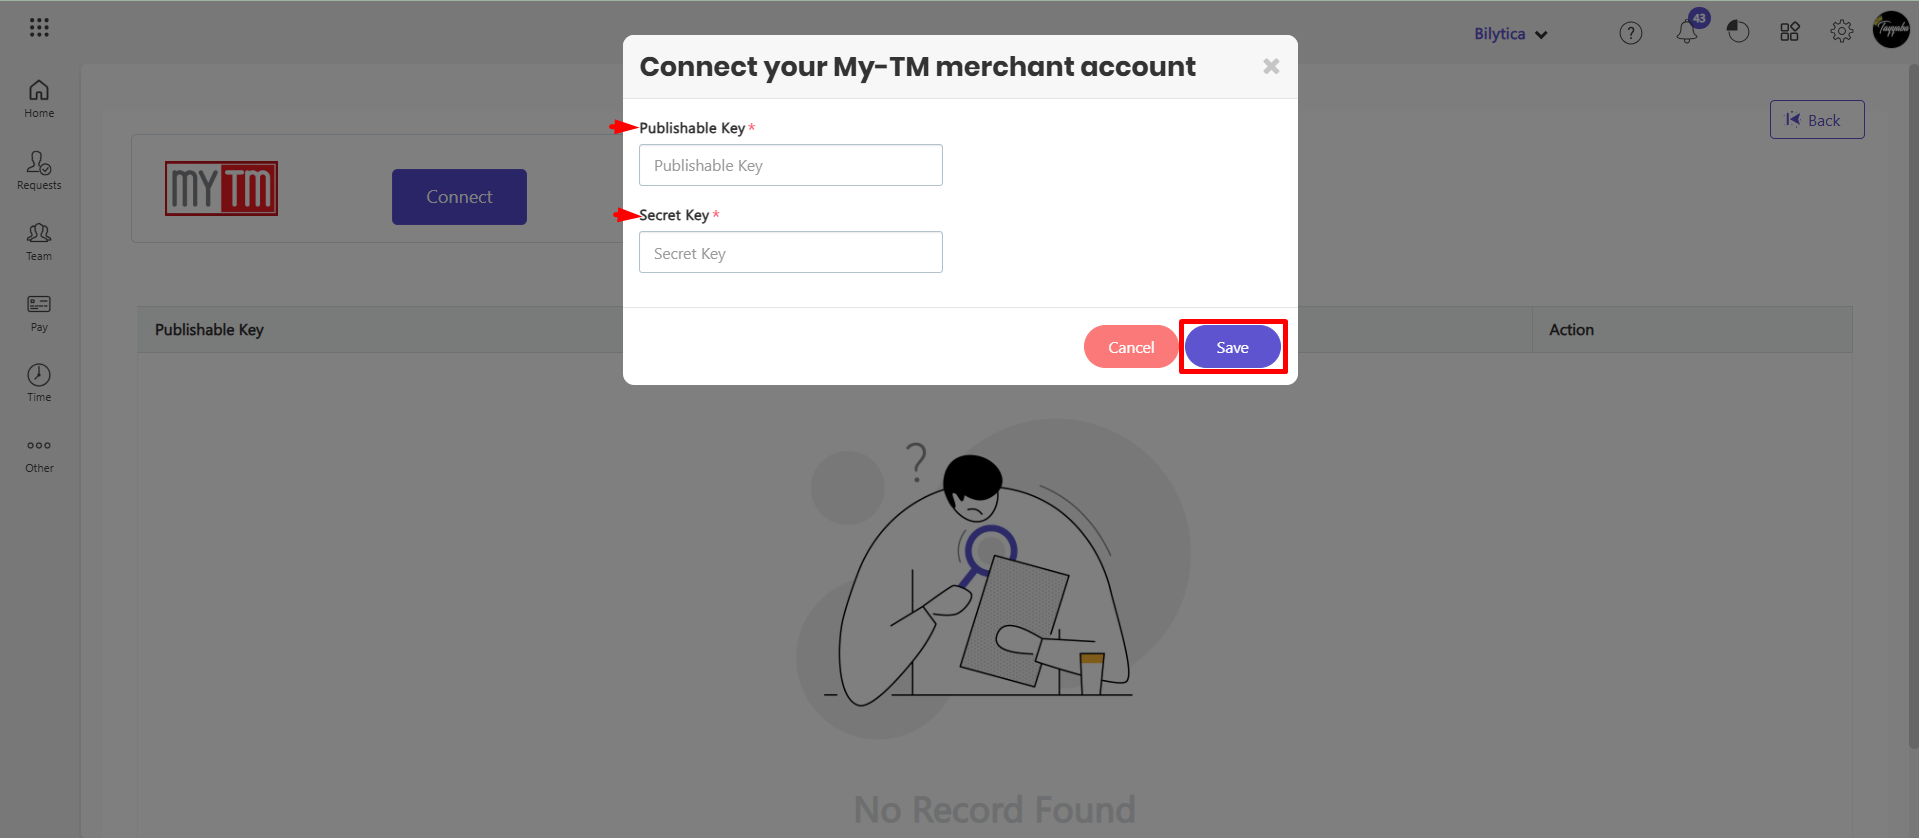
- Click Connect button to add MYTM.
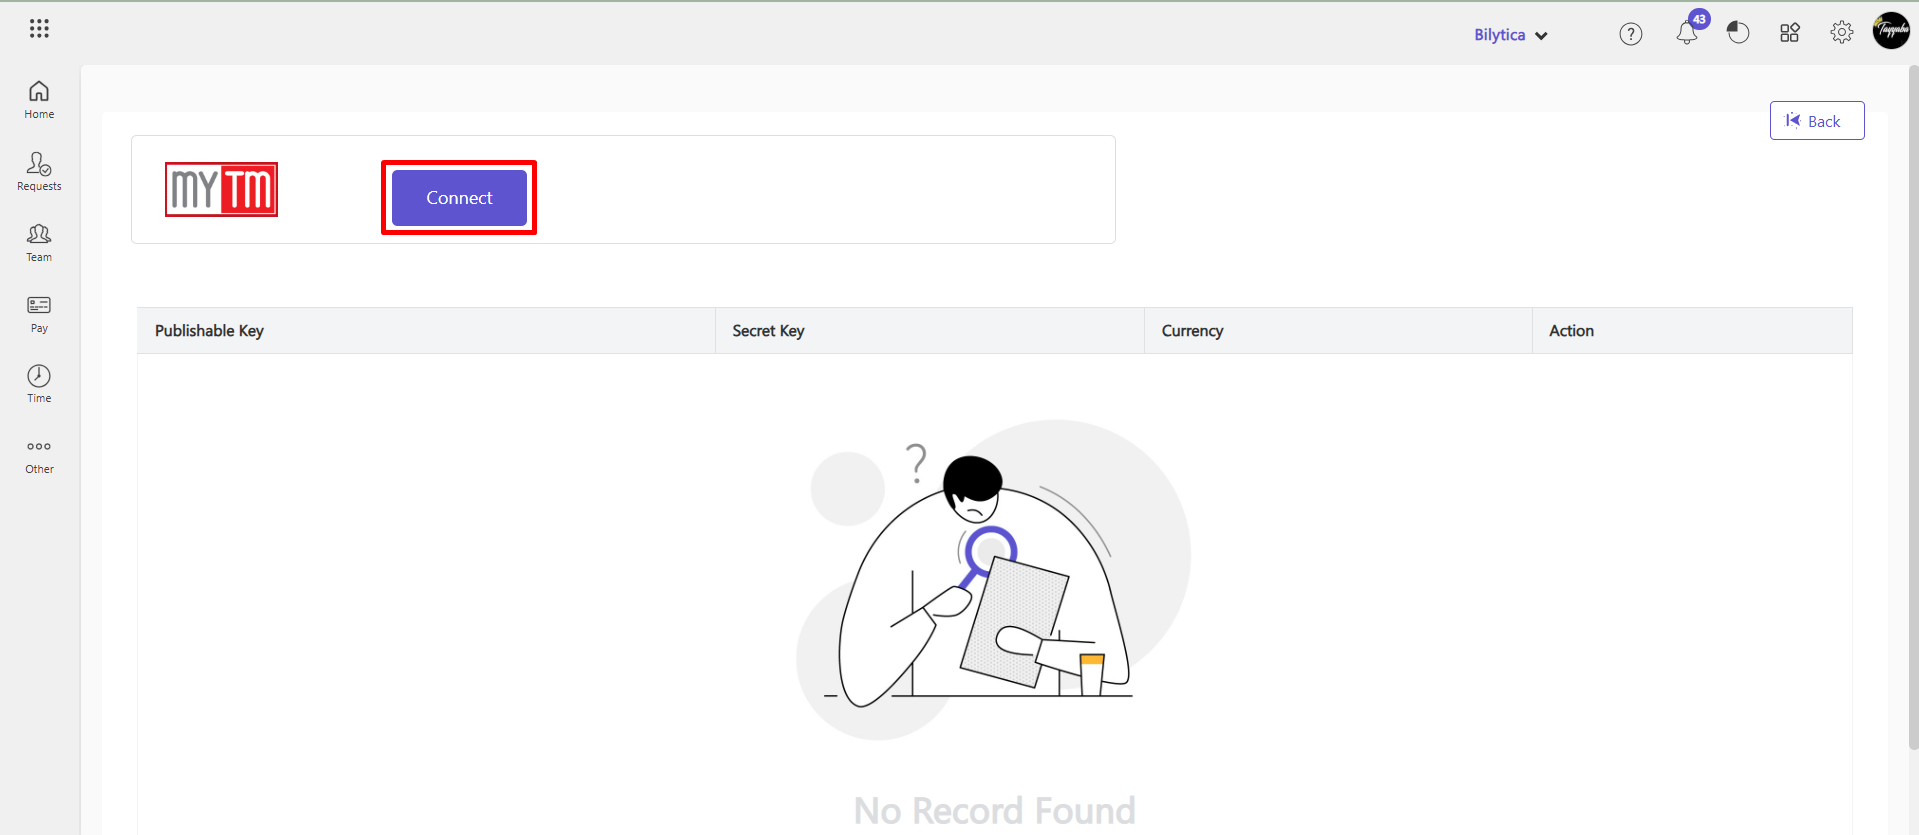
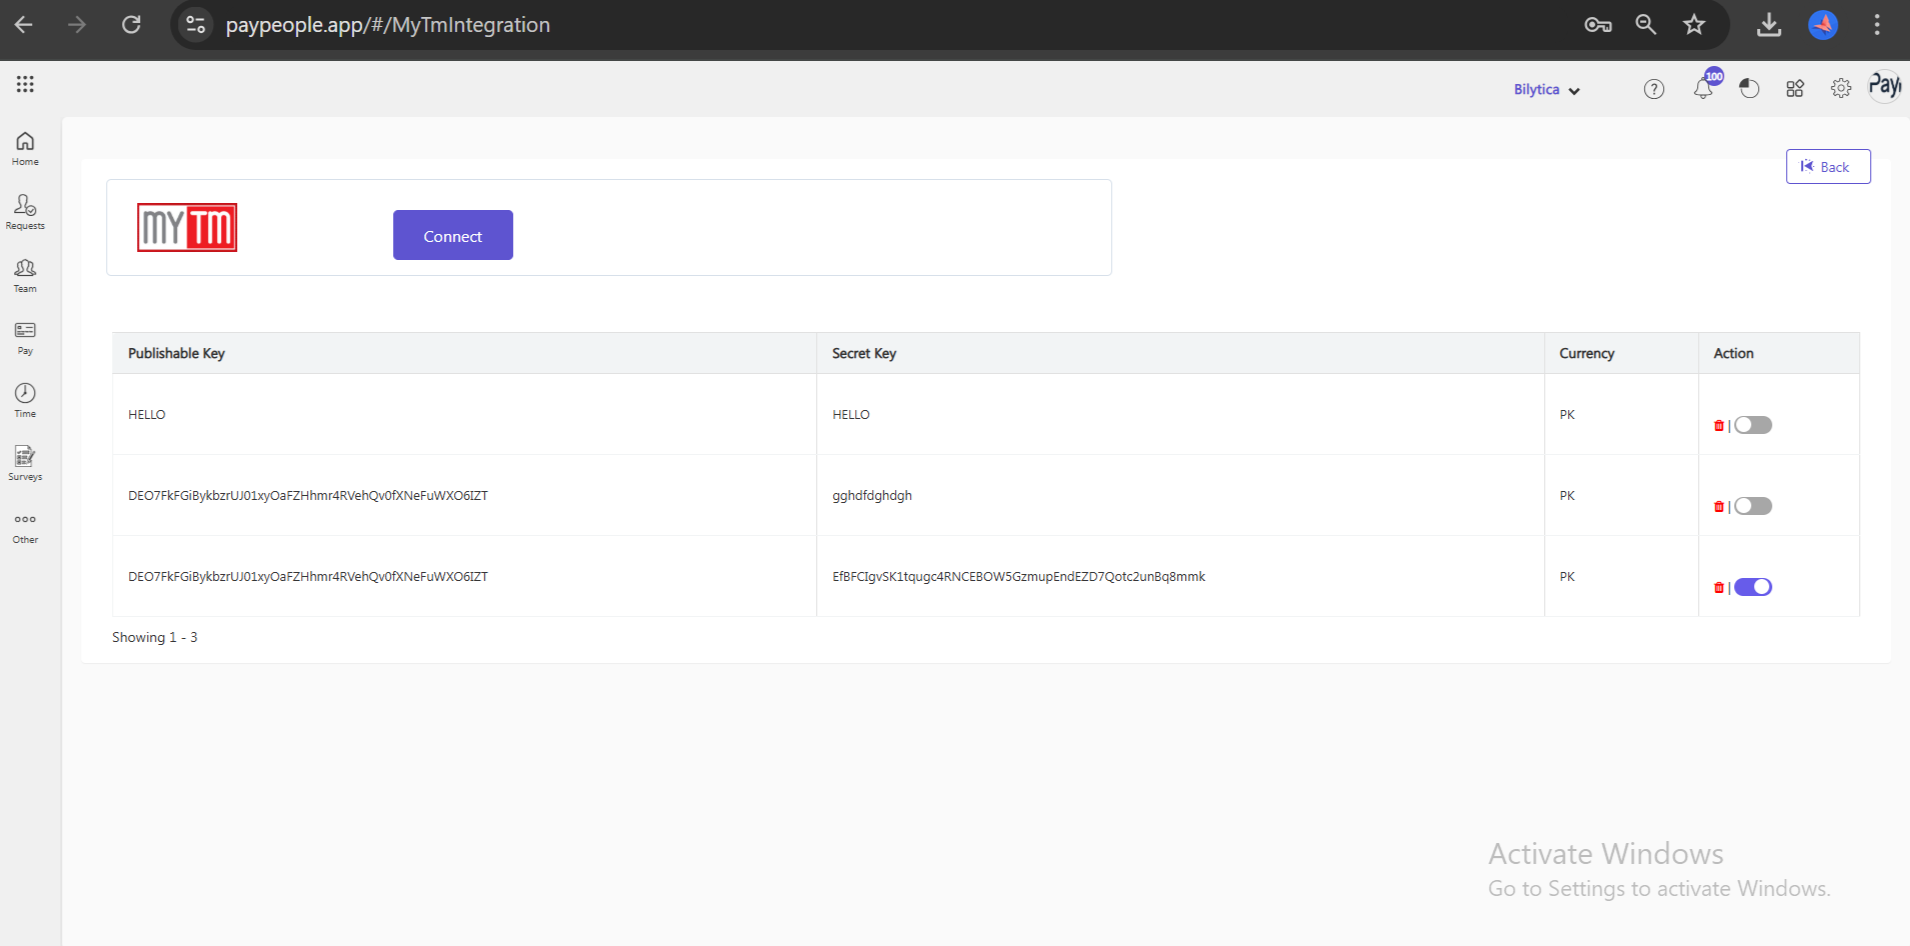
- Copy Publishable Key and Secret Key from your MYTM company account and paste it here.
- Click Save button.
- Your MYTM account will be integrated and showing here.
- Enable action button to active your account.
- Go to Team => open employee profile (whose salary you want to send through MYTM)
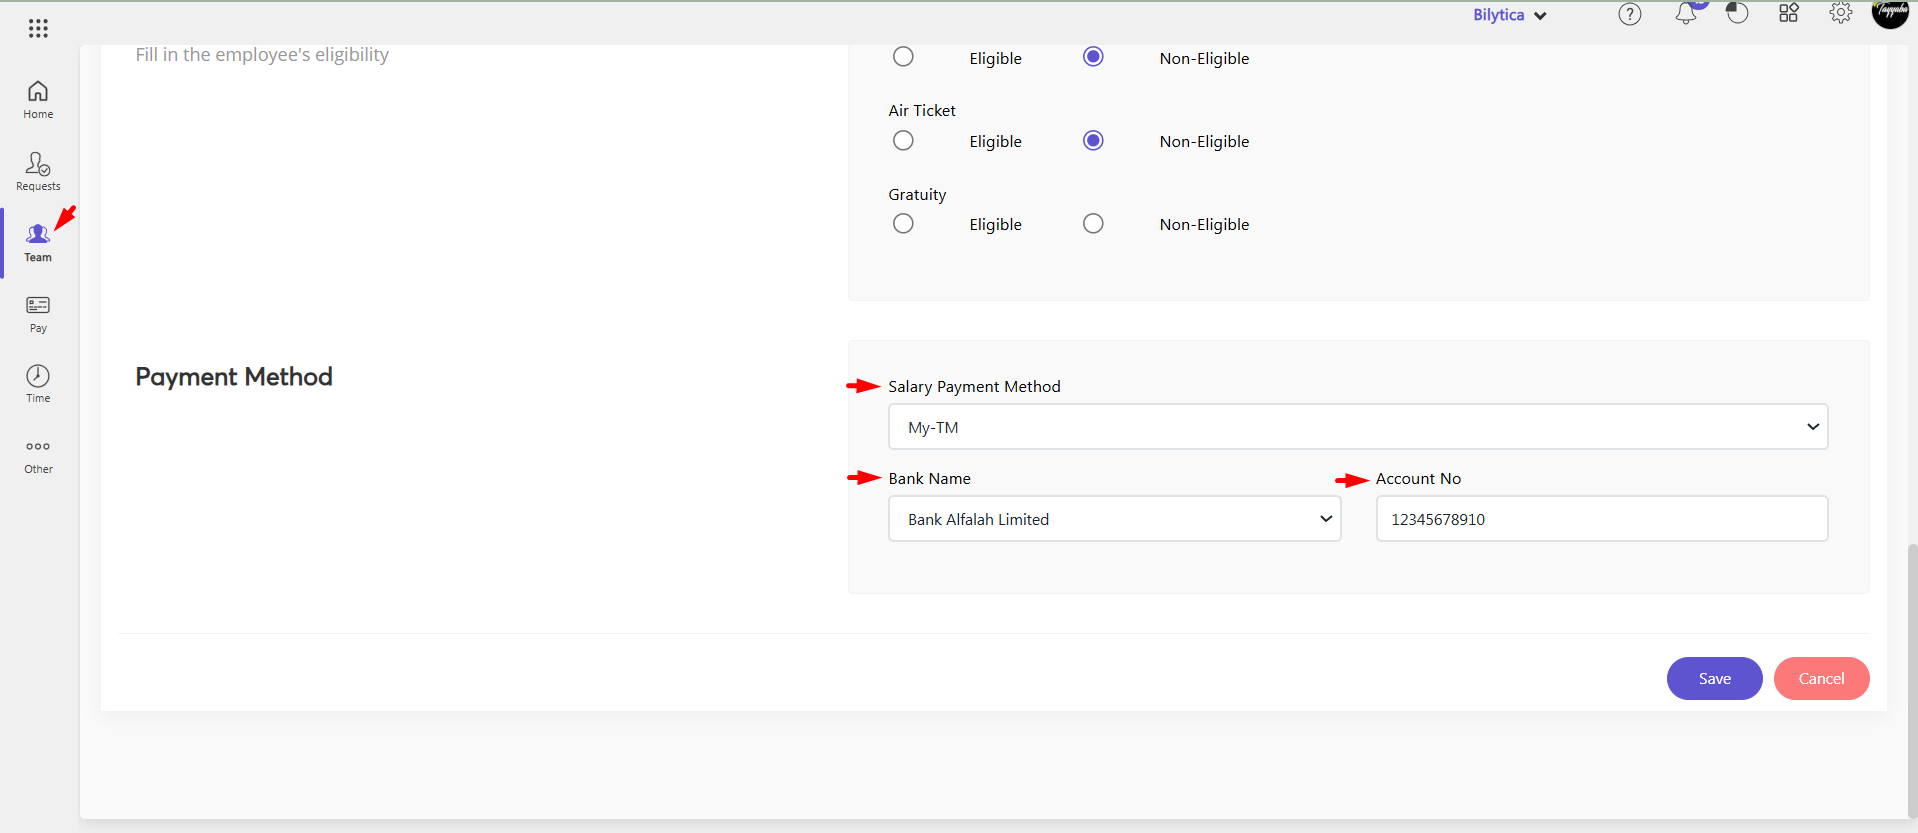
- Edit Profile => Official => Select My-TM under Salary Payment Method => Select bank name under Bank Name input field => Write account number under Account No.
- Click Save.
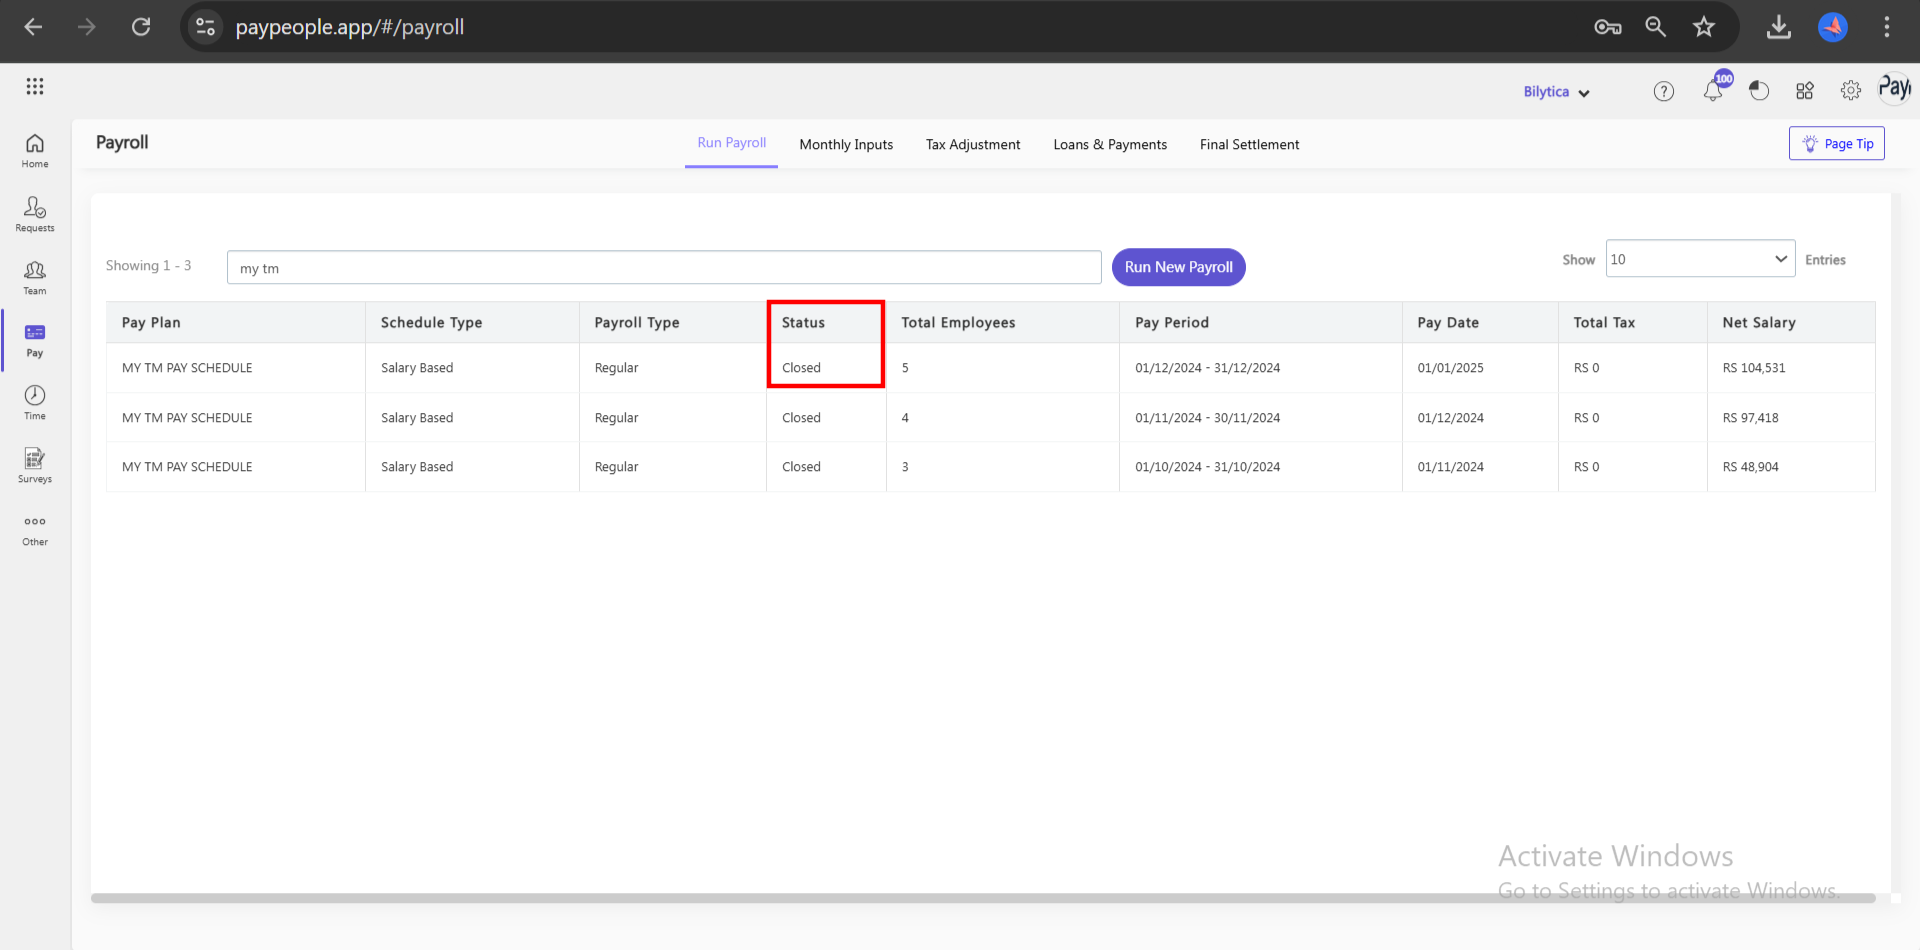
- Click on Payroll with a status of ‘Closed.’
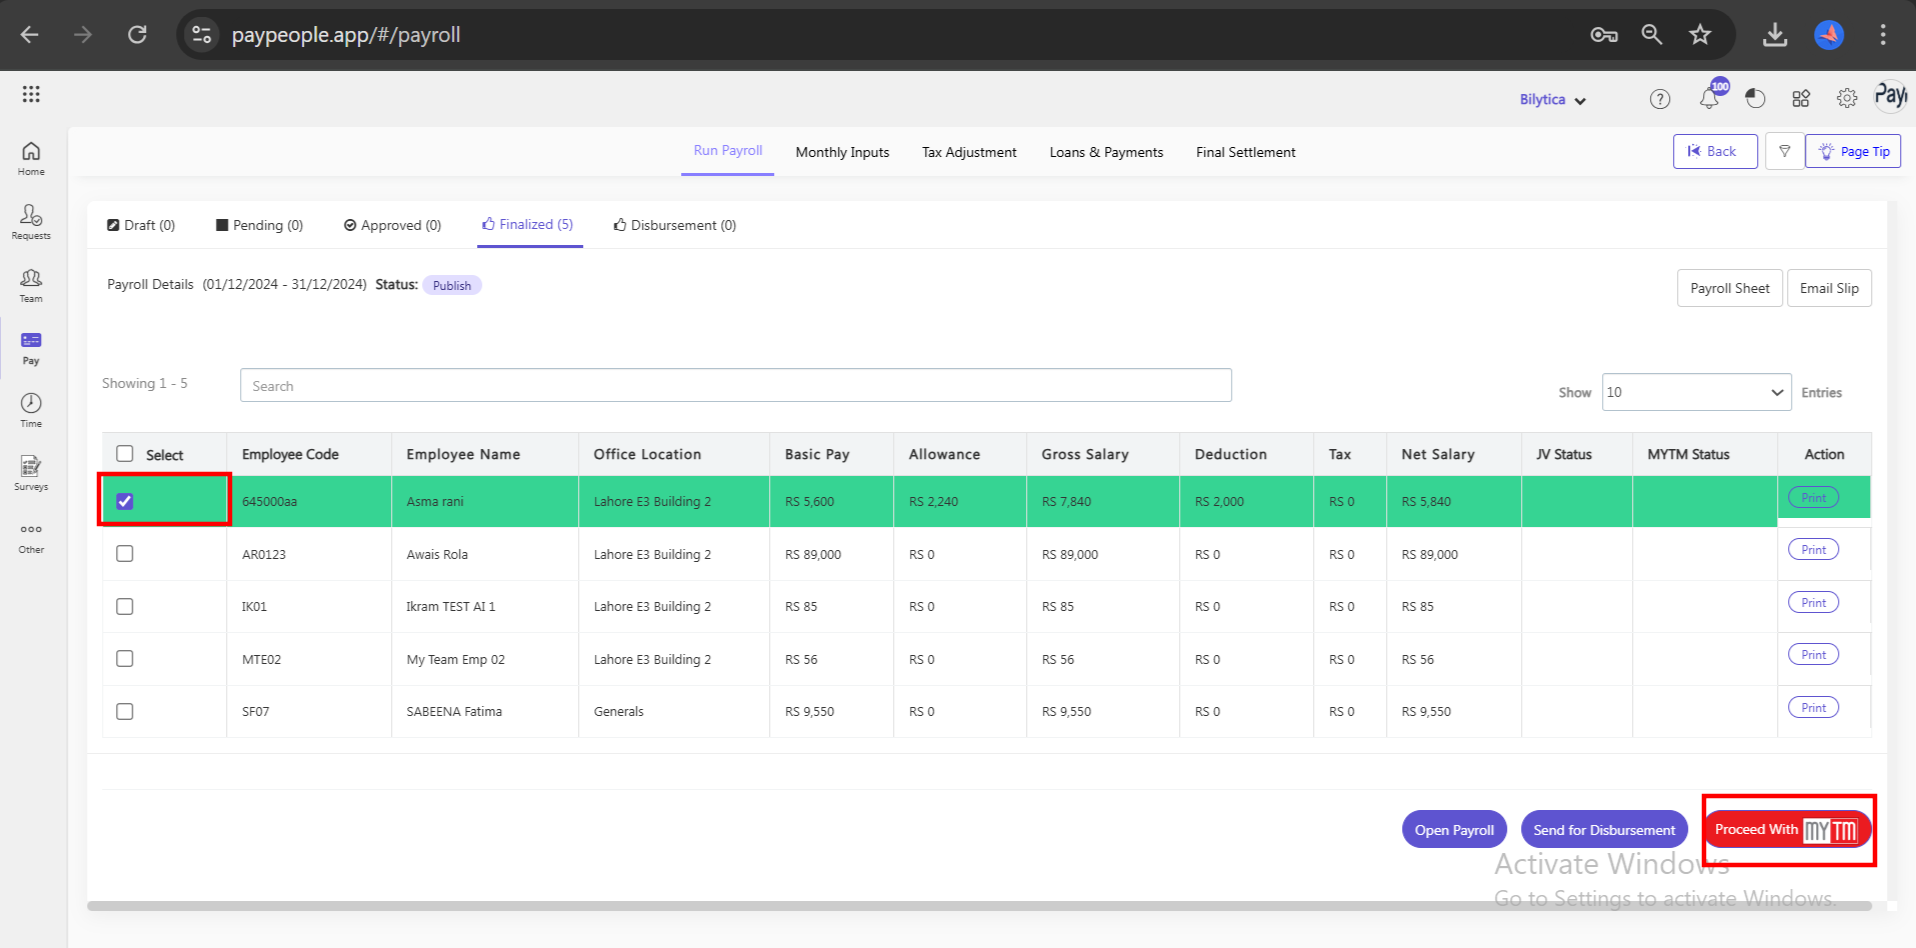
- Select the employee by checking the checkbox for whom you want to send the salary.
- Click Proceed With MYTM button.
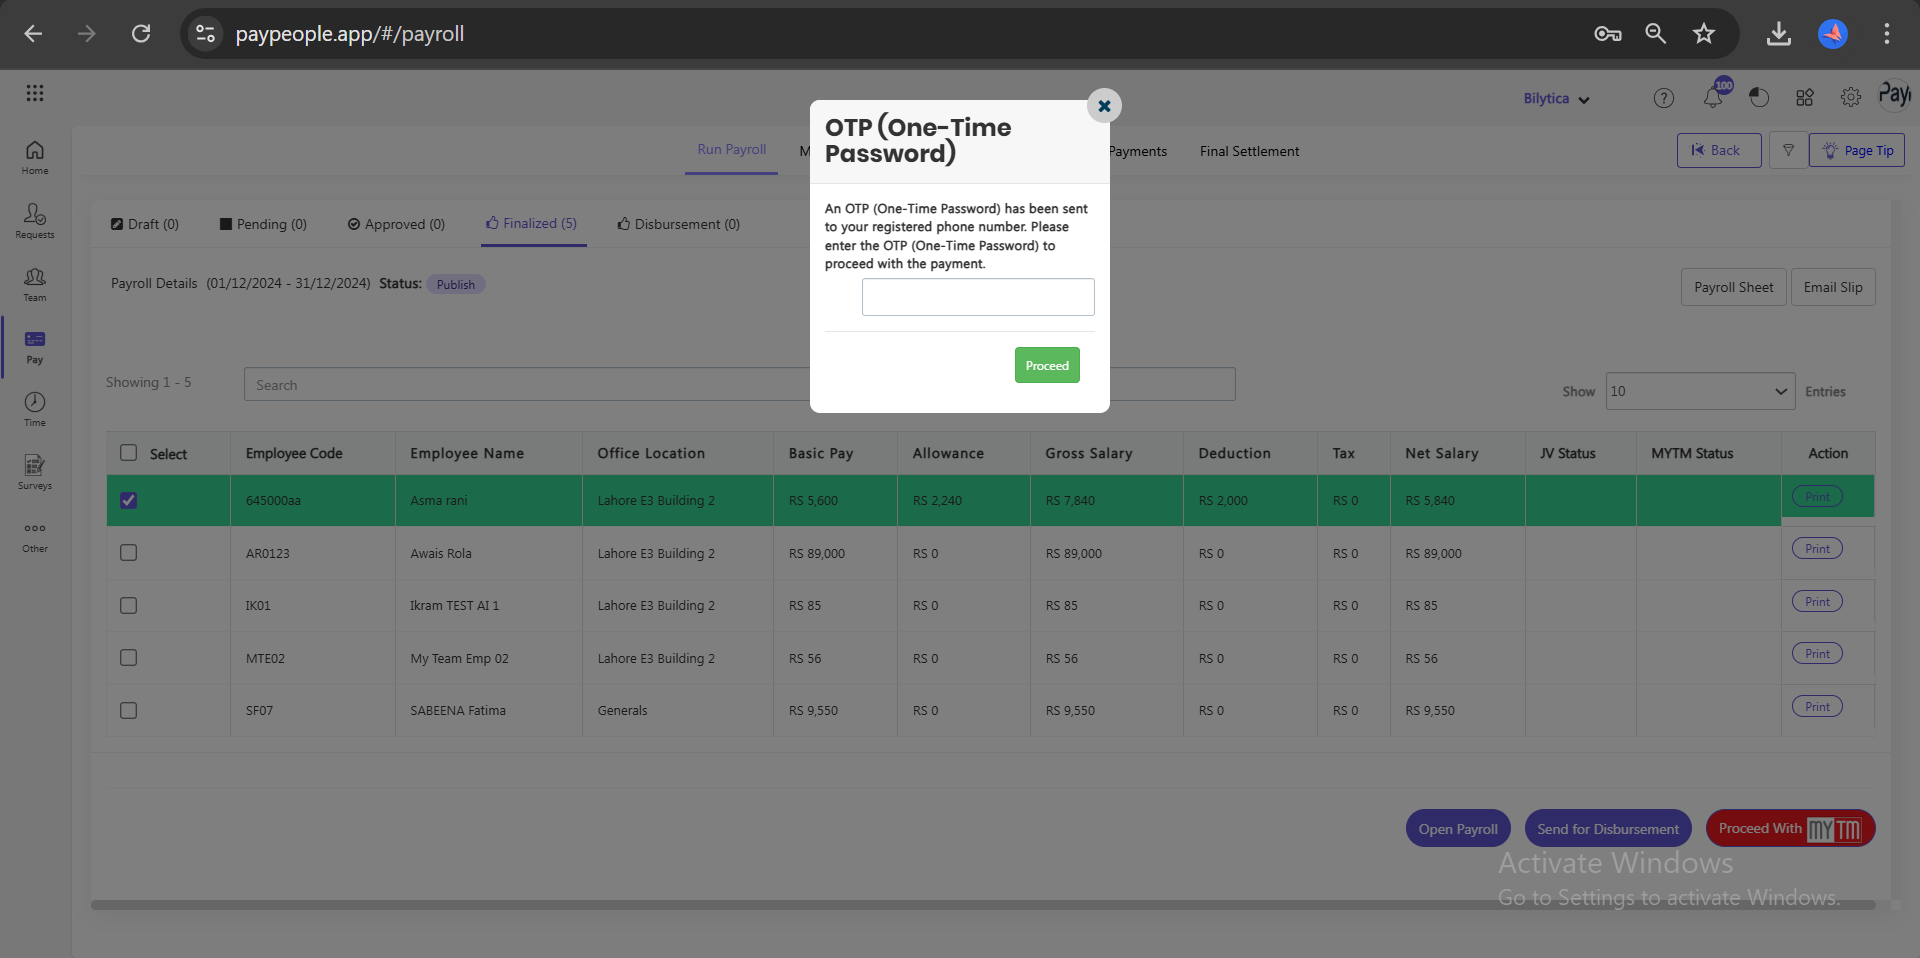
- Enter the OTP sent to your registered phone number in your MYTM account.
- Click Proceed button.
- A success message will be displayed if the payment is transferred successfully.
Abhi Integration #
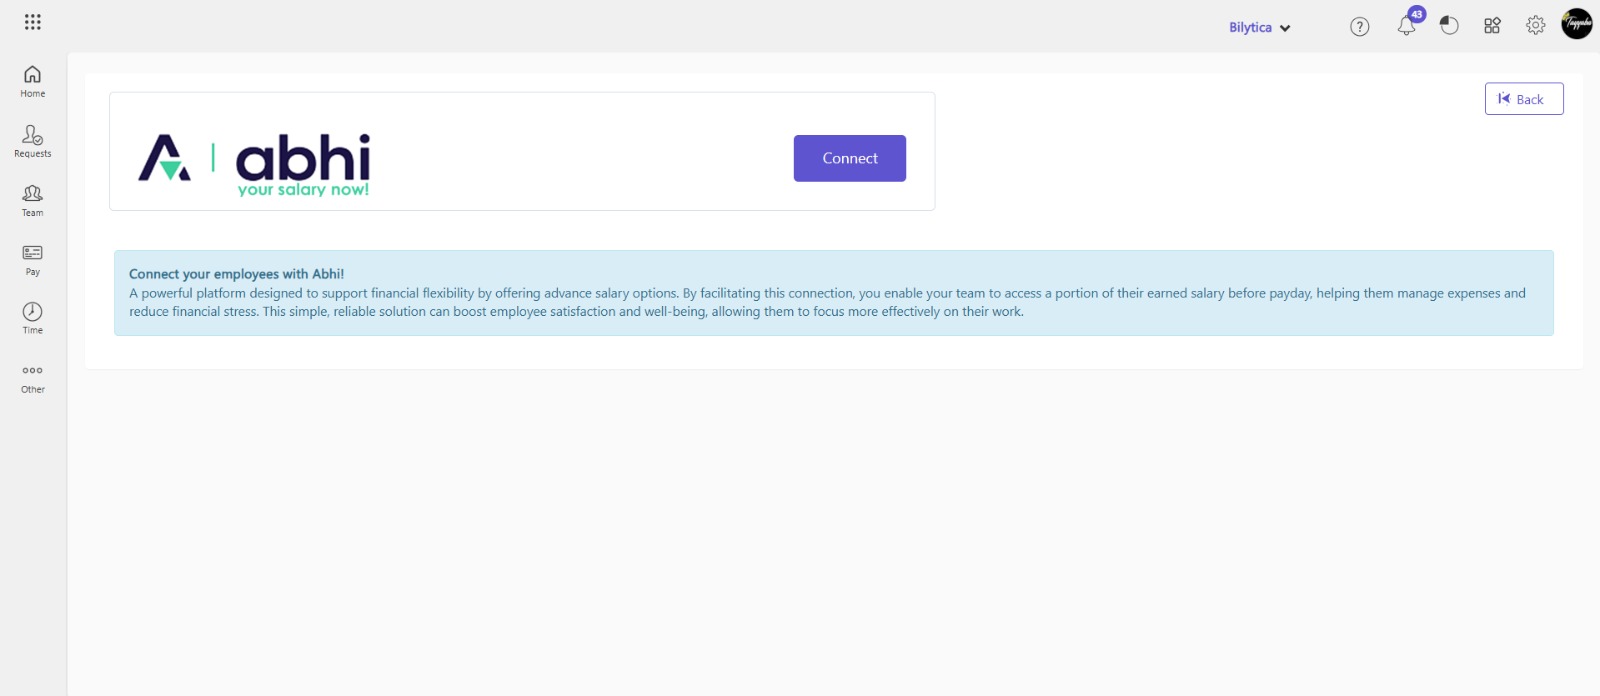
Integrating Abhi with PayPeople can streamline financial wellness offerings for employees, enhancing their experience and making financial services more accessible. It enable employees to apply for short-term or long-term loans via Abhi, integrated into PayPeople. Here’s a detailed look at how Abhi integrate with PayPeople:
- Go to Setup => Integrations => Abhi
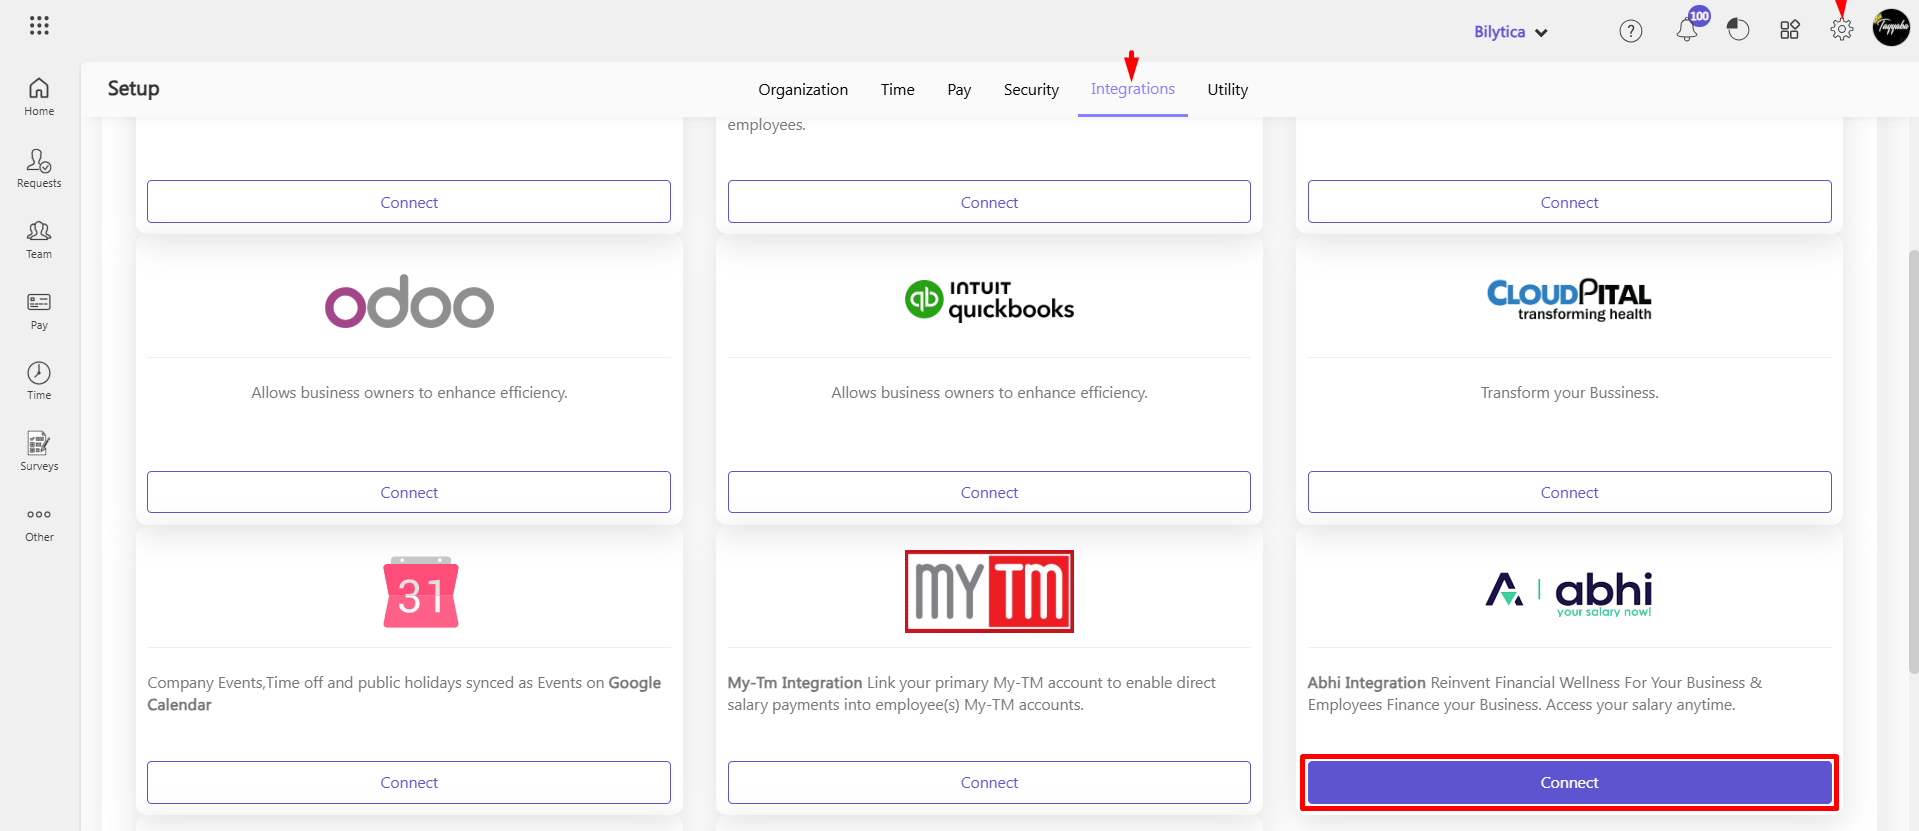
- Click Connect button.
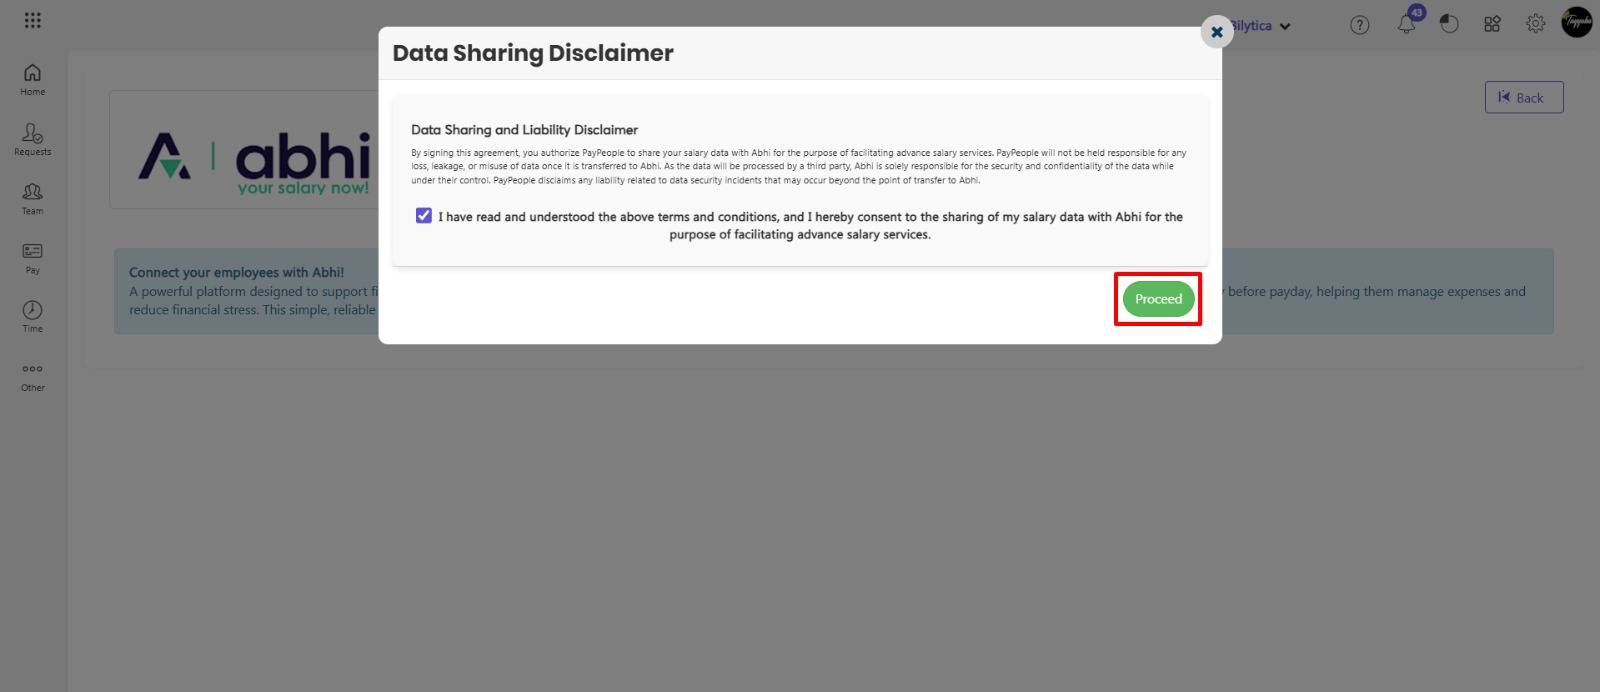
- Read the Terms and Conditions and check the checkbox for agree.
- Click Proceed button.
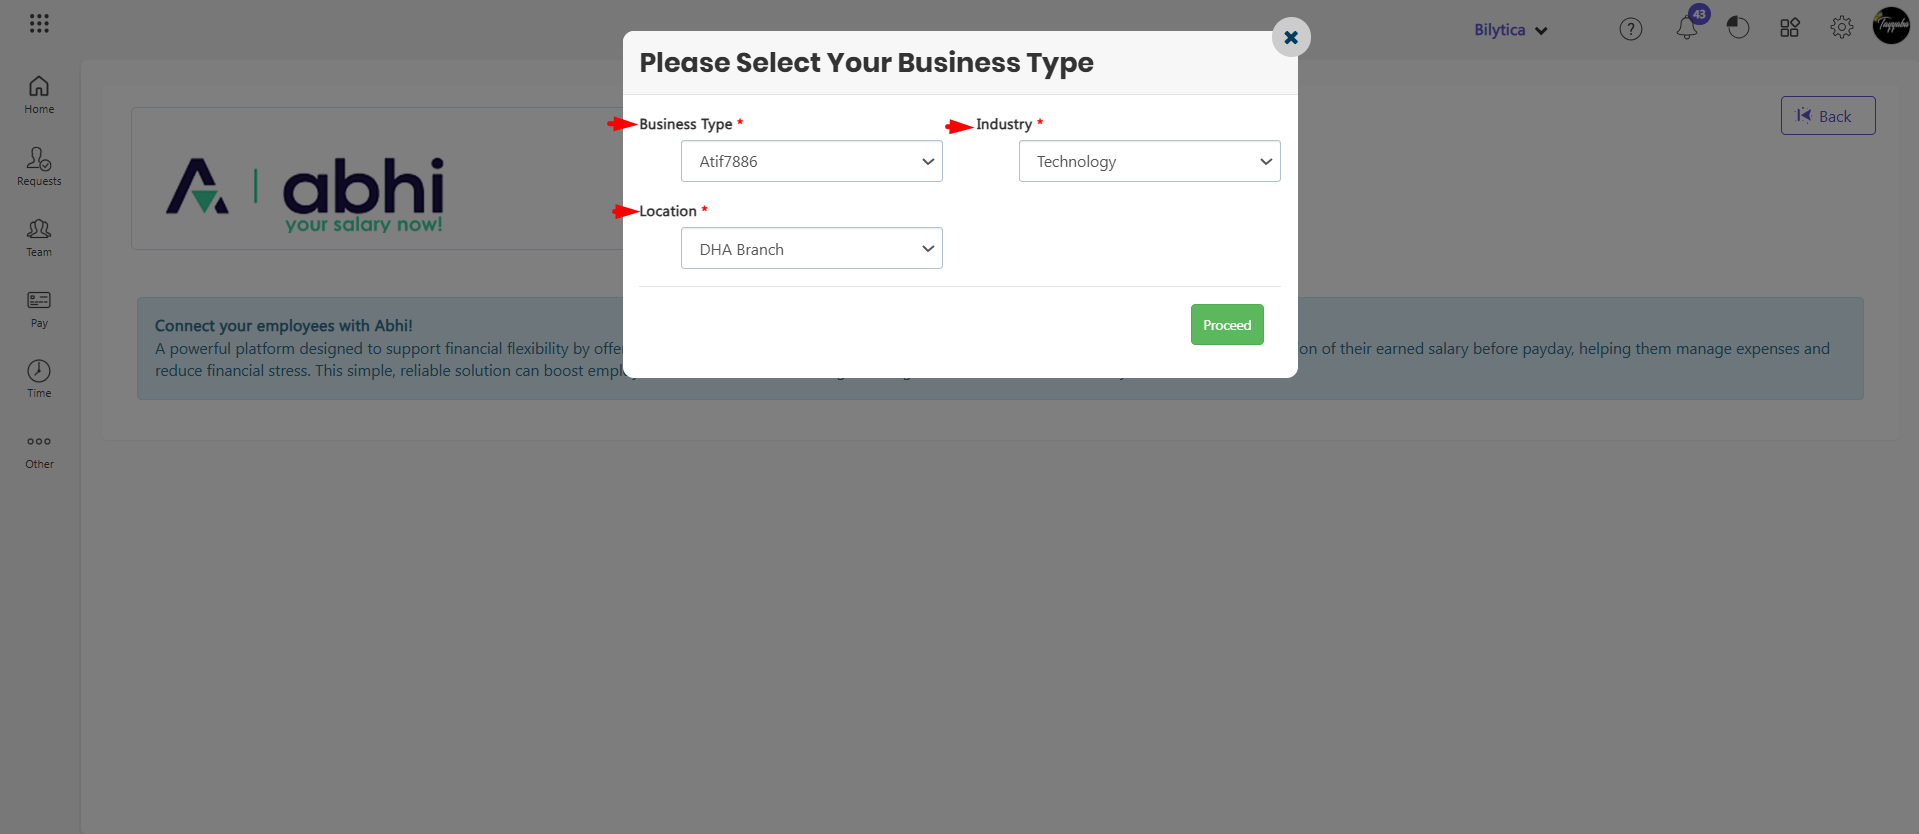
- Select the business type under the ‘Business Type’ field, the industry under the ‘Industry’ field, and set the location in the ‘Location’ field.
- Click the ‘Proceed’ button. A success message will be displayed.
- All your PayPeople employees will be displayed here under the ‘All Employees’ tab.
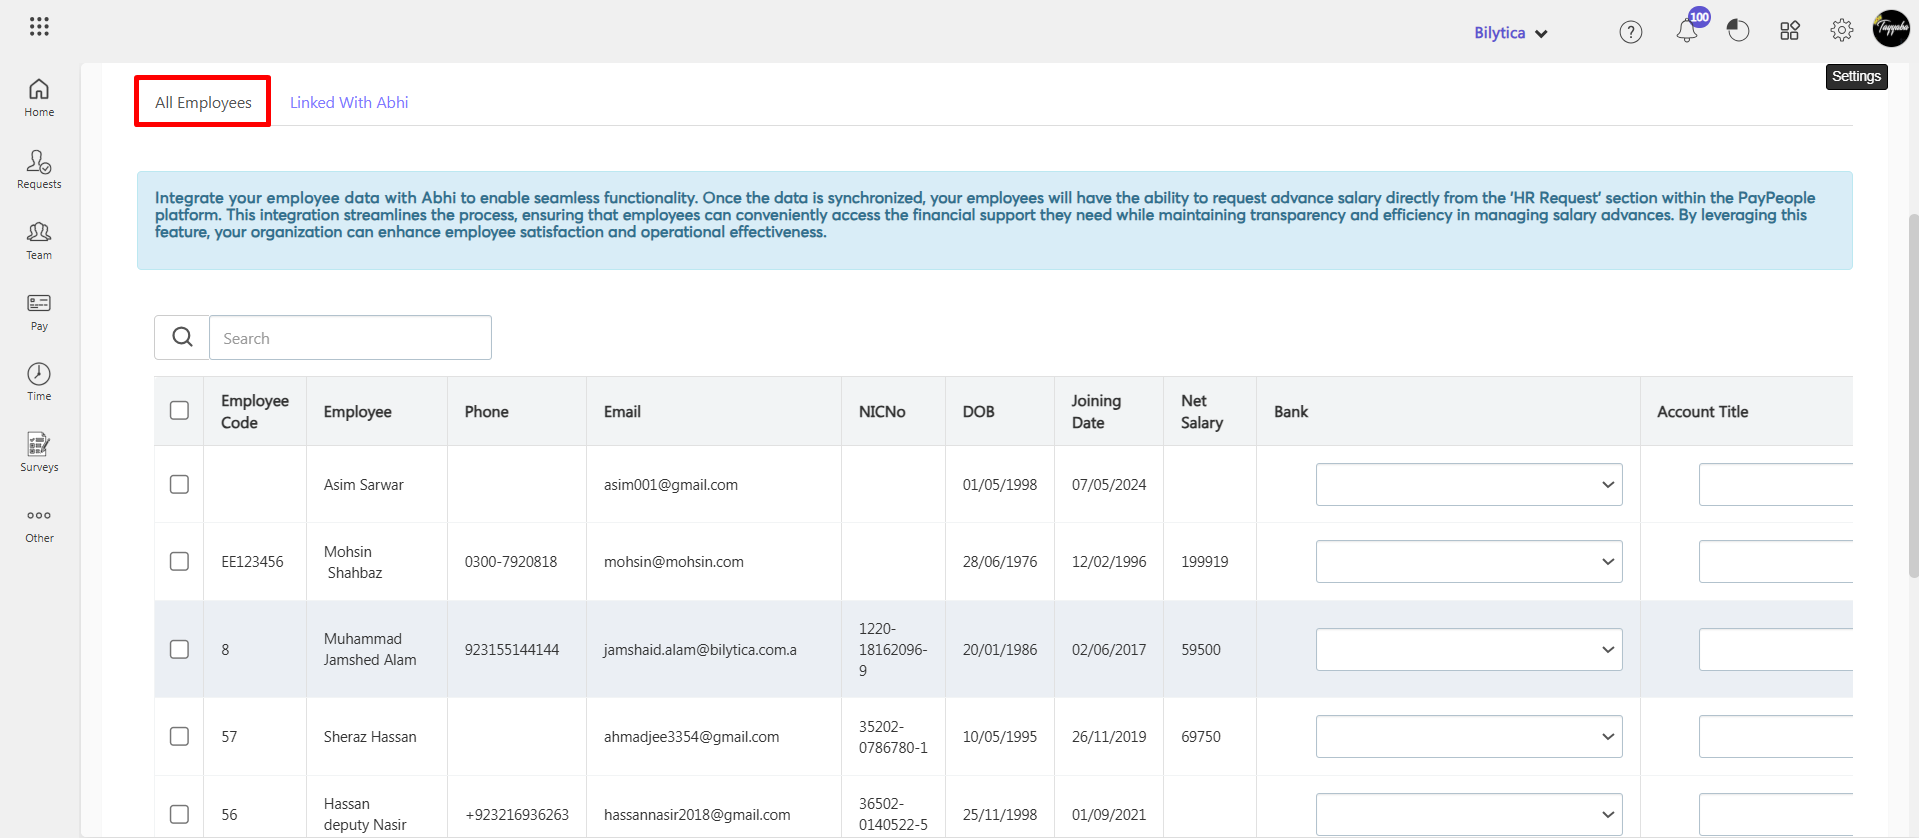
- Select employee you want to integrate with Abhi.
- Add employee bank, account title and account number.
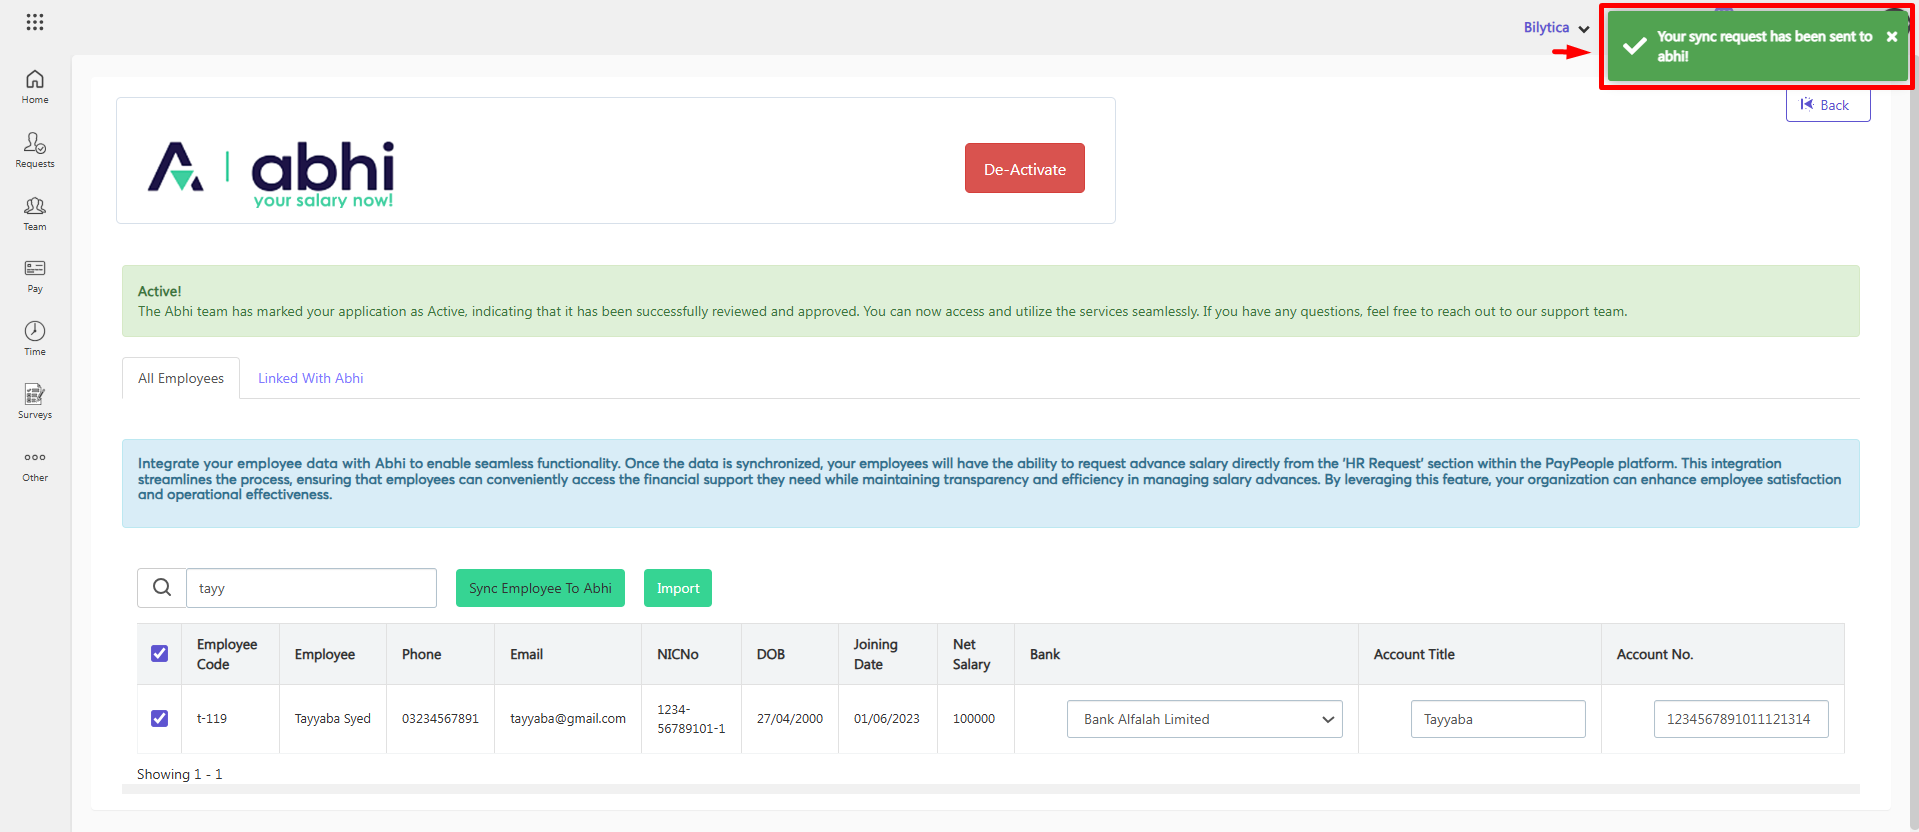
- Click Sync Employee To Abhi.
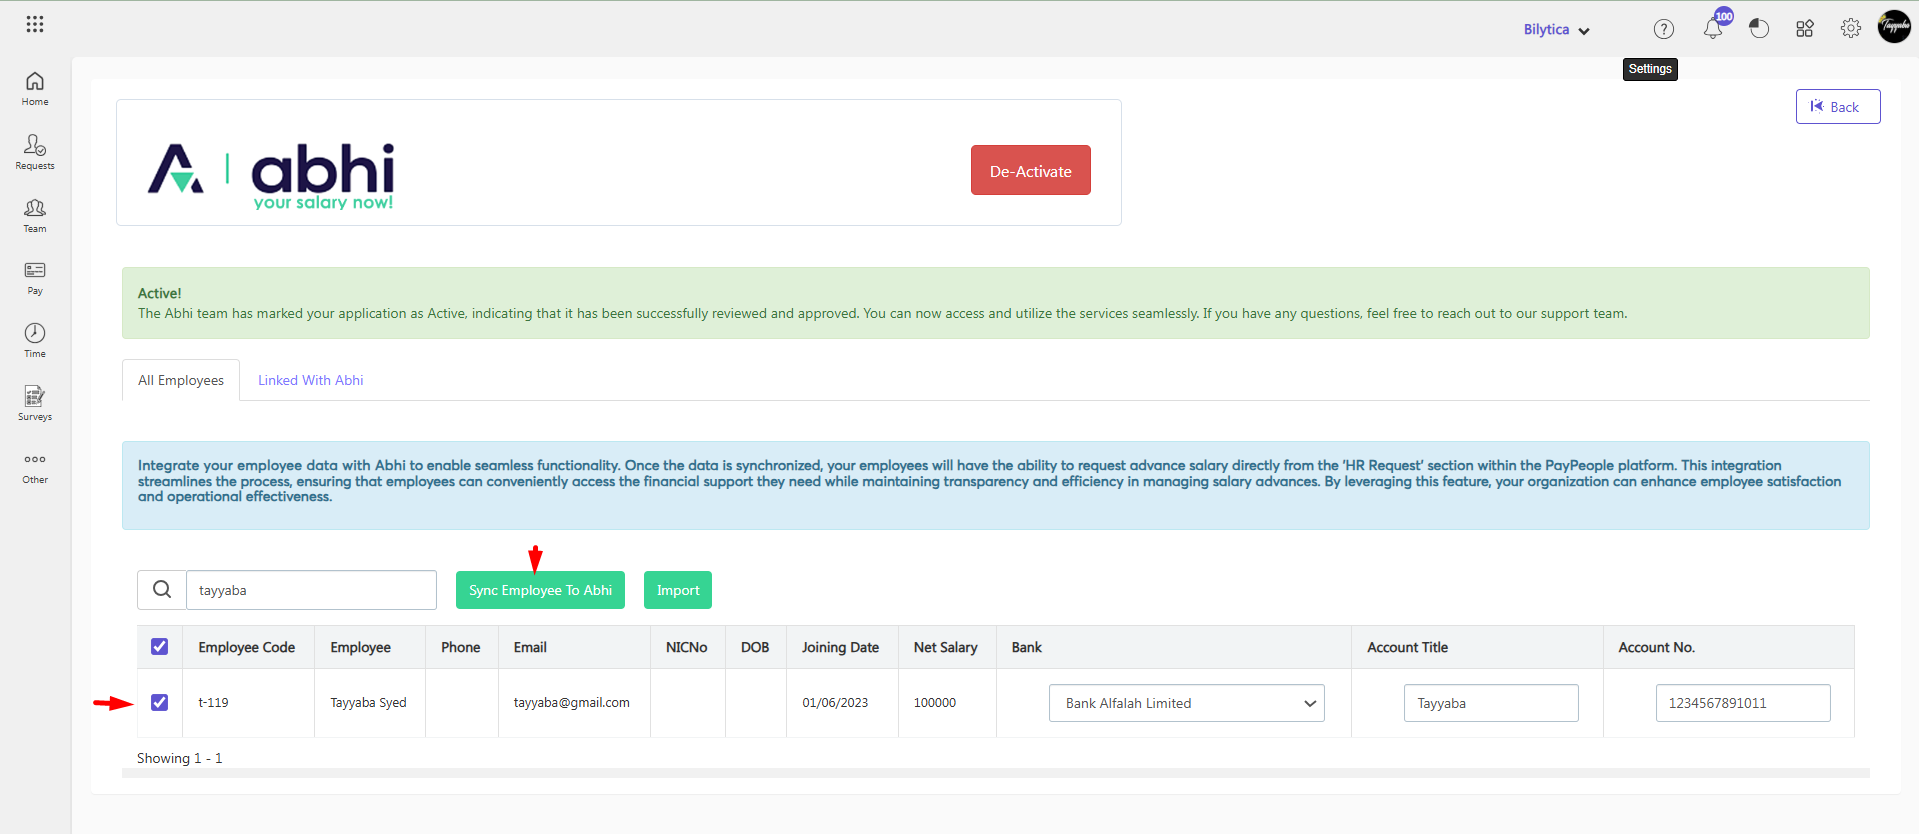
- You will receive a success message once it is successfully synced with Abhi.
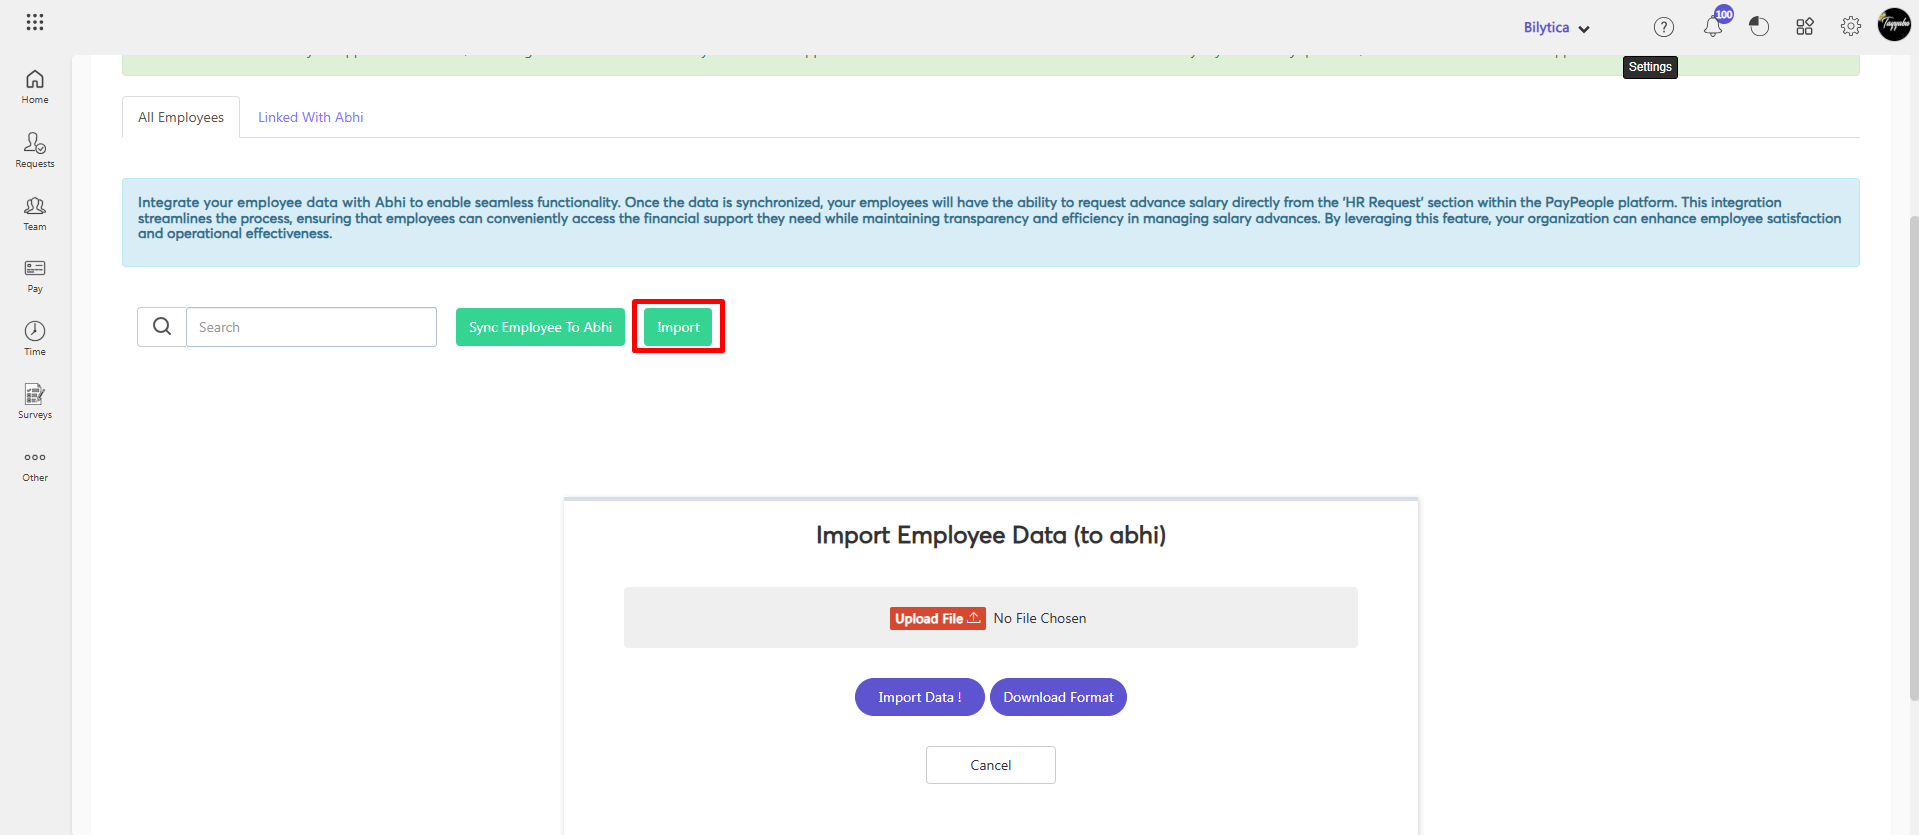
- By click on Import button you can also upload employees.
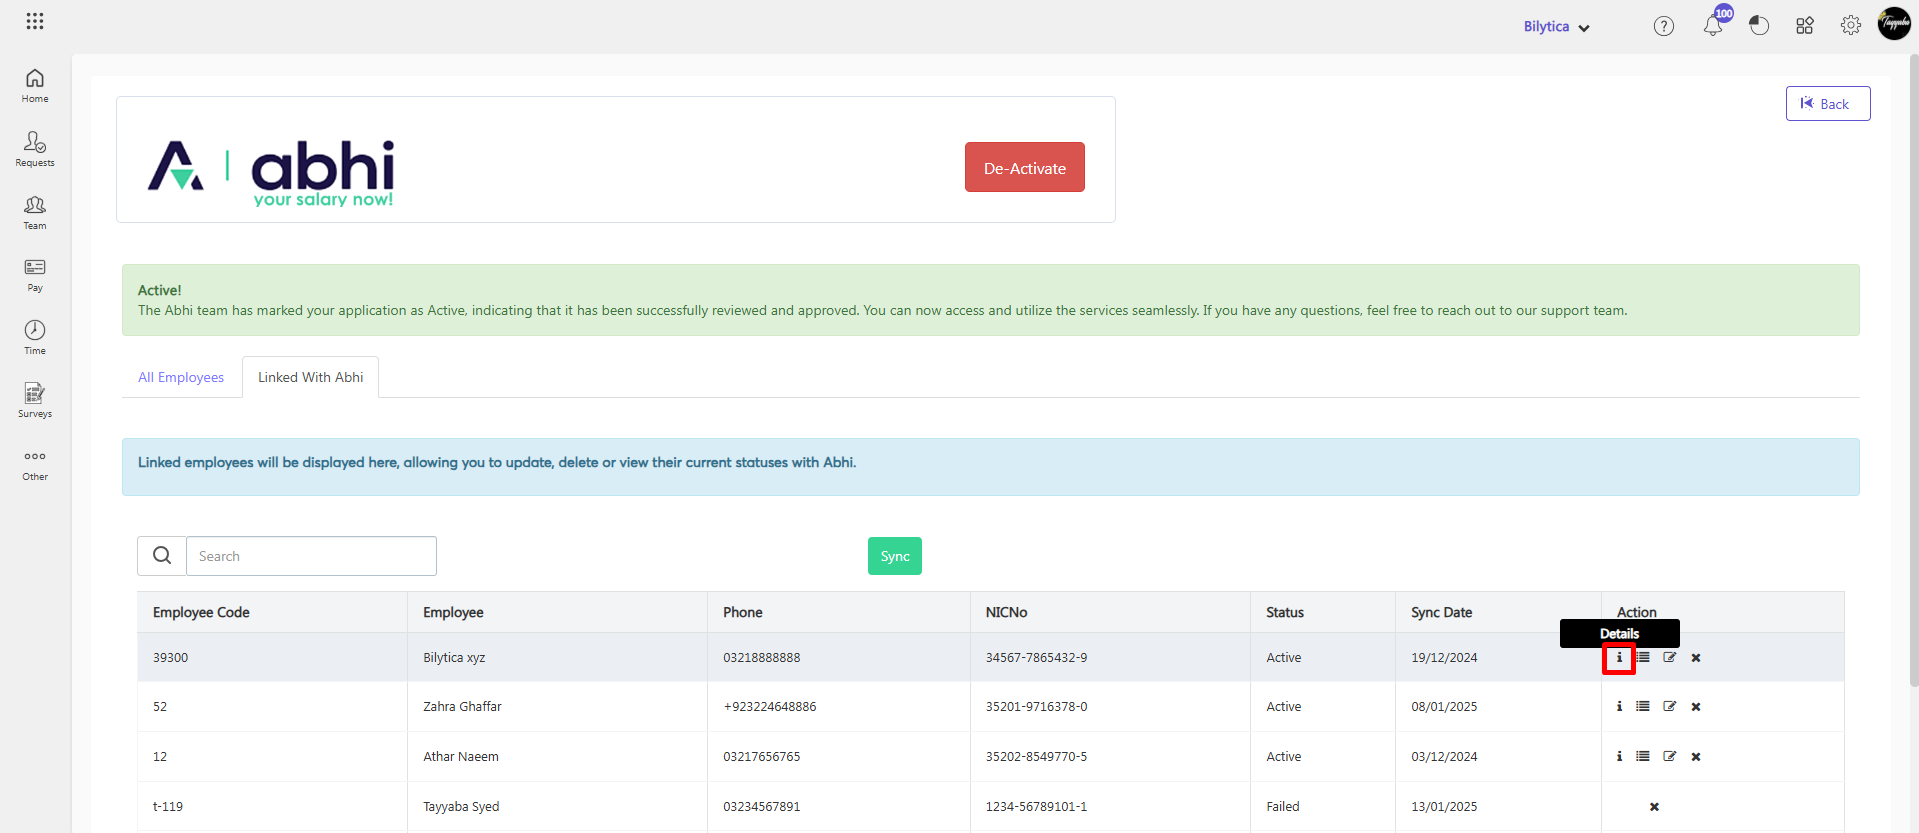
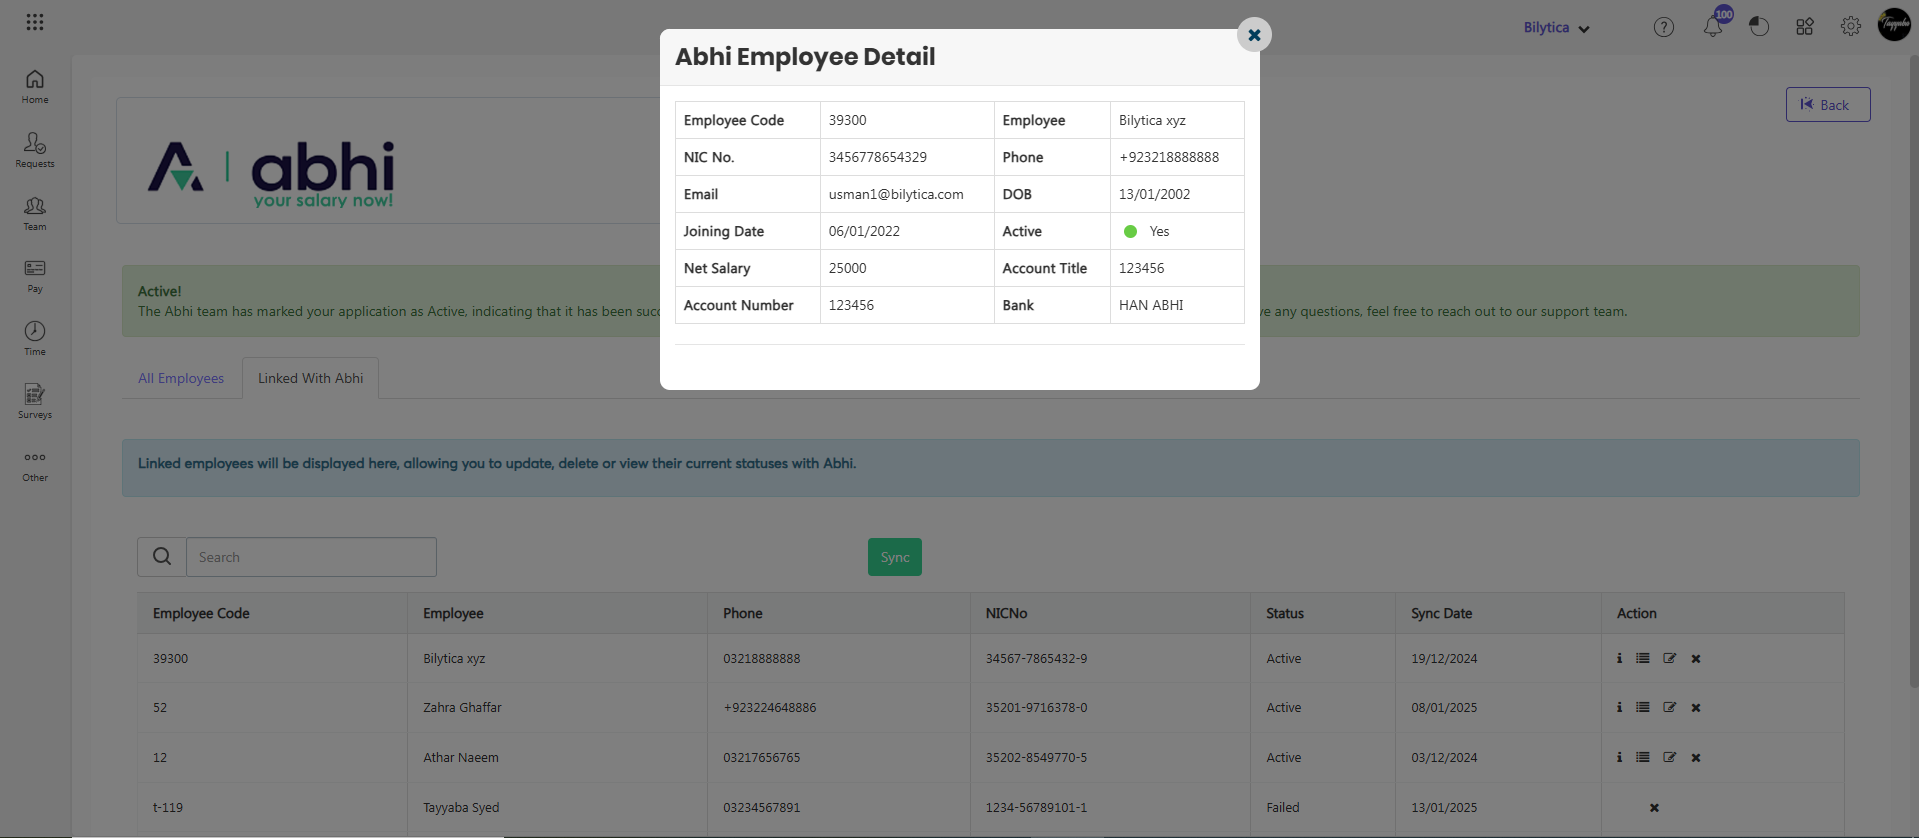
- In the ‘Linked With Abhi’ tab, you can view all employees whose integration has been completed with Abhi.
View Employee Details In Abhi #
- By clicking the detail icon, you can view the employee’s Abhi details.
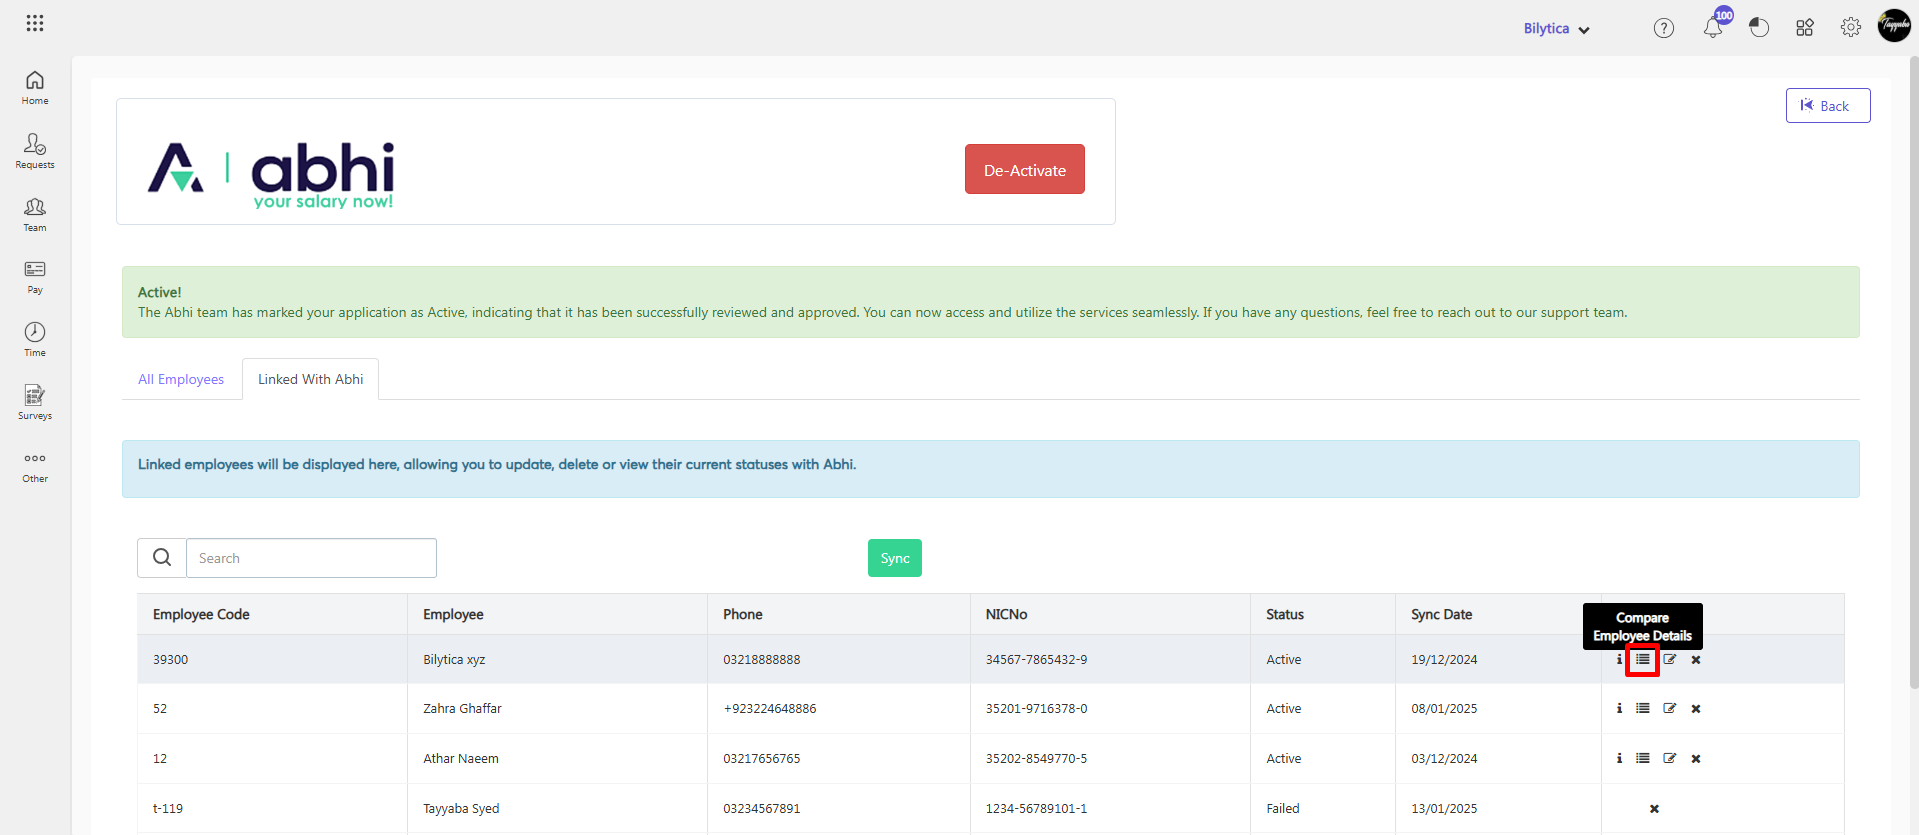
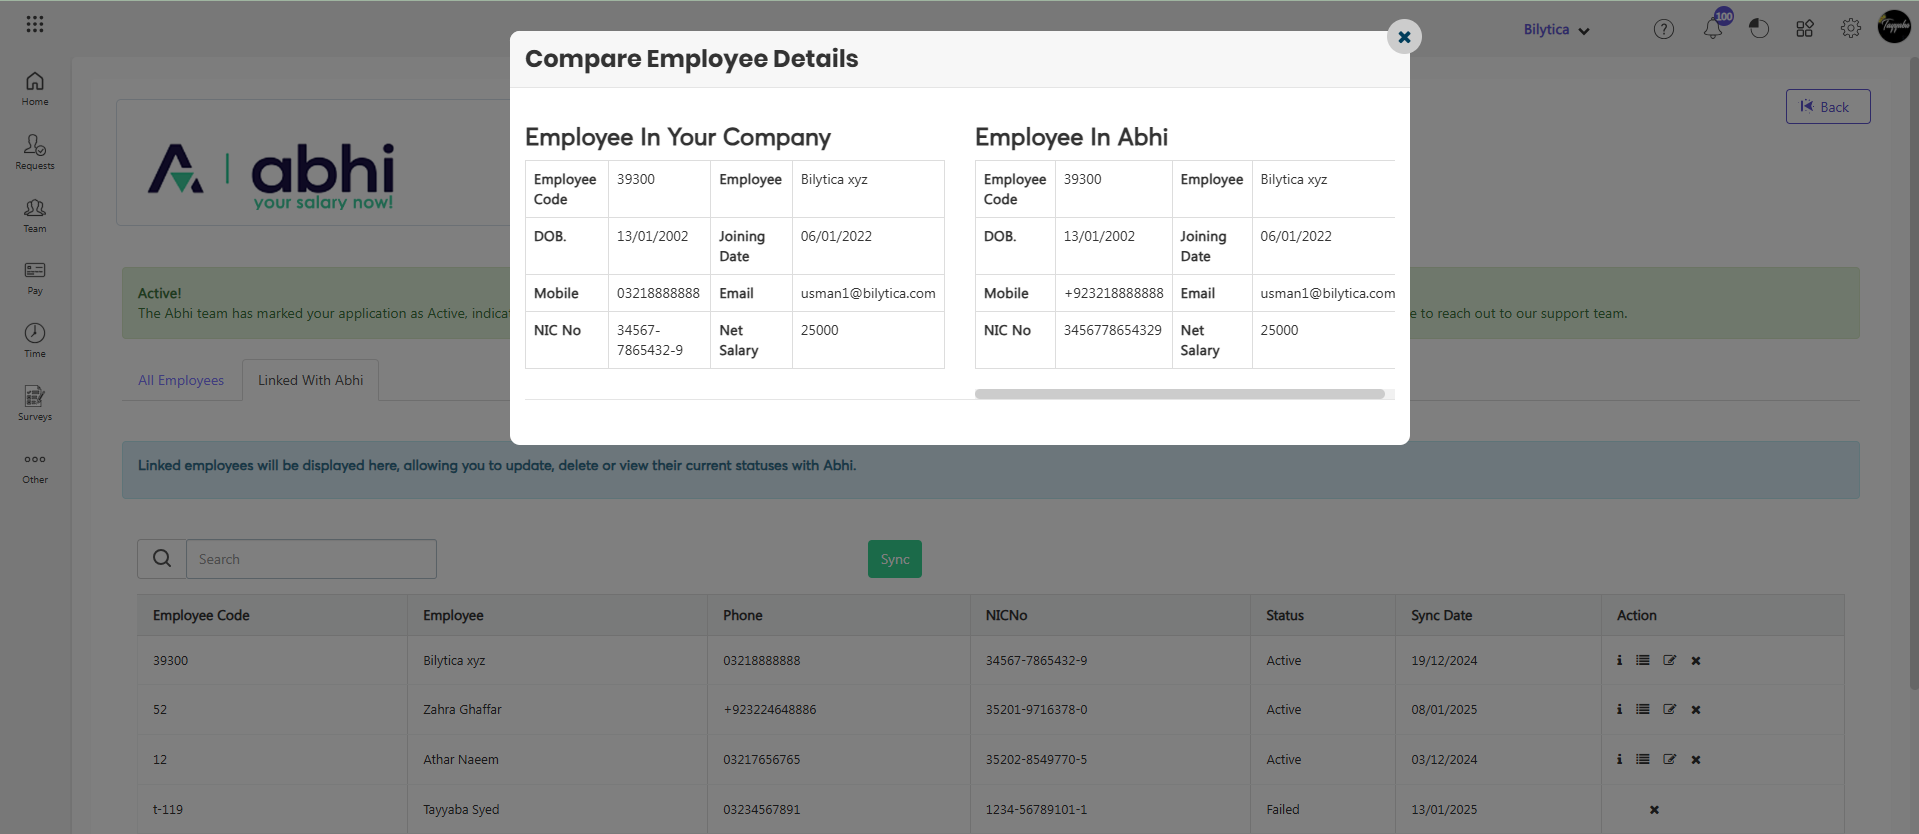
Compare Employee Details with Abhi #
- By clicking ‘Compare Employees Details’ icon, you can view the employee profile details for both PayPeople and Abhi.
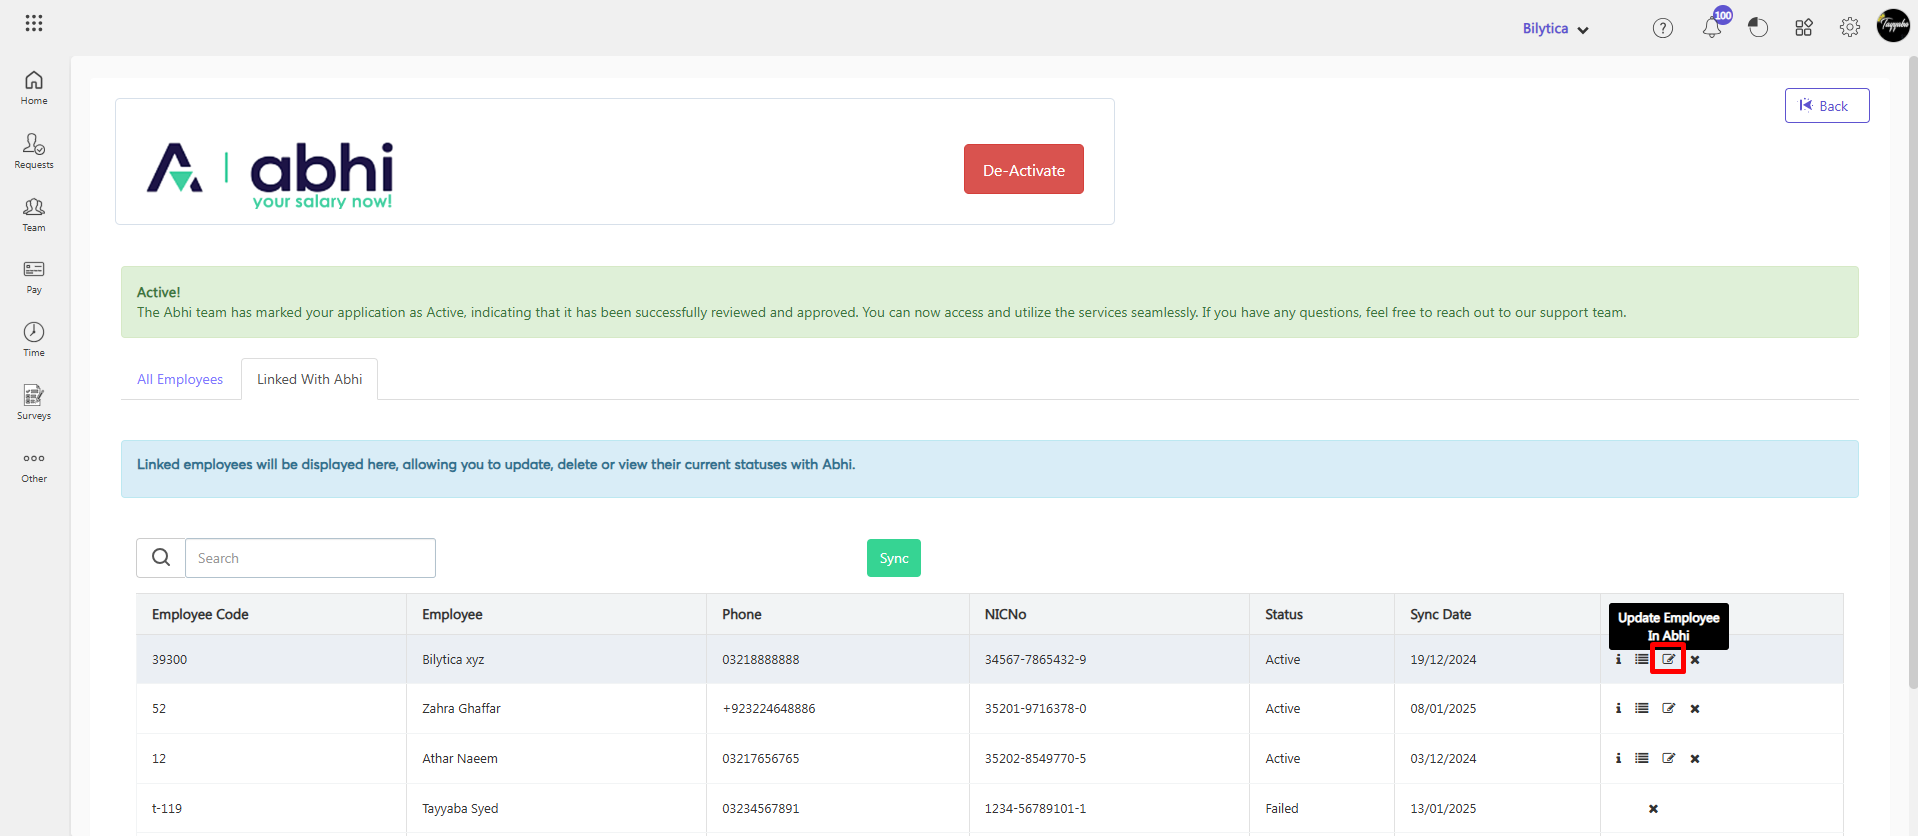
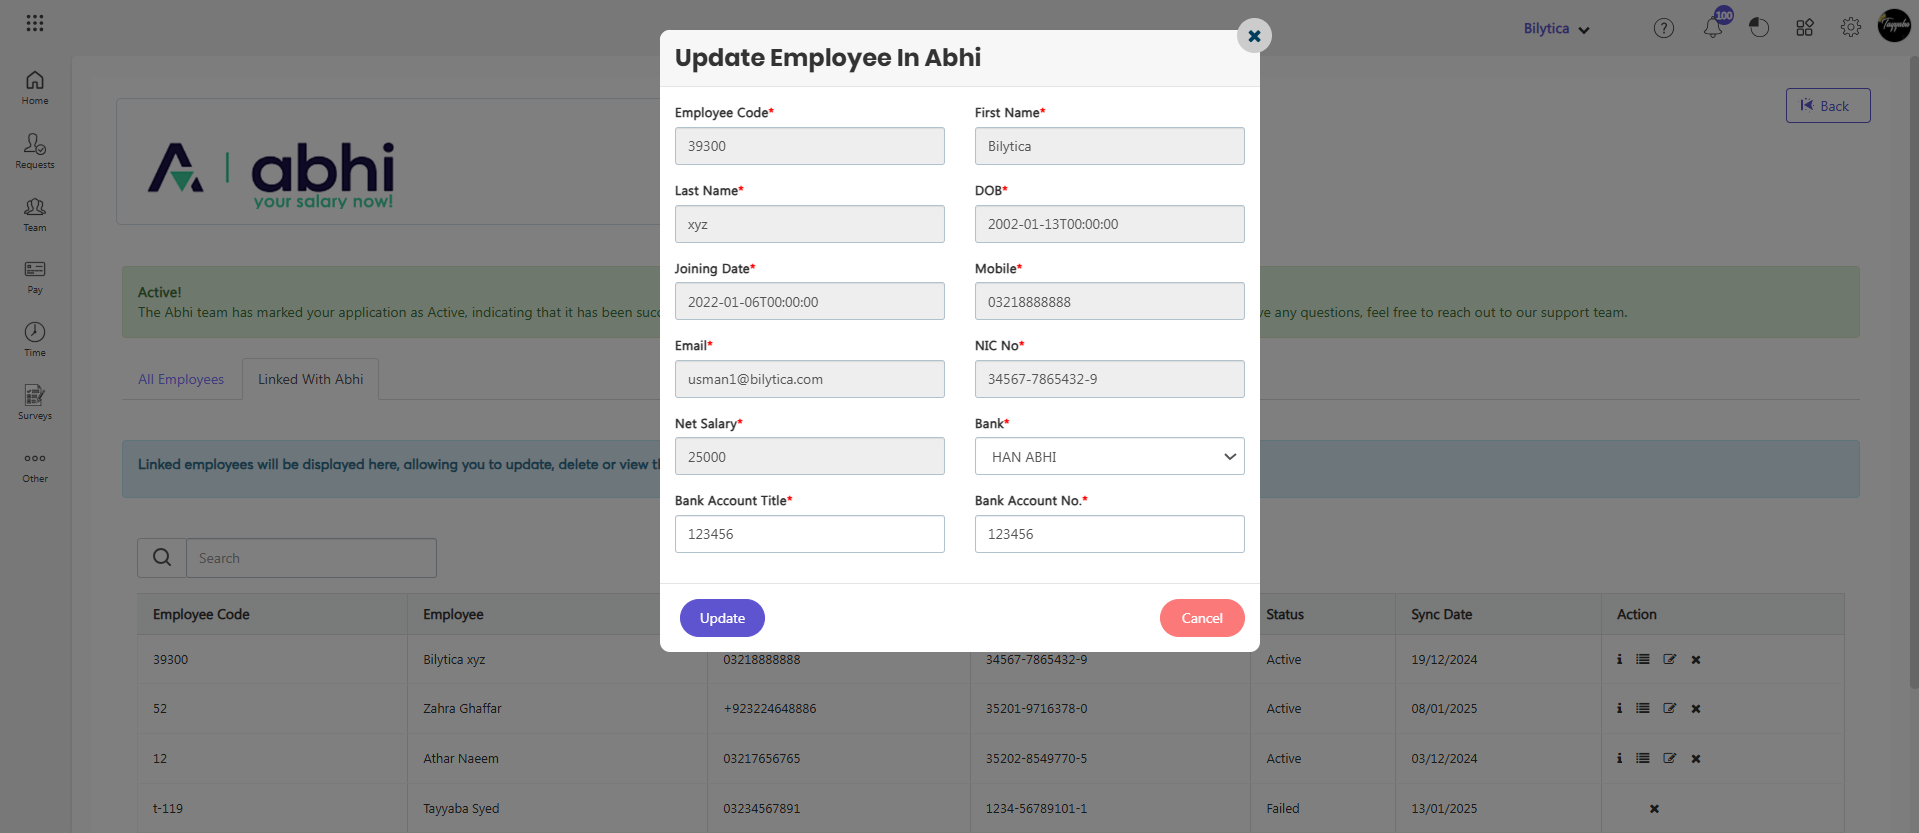
Update Employee Details in Abhi #
- By clicking the ‘Update Employee In Abhi’ icon, you can update the employee details.
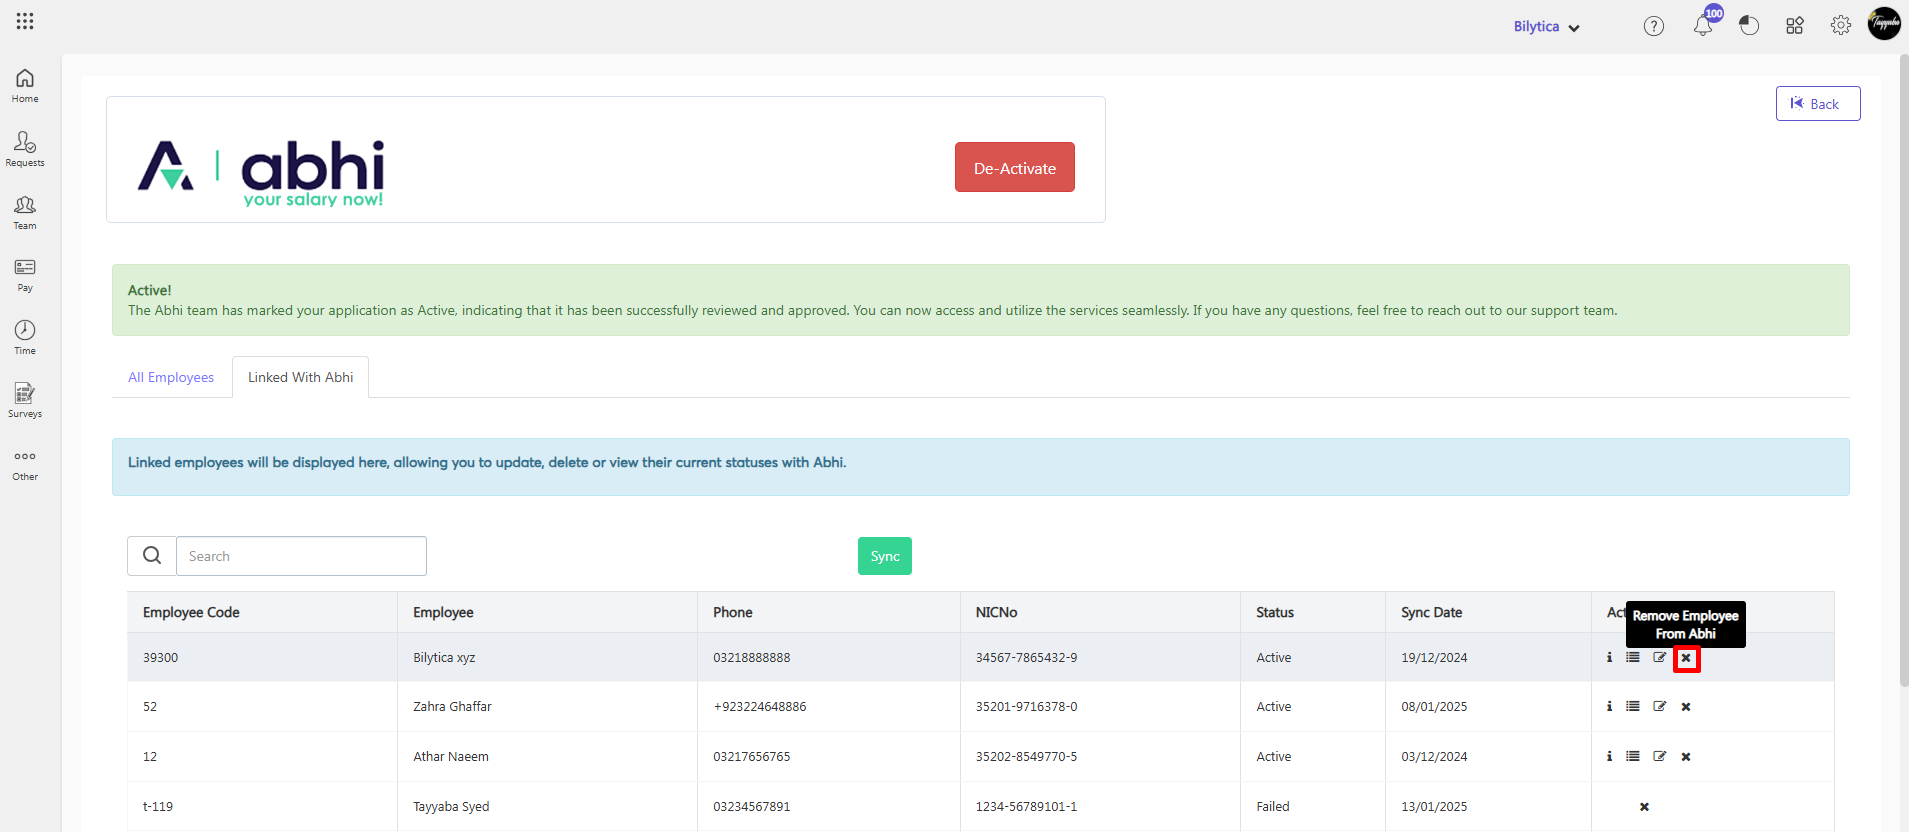
Remove Employee from Abhi #
- By clicking the ‘cross’ icon, you can remove the employee from Abhi.
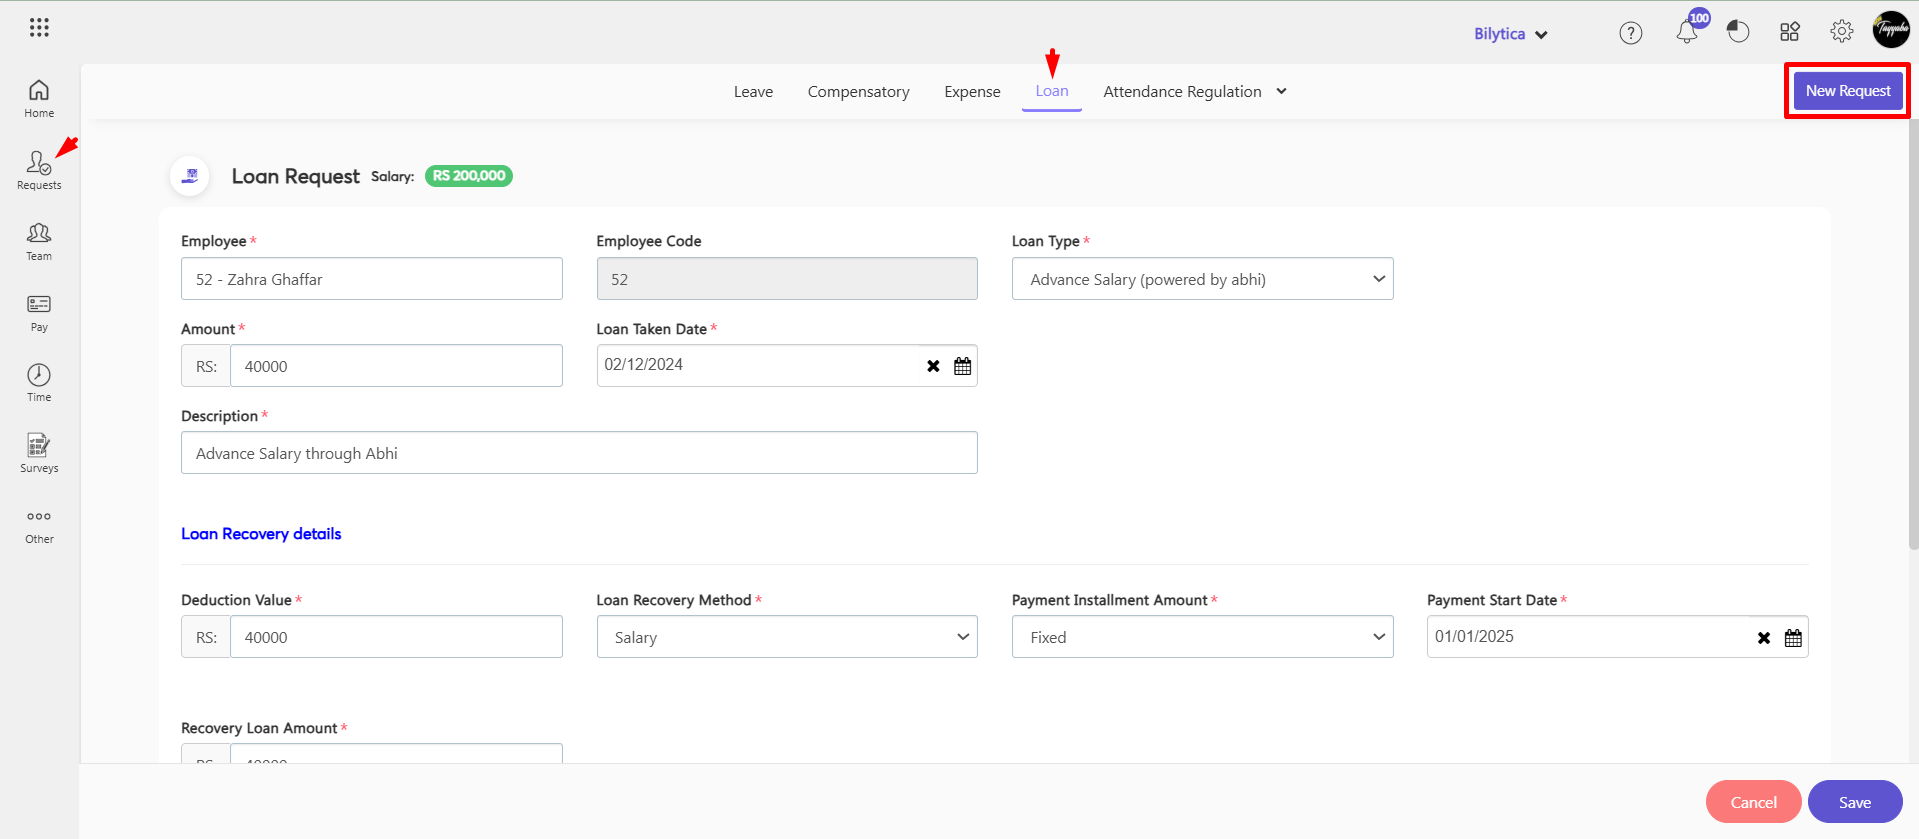
Request Advance Salary Through Abhi #
The employees who are registered with Abhi or re-synced with Abhi can apply for an advance salary request.
- Steps to Apply for Advance Salary (Powered by Abhi):
- Go to Request Section
- Go to Request => Loan => New Request
- Search for the Employee
- Search and select the employee for whom you want to add a request.
- Select Loan Type
- Choose the loan type as “Advance Salary (Powered by Abhi).”
- Enter Advance Amount
- Specify the advance amount that the employee is requesting.
- Select Loan Taken Date
- Choose the date when the advance is being taken.
- Add Description
- Provide a description or reason for the advance request.
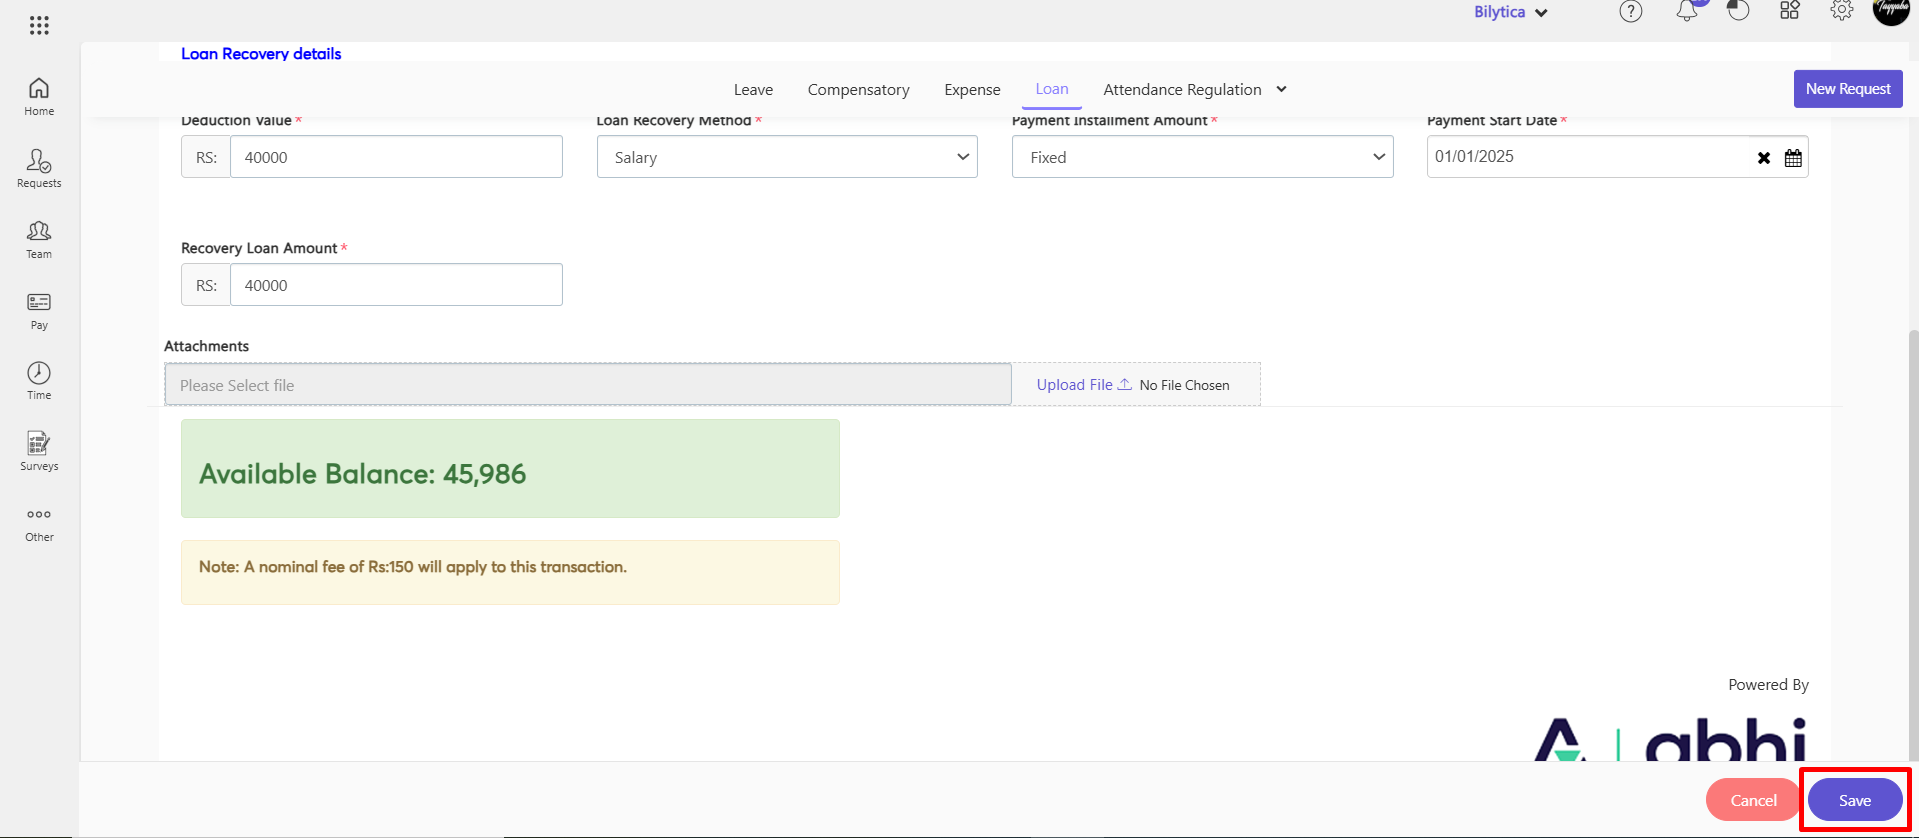
- Set Advance Deduction Value
- Enter the amount that will be deducted every month from the employee’s salary for repayment.
- Choose Loan Recovery Method
- Select the method of payment recovery:
- Deduction from monthly salary.
- Cash repayment.
- Select the method of payment recovery:
- Set Payment Installment Amount
- Specify the installment method for loan recovery:
- Fixed Amount.
- Percentage of Basic Salary.
- Specify the installment method for loan recovery:
- Select Payment Start Date
- Choose the start date from which the advance deductions will begin.
- Go to Request Section
- View Available Balance
- The available balance in Abhi will be displayed on the screen, helping you determine how much advance request you can add.
- Save Request
- Once all details are entered, submit the request for processing.
- You can view the pending Abhi advance requests.
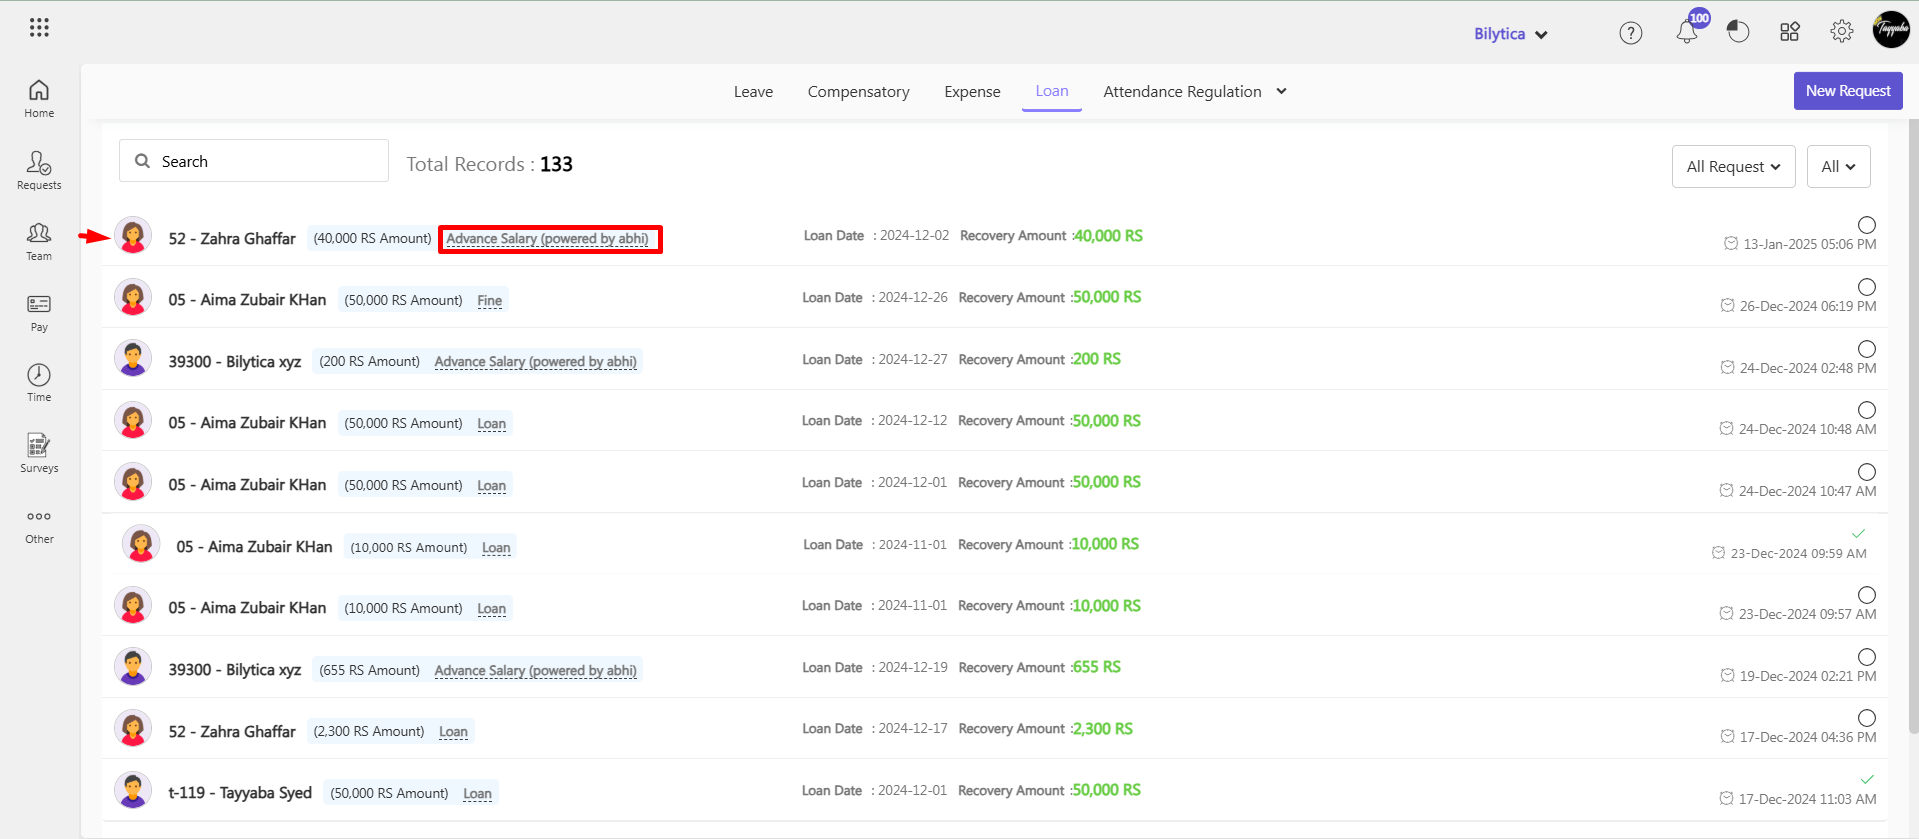
- After save the request will show on approver’s dashboard in Pending task.
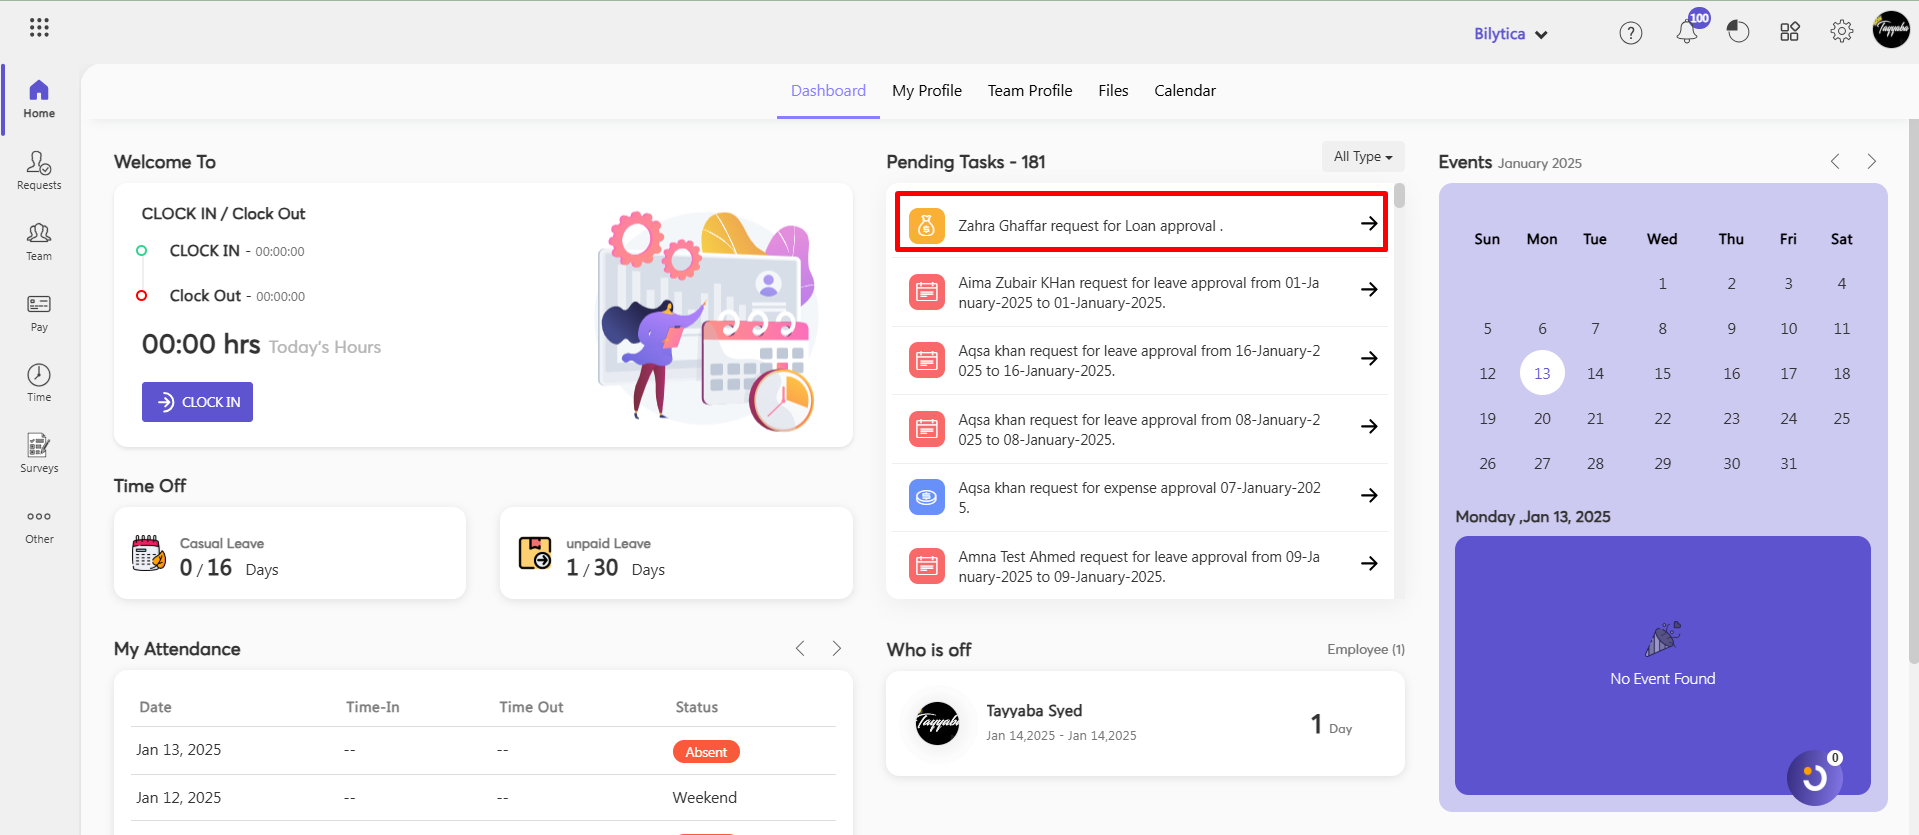
- By click on pending button approver can Accept the Reject the request.

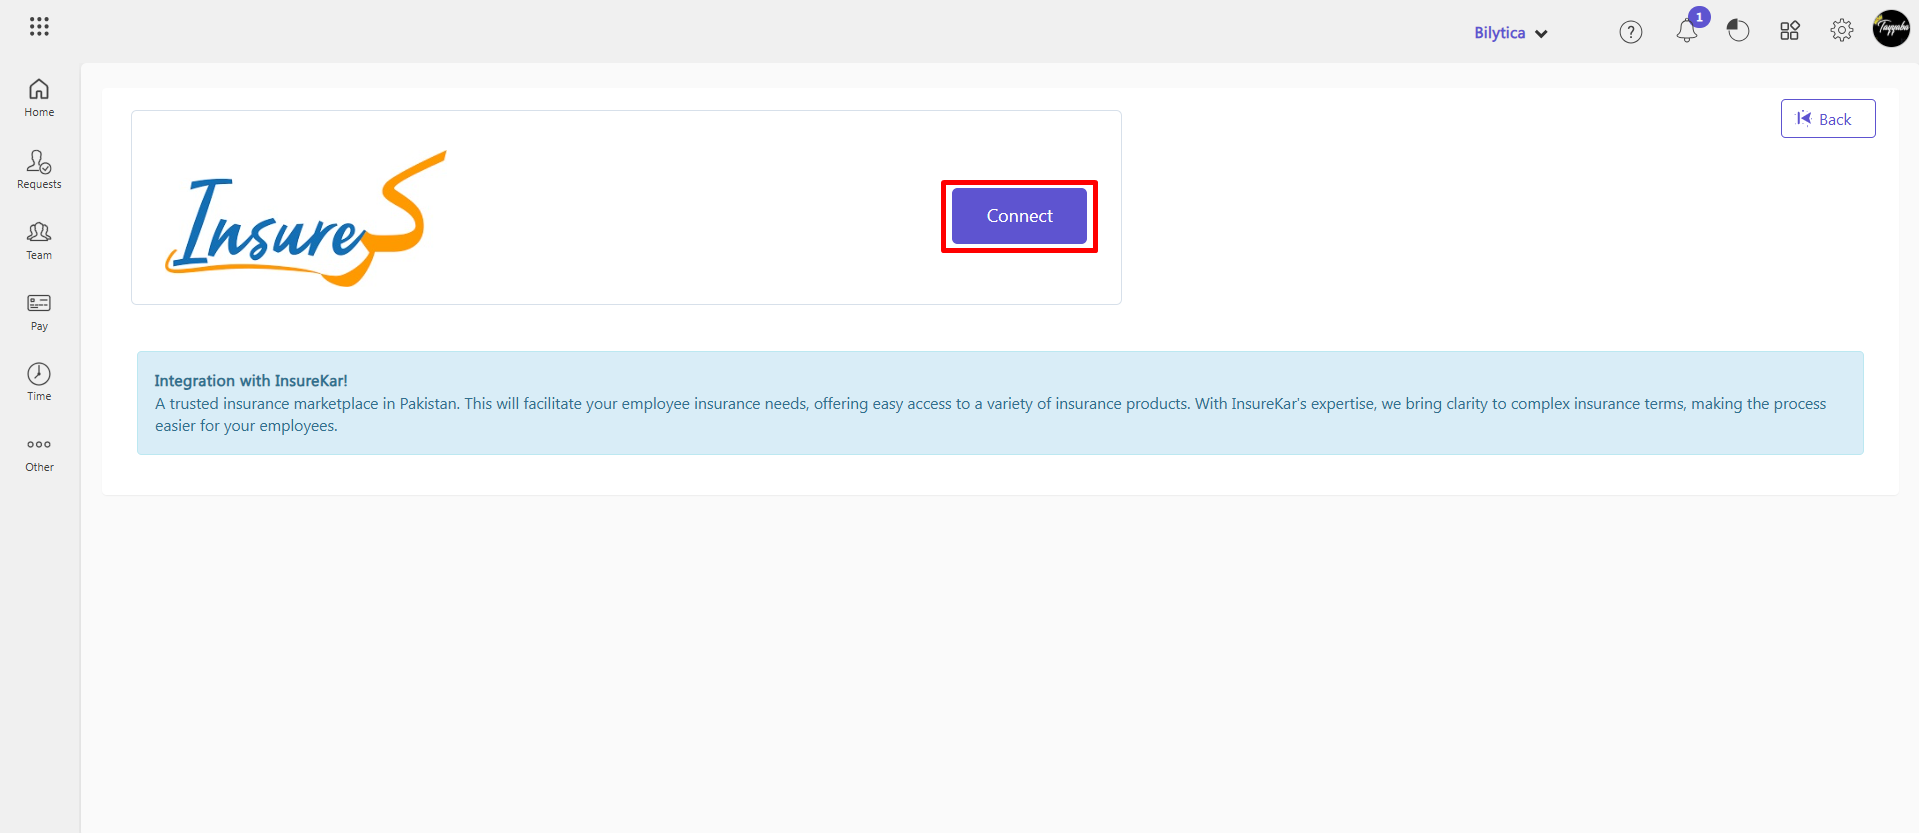
InsureKar Integration #
Integrating InsureKar with PayPeople could offer employees easy access to insurance products directly within the platform, streamlining the process of managing insurance. Here’s a detailed look at how InsureKar integrate with PayPeople:
- Go to Setting => Integration tab => Click on “Connect” button under InsureKar.
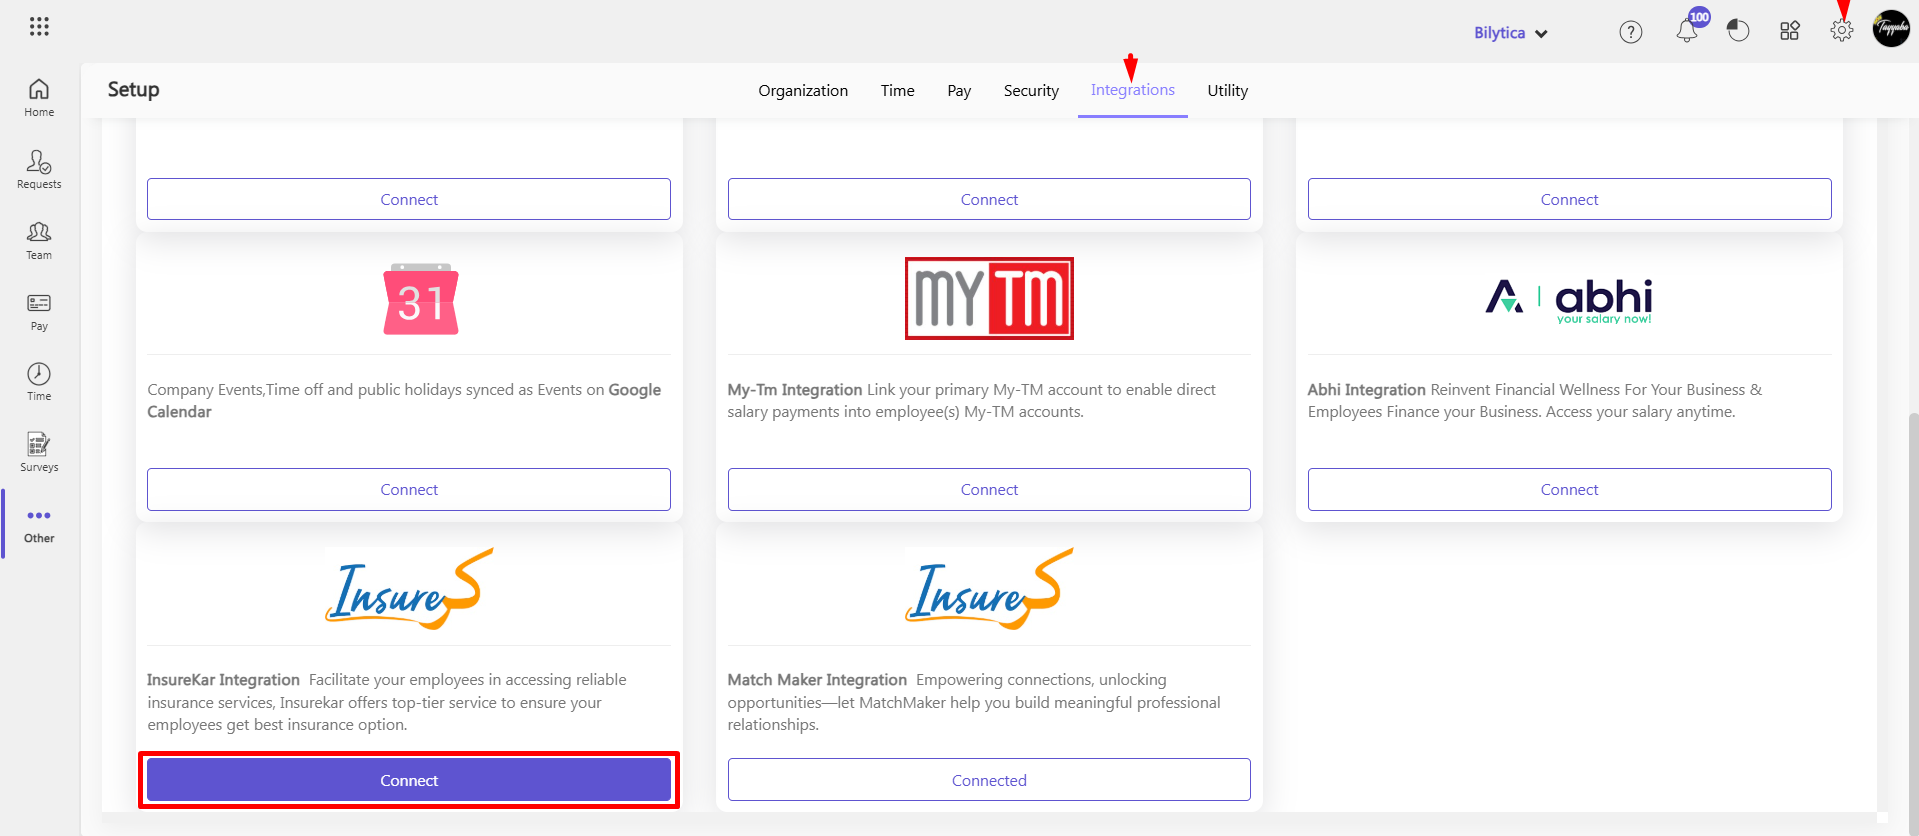
- Click Connect button.
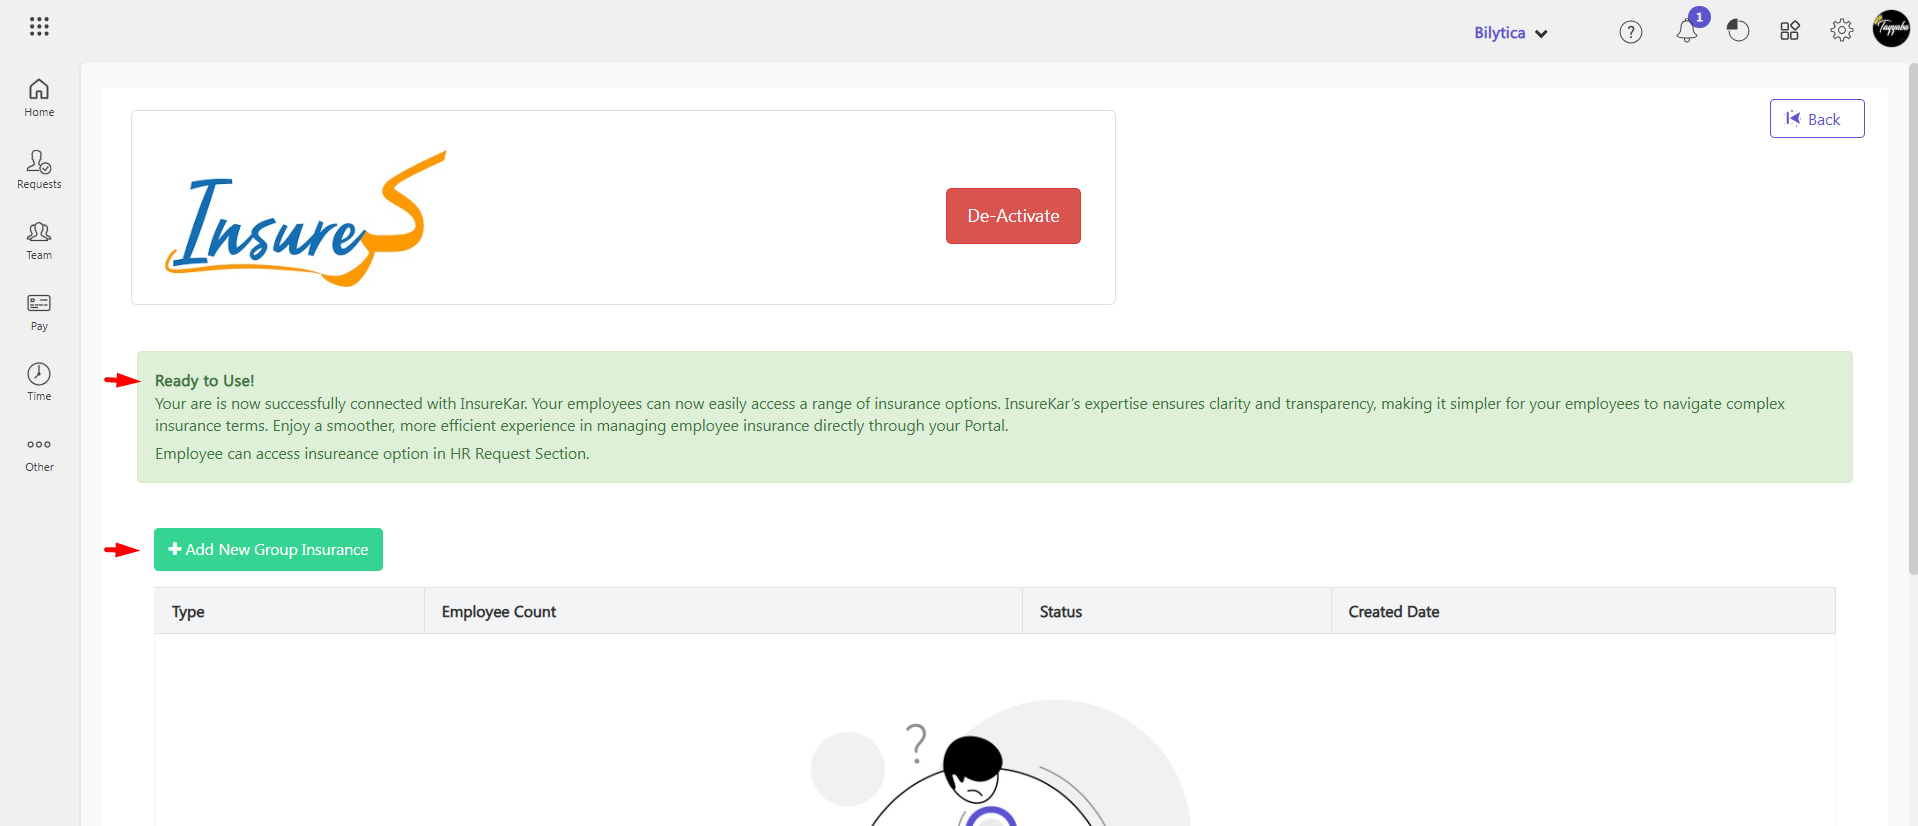
- Success message and Ready to Use message will show on your screen.
- By clicking the De-Active button, you can deactive the InsureKar account.
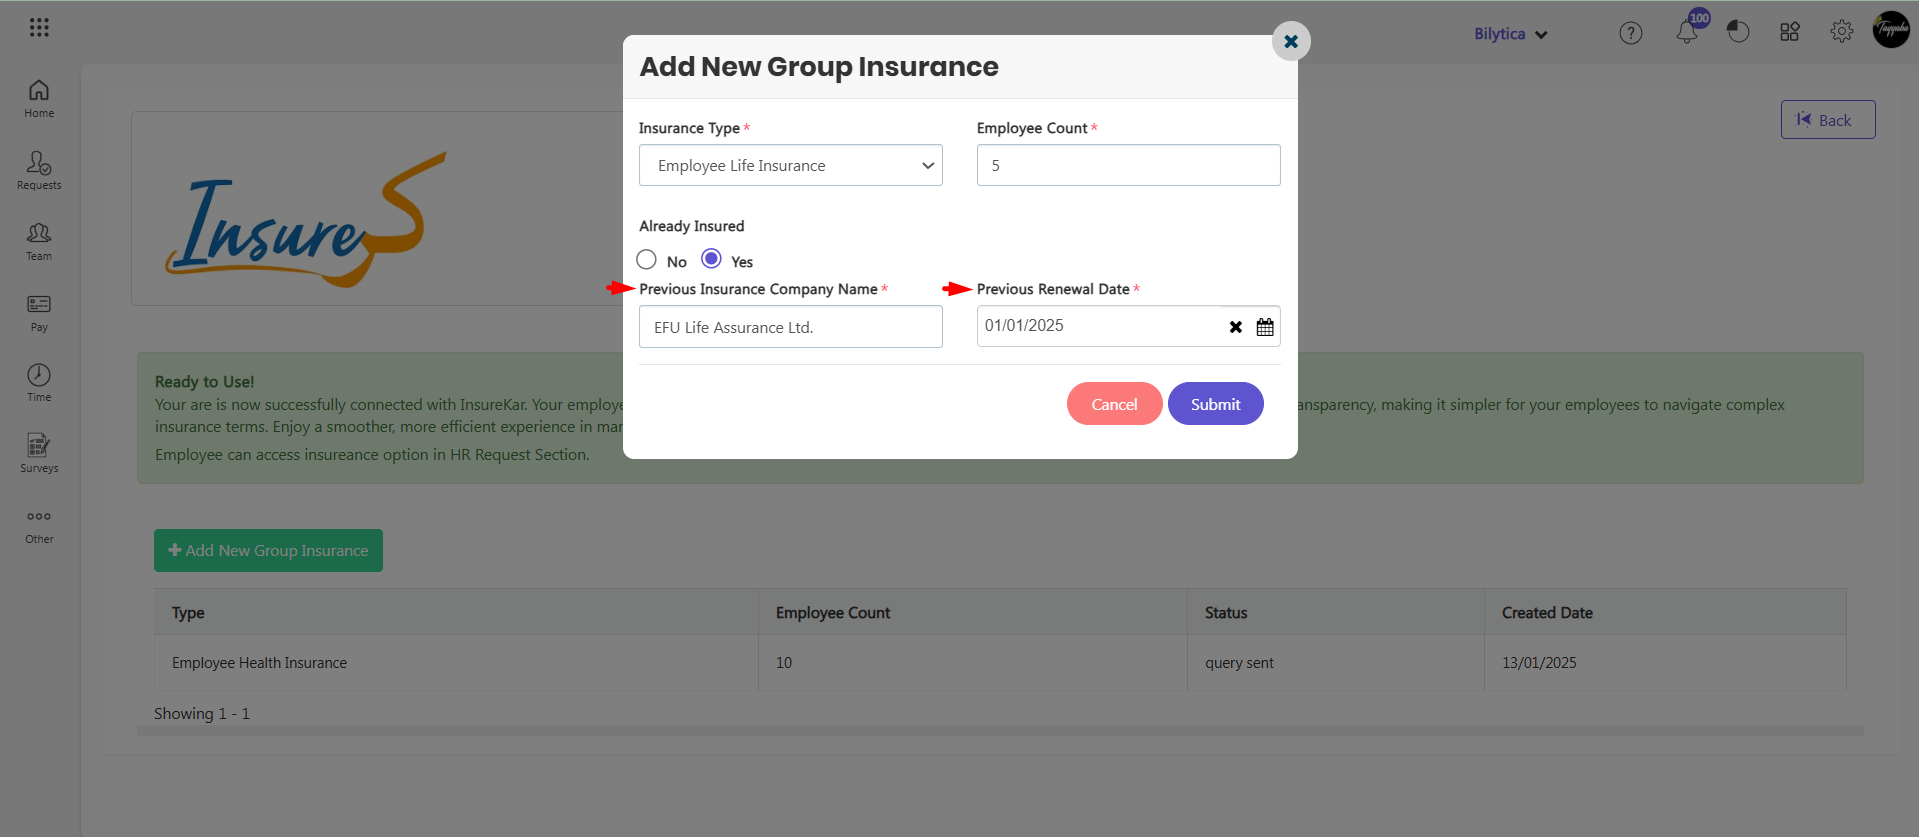
- Click +Add New Group Insurance button to add group.
- Add insurance type under Insurance Type.
- Write employee head count under Employee Count.
- Click No if employees are not insured before this policy.

- Click Yes if employee are already register in insuance policy.
- Write previous company name under Previous Insurance Company Name.
- Add date under Previous Renewal Date.
- Click submitt button.
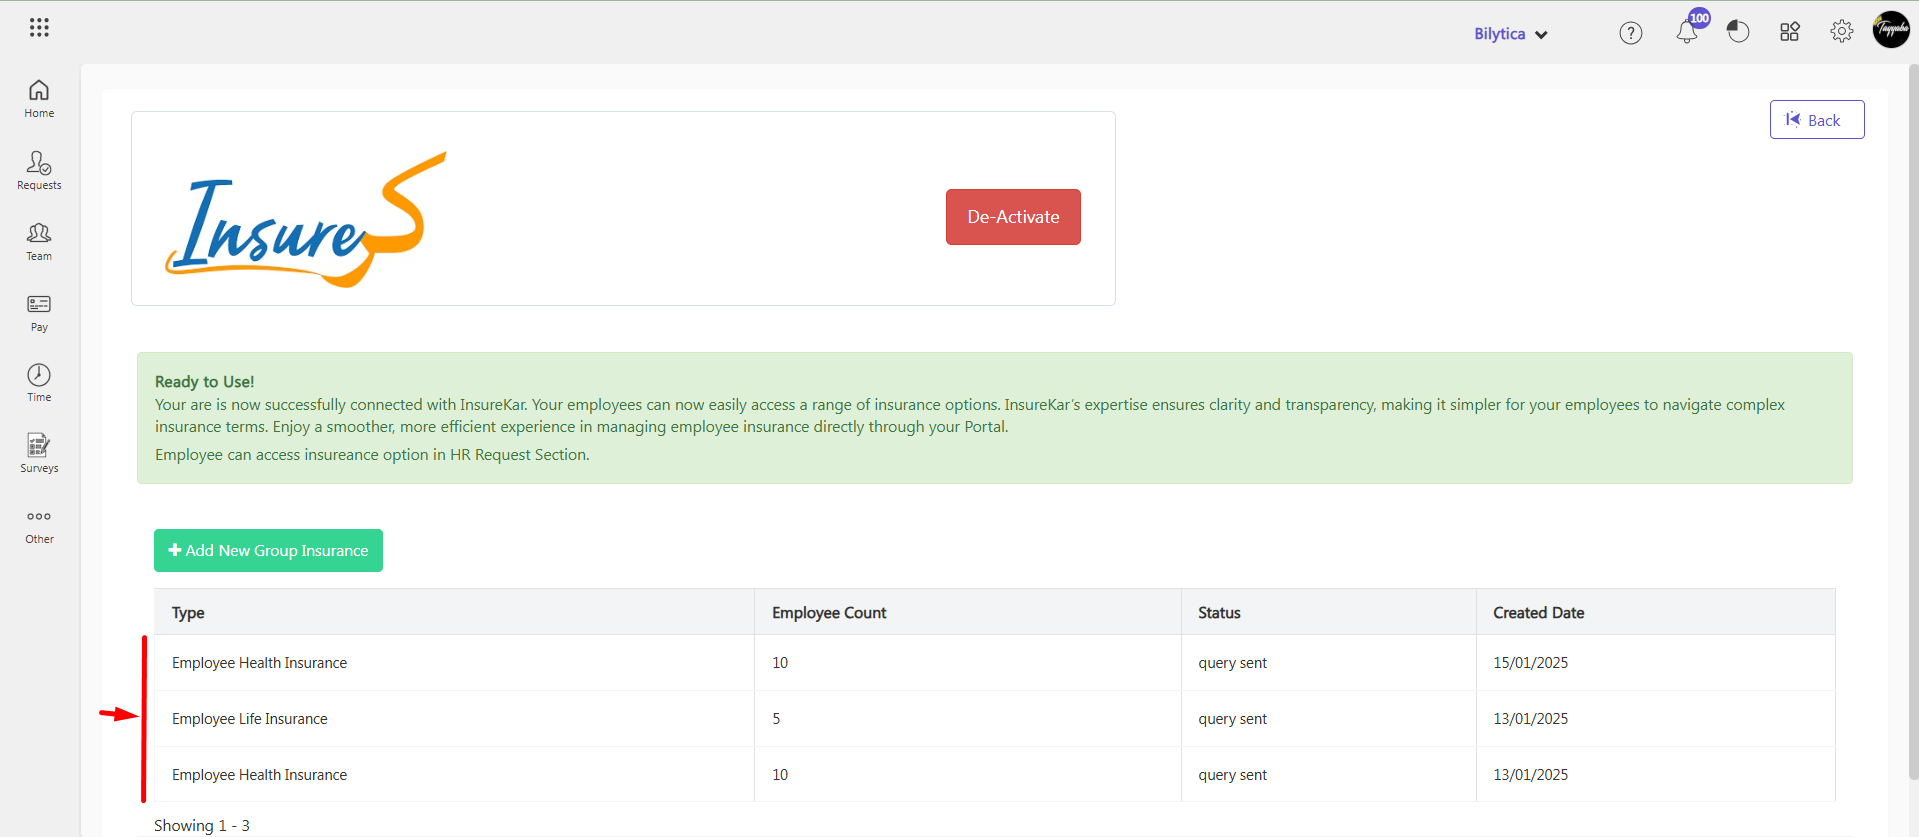
- All insurance groups will be show.
How to Add Insurance Request? #
Follow these steps to add an insurance request in PayPeople:
- Navigate to Request Section
- Go to the Request menu.
- Click the drop-down arrow icon and select Insurance.
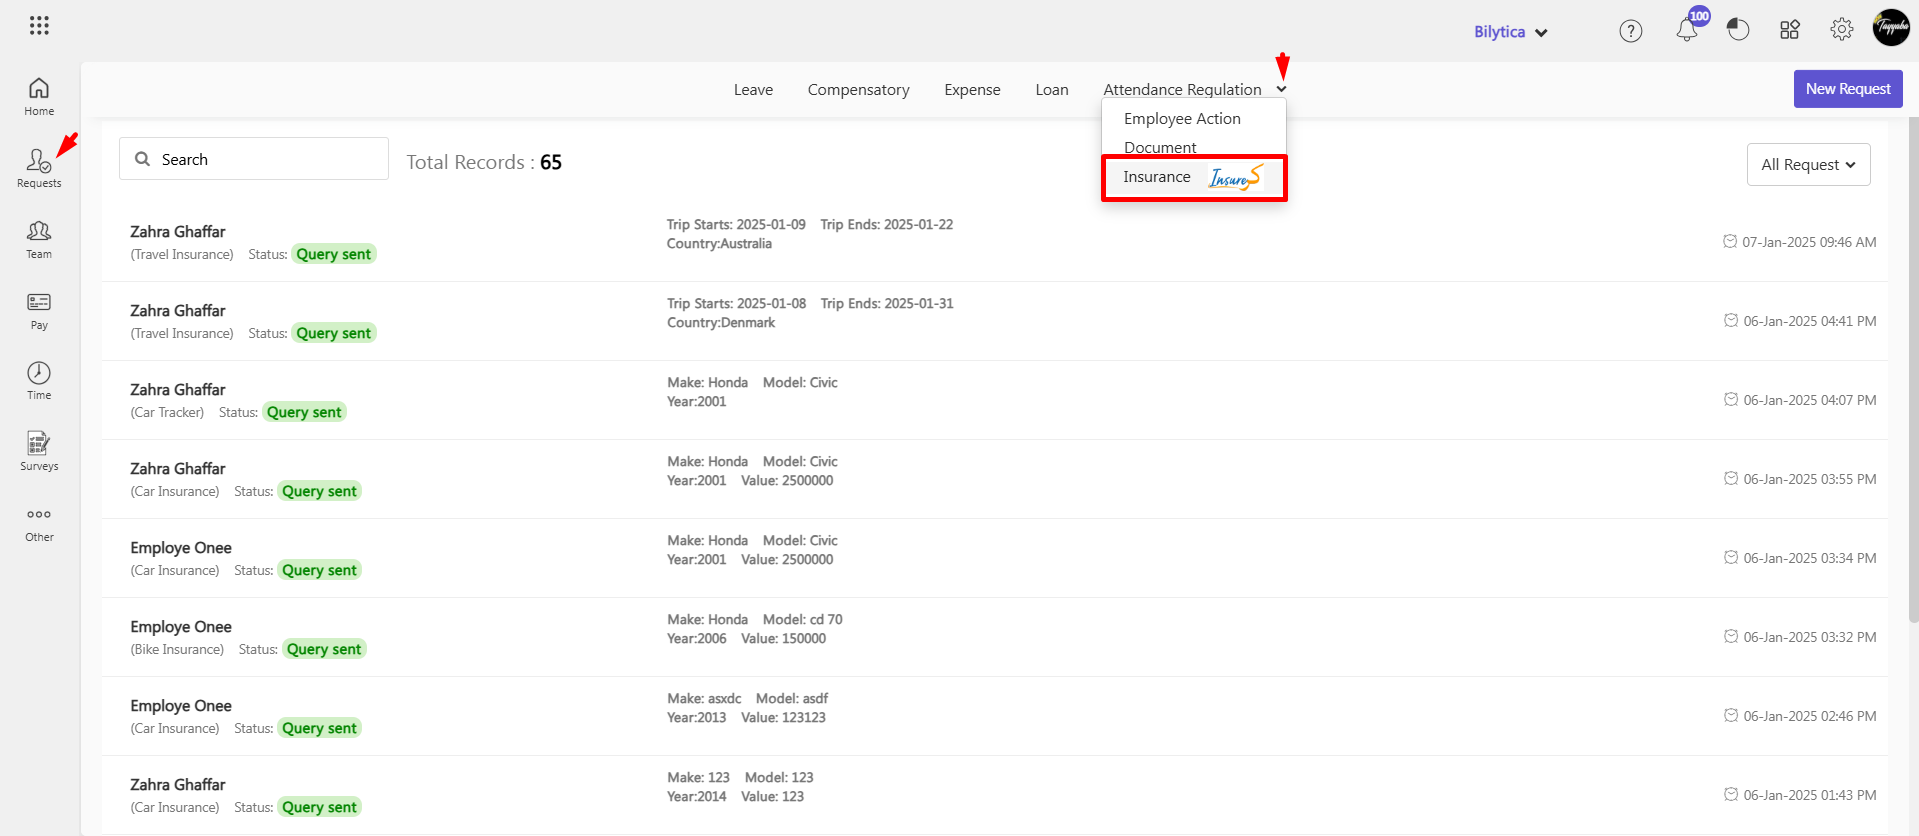
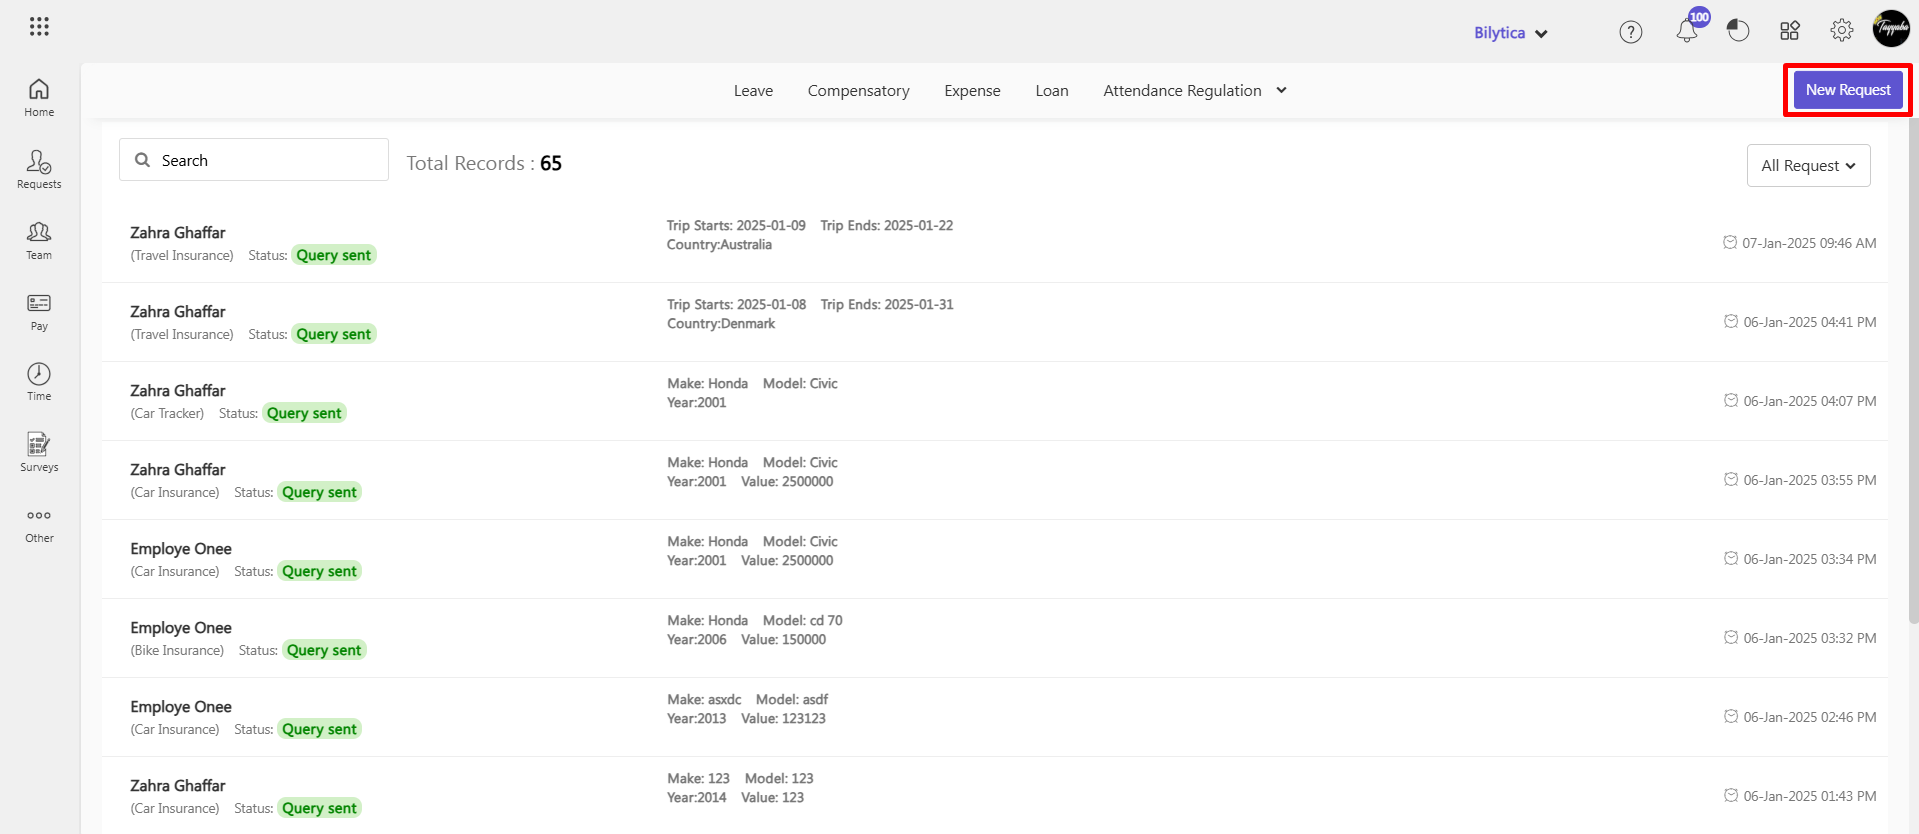
- Initiate a New Request
- Click on New Request to begin adding an insurance request.
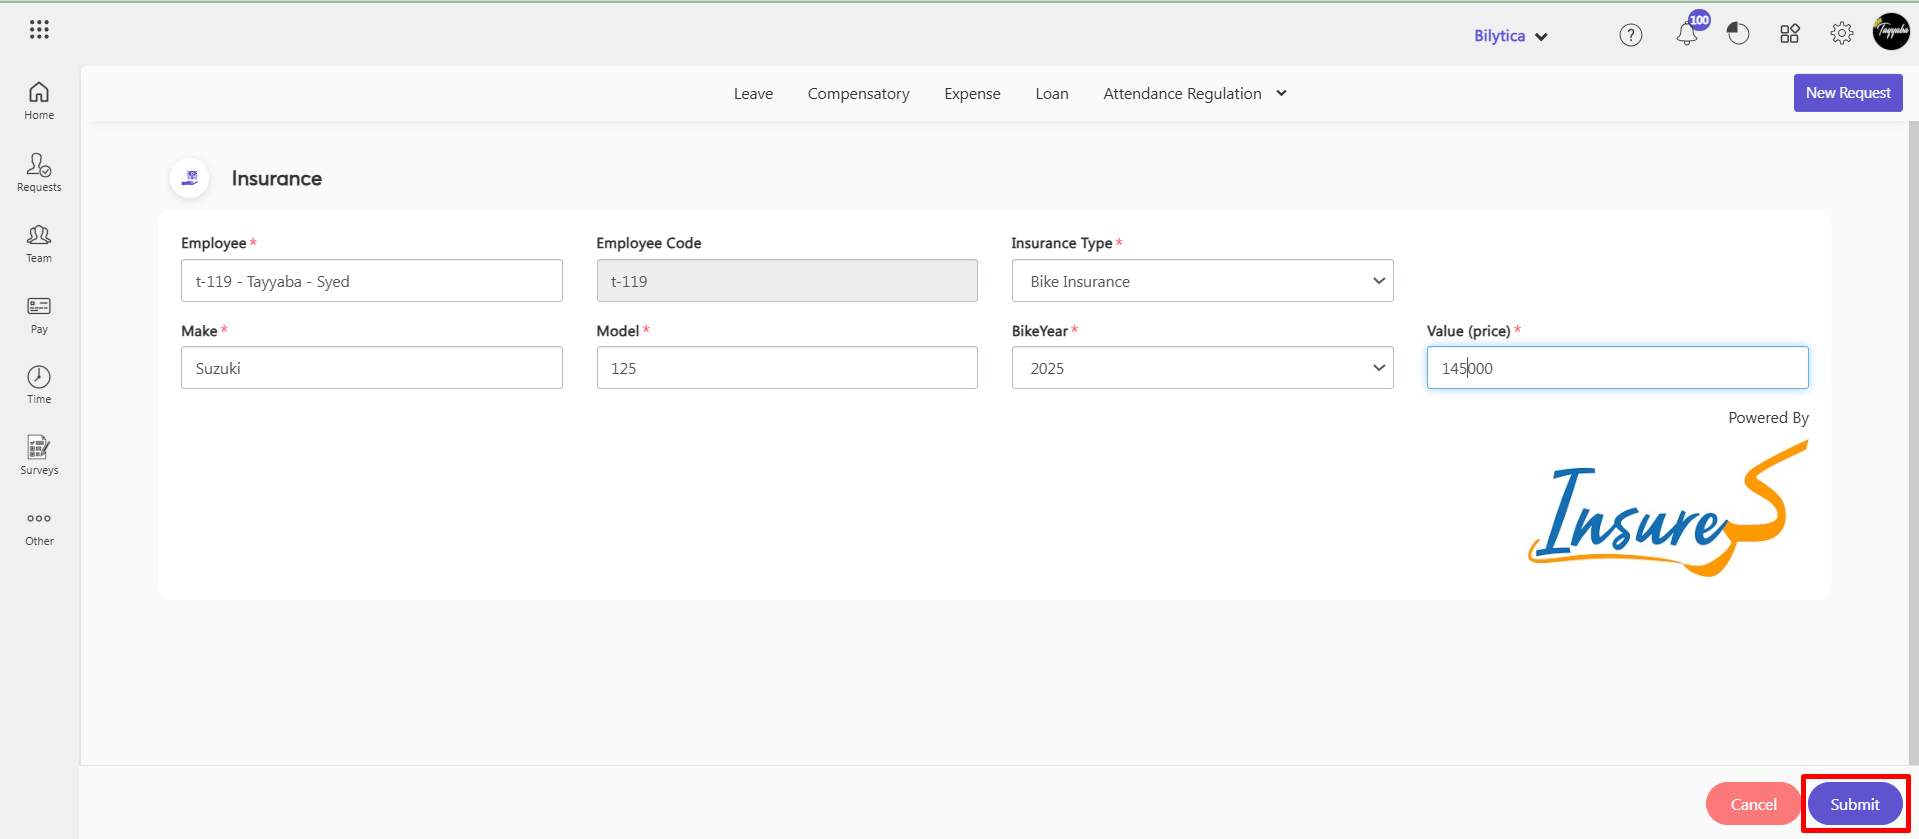
- Enter Insurance Details
- Select Employee Name: Choose the employee for whom the request is being made.
- Insurance Type: Select the type of insurance (e.g., Bike Insurance, Car Insurance).
- Make: Specify the make of the vehicle (e.g., Suzuki).
- Model: Enter the model of the vehicle.
- Bike Year: Provide the year of the vehicle.
- Price: Enter the price of the vehicle.
- Submit Request
- Click the Submit button to finalize and send the insurance request for processing.
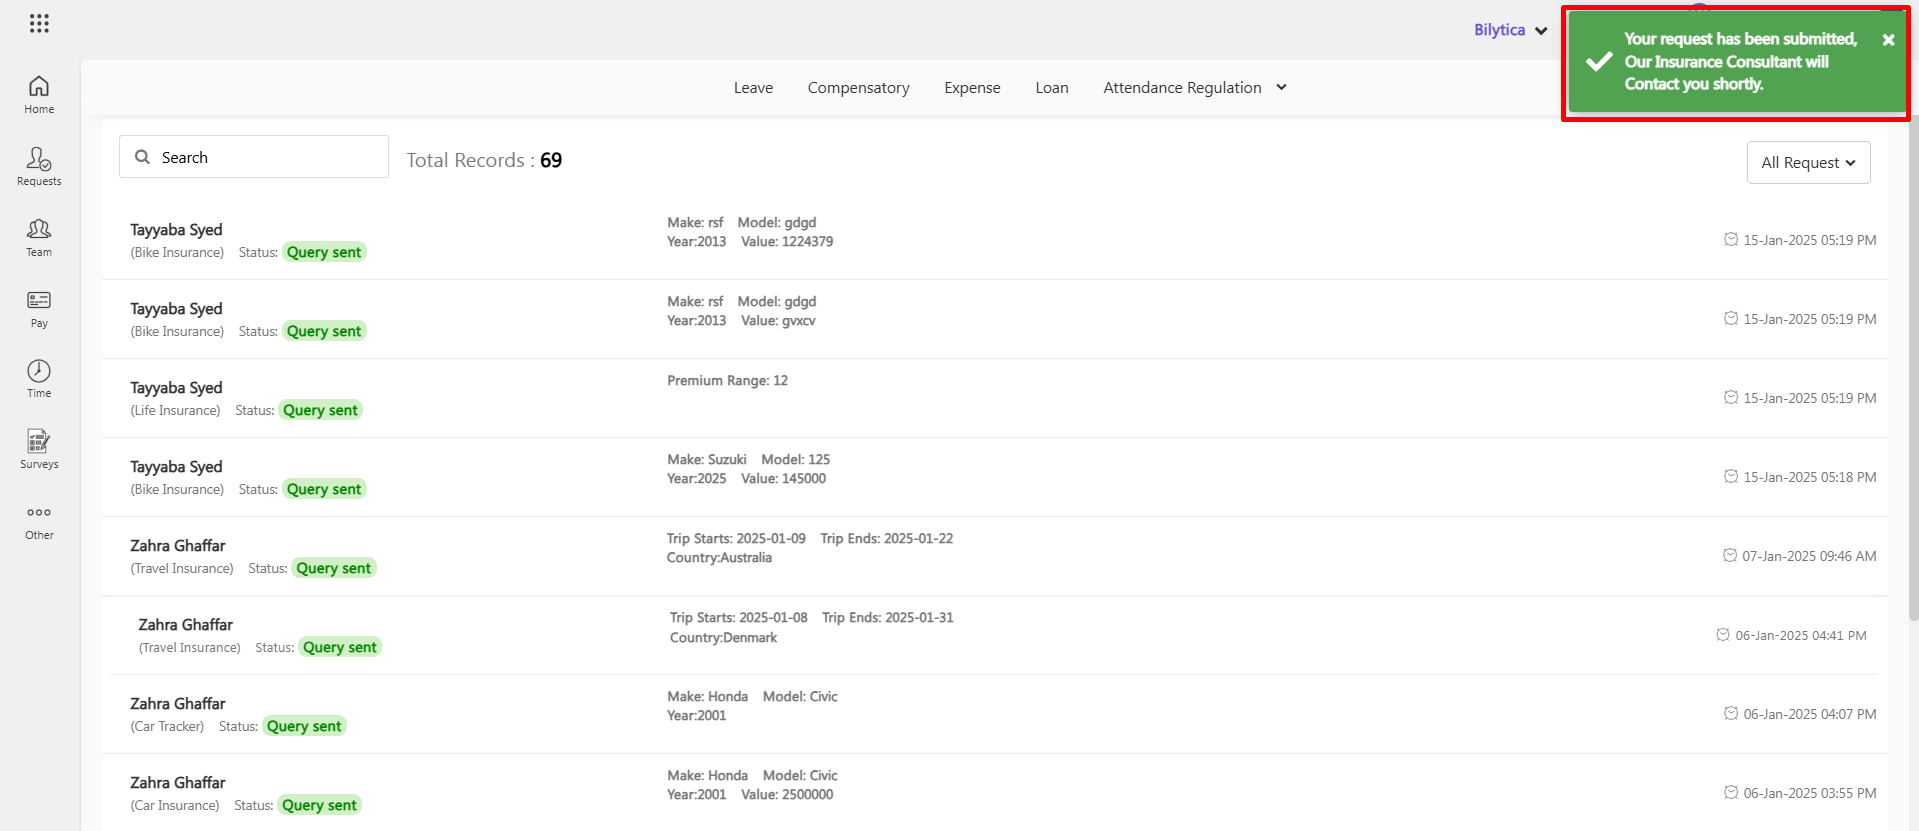
- Confirmation
- A success message will appear, confirming the request has been successfully submitted.
Agora Integration #
To integrate Agora for video calling in PayPeople, follow the steps below:
Steps to Integrate Agora in PayPeople
- Login to PayPeople using your credentials.
- Click on the Setup option from top right corner.
- Locate and select Integration from the available options.
- Under the list of integrations, find Agora.
- Click on “Connected” under the Agora section.
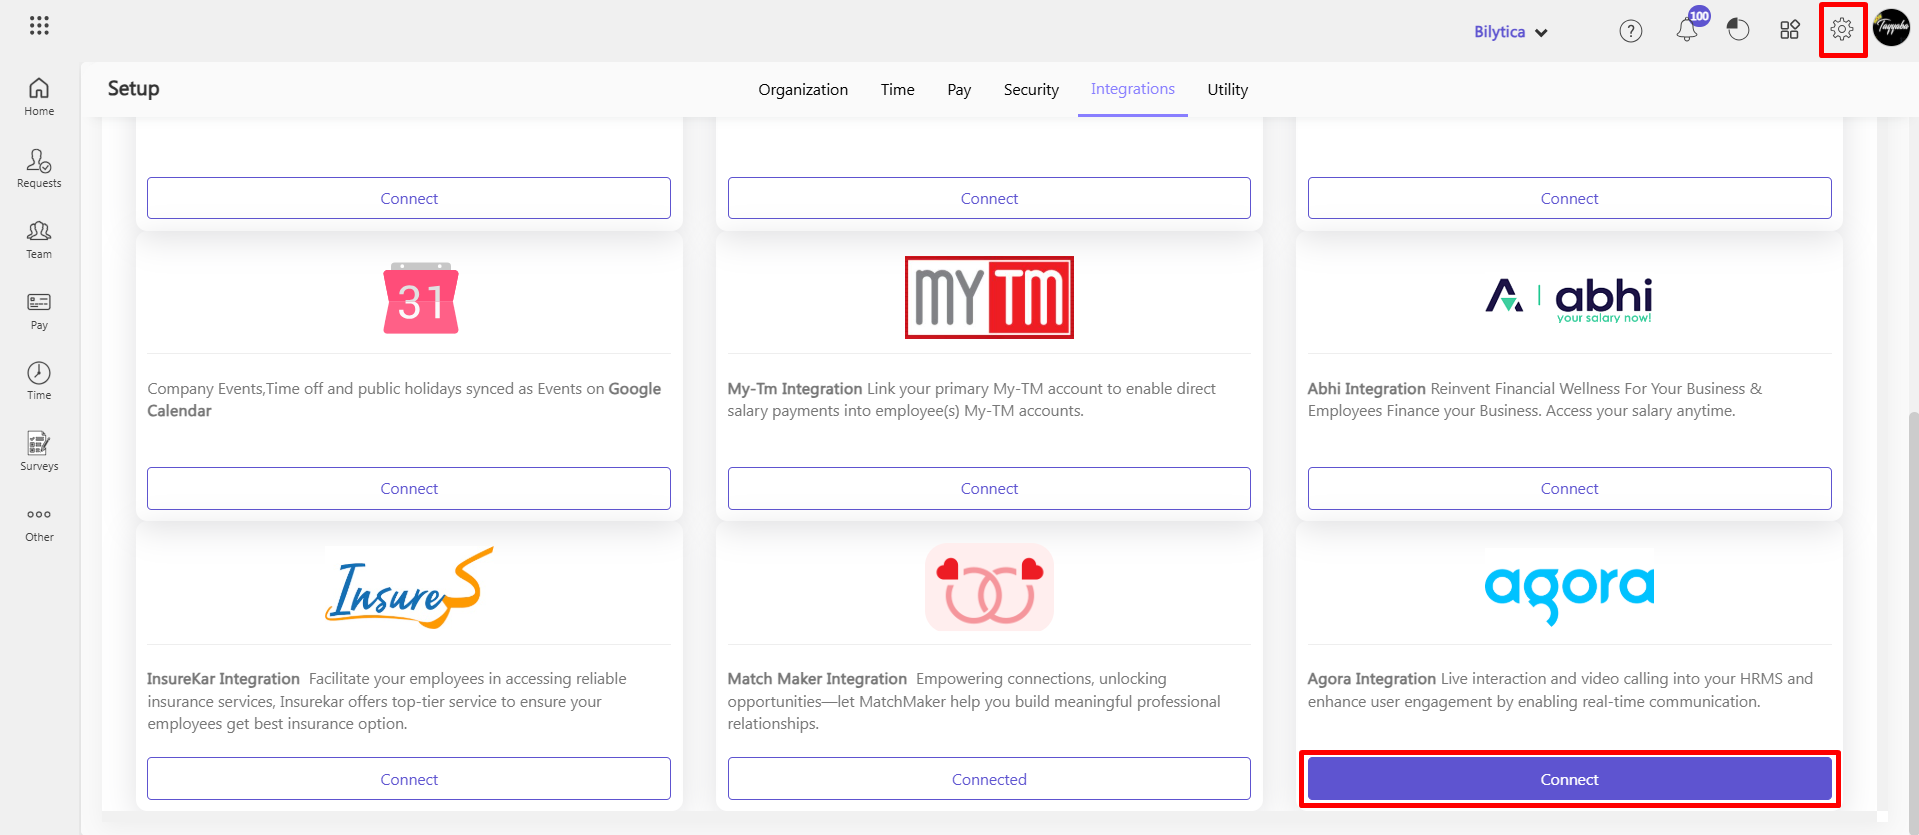
- Click on “Connect” to enable the integration.
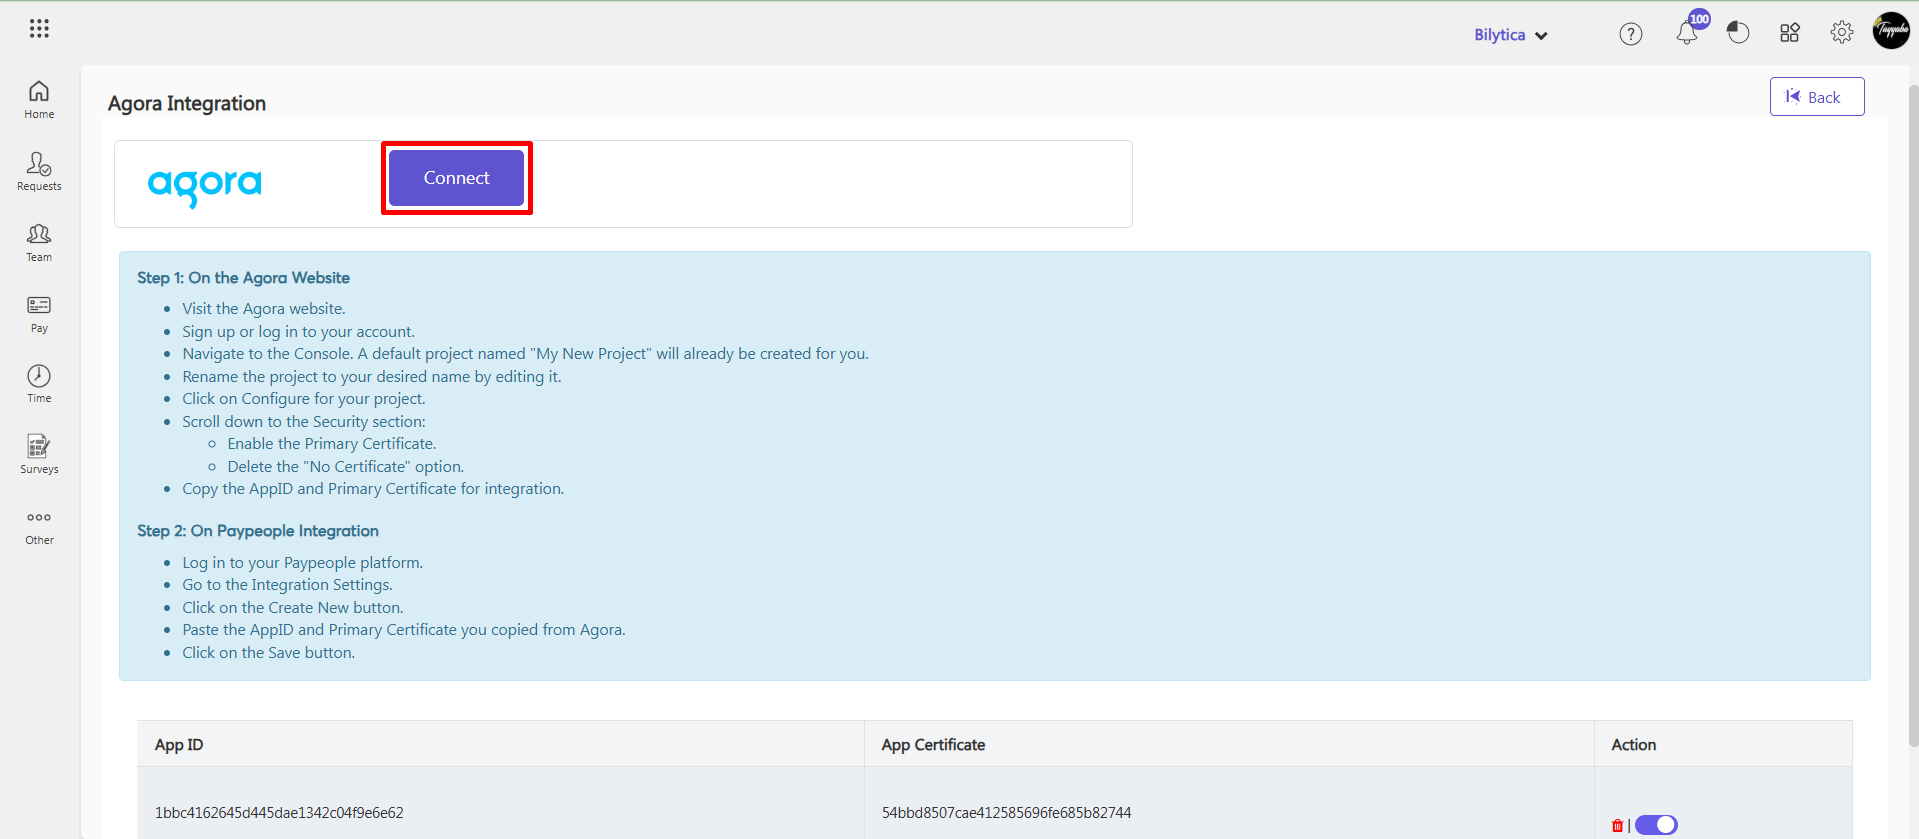
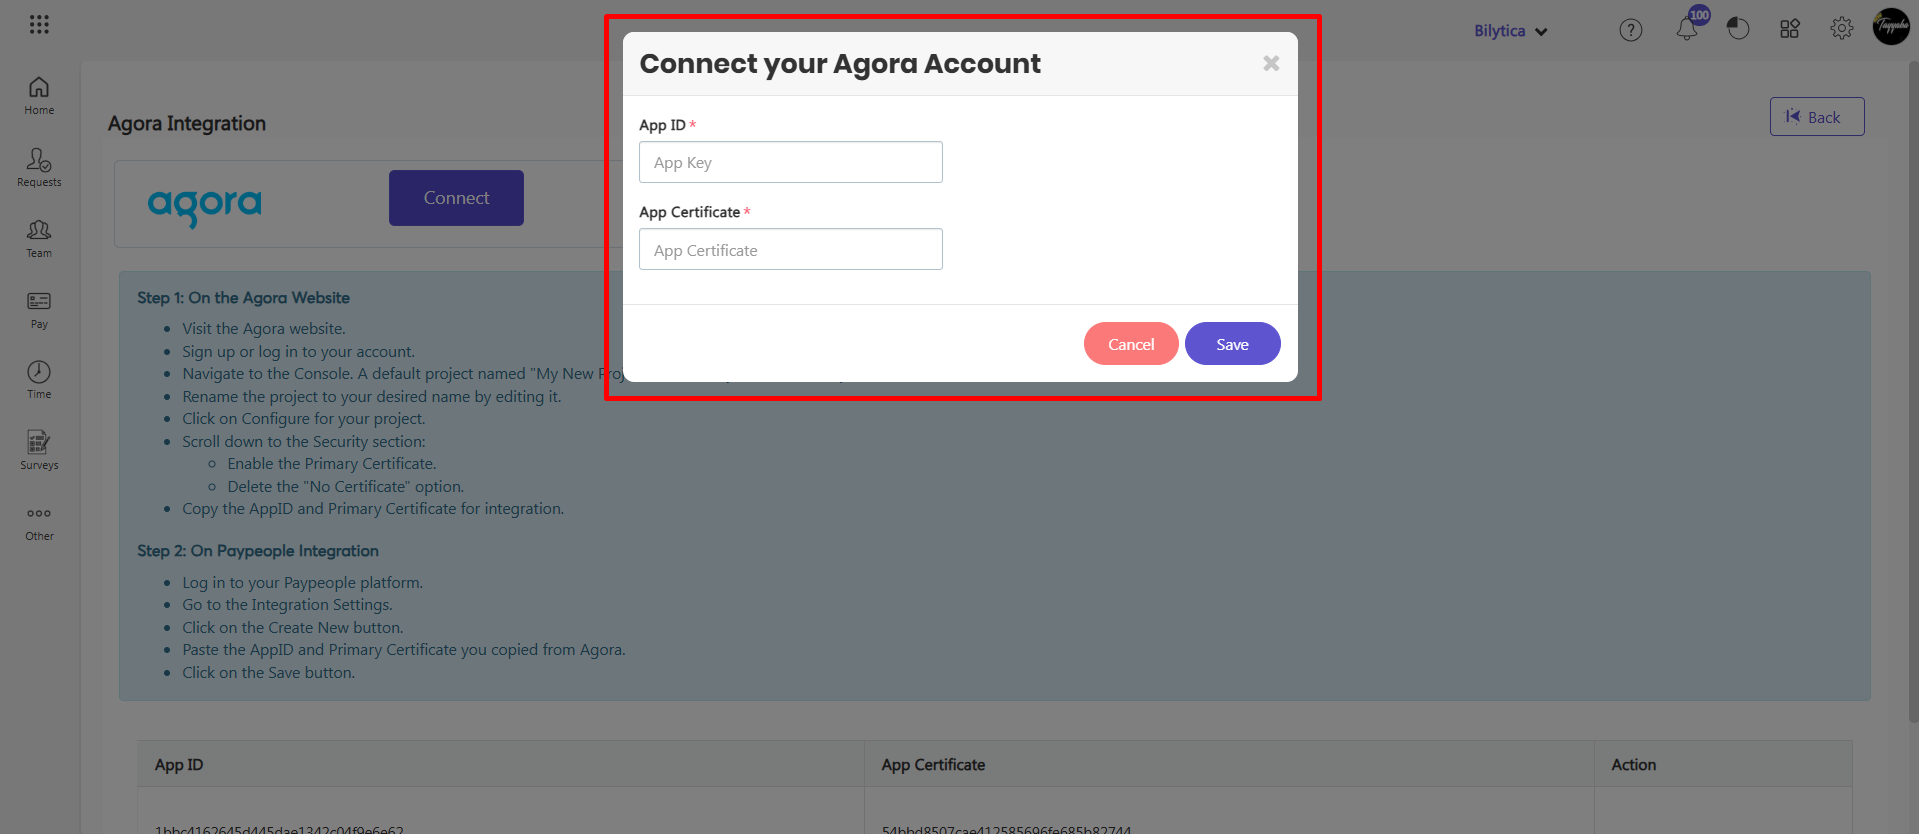
- Add AppID and App Certificate from Agora and Paste it here
- Click Save.
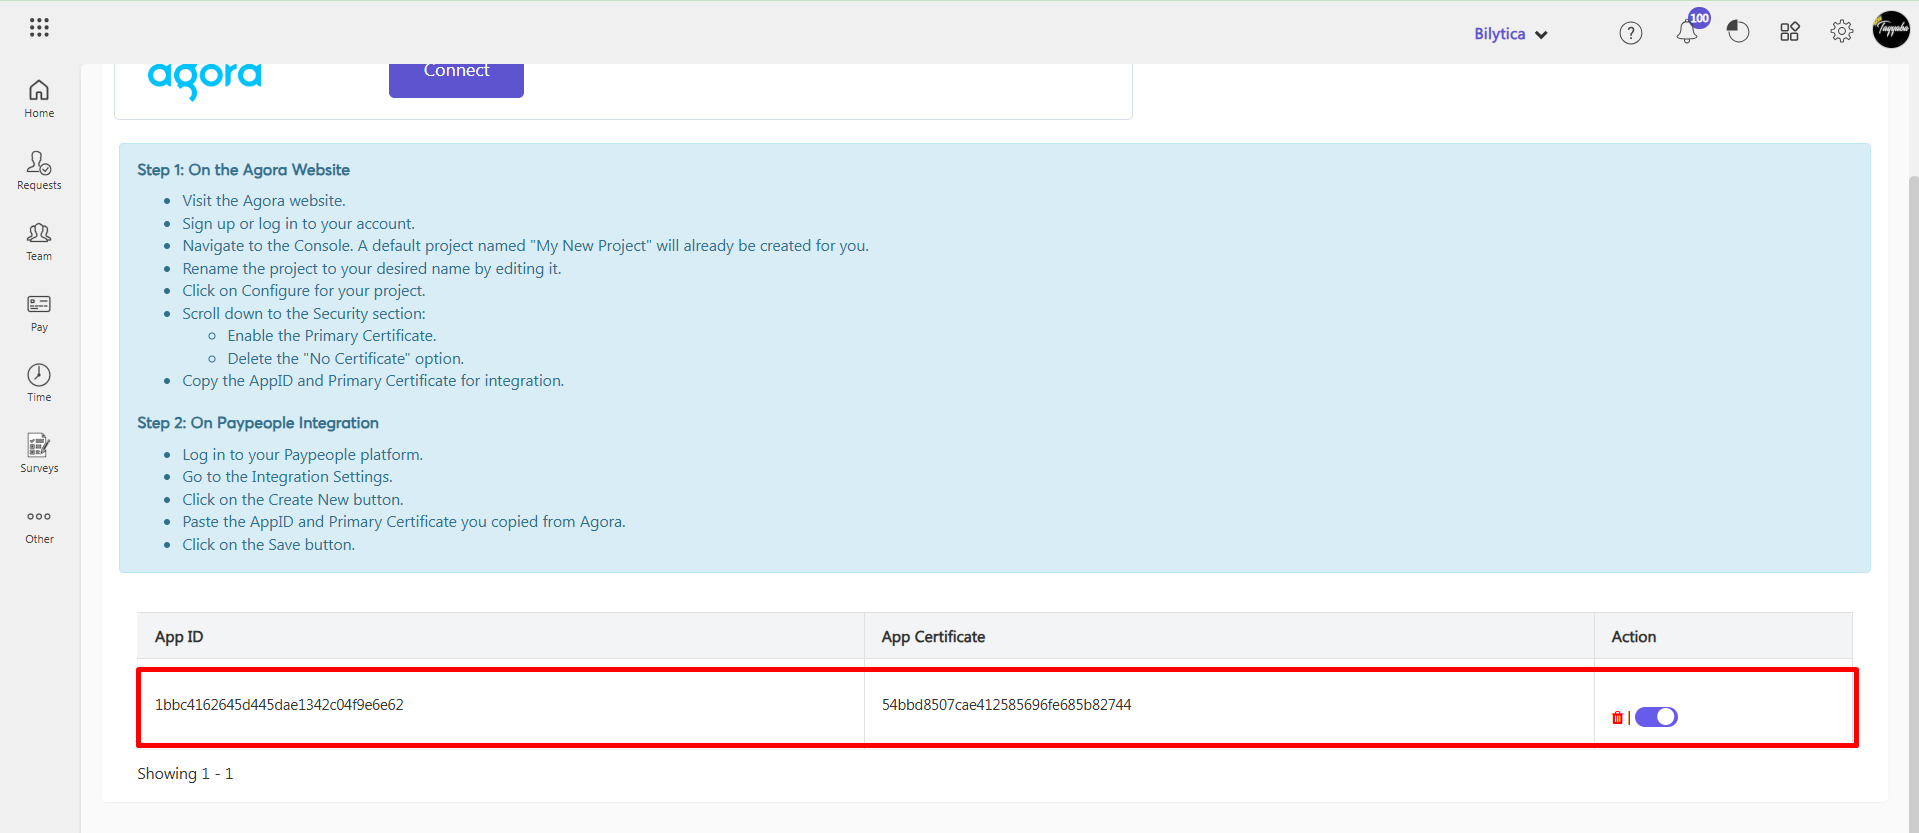
- Agora integration will be added successfully, and by clicking the switch button, you can activate or deactivate Agora.
- By clicking the delete button, you can remove Agora.
This integration will allow seamless video calling functionality within the PayPeople platform using Agora.


